February 28, 2013

Easy Letter Stitching

Olá! This week I'll show you how I create patterns with numbers or letters in a very, very, simple way!
As my drawing skills are not so great I try to make my life easier using other instruments... And a word processor is of great help as you will see...

Let's begin!
  1. In a new page type the letter you want to work with - the font and size font are not important so far...
  2. Then select the letter you've typed and open the "format - font" window. That's what I've done with the letter "I".
  3. Choose "70" for the size font, "bold" for the font style and the "outline" effect.
  4. In the preview box your letter will be displayed in all its size and you'll be able to choose the best font type (if you choose a size larger than 70 you'll have your letter cut in the preview box).
  5. In order to choose the font you just have to scroll down the fonts that are available in the font menu. As you are scrolling down, the final look of the letter will be previewed in the box. In this case, I decided myself for the Handwriting-Dakota.
  6. You can close the window and in your document choose the font size that you want to work with.


Using the Format - Font window to choose your font
Sometimes the "Character Spacing" window is also helpful... Using the "scale" you can enlarge or narrow your letter, what is great when you have to fit it to a predefined space. And with "spacing" the same happens, particularly if you will be working with more than one letter.

I've made this Alphabet using this method - Easy! Am I right??
Alphabet created with word processor

Everyone loves a a personalized gift!! Embroidering letters (or numbers) is a great way of surprising someone you love!

That's what I've decided to do using a notebook. I used Handwriting - Dakota font, size 330, bold, outline and scale 66% in Character spacing. I had to reduce the scale in order to fit the notebook.

As always I used a notebook made in Portugal and the threads are also Portuguese.

Easy Letter Stitching
Personalized Notebook, my photo
*In Portuguese we say letra instead of letter and alfabeto (or abecedário) instead of alphabet.

February 26, 2013

Old computer games


stitched by K.J. Andersson

Awesome, huh? Stumbled on this homage to old computer games by Swedish artist, K.J. Andersson via Reddit and a few other sites. I love the way that white space invaders border looks almost like lace. Pop by K.J. Andersson's Embroidery section for more game-related goodness.

Hi, I'm floresita, editor of Feeling Stitchy. I'm an avid stitcher, knitter, and crafter. You can see more of my stitching on Instagram and my blog. My vintage transfer collection is on Vintage Transfer Finds.

Feel free to email me with any ideas for the blog!

February 25, 2013

Orange and gray

TAST stitches 49 & 52
stitched by Liana D

I love this unusual combination of colors and the subtle beauty they impart to these gorgeous TAST stitches by Liana D. According to her photo, the stitches are: Whipped buttonhole, knotted feather, French knots, and triangular feather 'whipped' with scroll stitches. Beautiful, Liana D!

Hi, I'm floresita, editor of Feeling Stitchy. I'm an avid stitcher, knitter, and crafter. You can see more of my stitching on Instagram and my blog. My vintage transfer collection is on Vintage Transfer Finds.

Feel free to email me with any ideas for the blog!

February 24, 2013

Patterns: Woodland cottage

woodland cottage sewing pattern

Woodland cottage sewing pattern by merwing✿little dear

Awww I love it when embroidery goes all 3D, check out those chain stich rafters! You can find the pattern by the talented Aimee Ray, in the Little Dear Etsy store.

Hi, I'm Jo - I feature new embroidery patterns Sundays on Feeling Stitchy. I also post on our Twitter and Pinterest.

Is there a new pattern you'd like us feature? Email me!

February 23, 2013

New Embroidery with Vintage Patterns - February Interview


Hi, everyone, as promised I am back this month with an awesome interview!  I am so excited that Brooke and Chris, two employees from the kitschy embroidery pattern company with the yellow pattern envelopes that we all know and love, Colonial Patterns, (nicknamed and often called the Aunt Martha pattern company) agreed to answer my questions!  The interview is long and image heavy but I do y'all enjoy it all -- leave a comment and let me know what you think!        

In between Brooke's and Chris's replies, I am thrilled to sprinkle in photos of new embroideries done with vintage Aunt Martha and Workbasket patterns as well as photos that the Colonial Pattern company shared too!  Admittedly, I over asked people their permission to share their photos in this post, so I deeply apologize if you do not see your photo included.  If you like the stitchy photos, be sure to click on over to flickr and leave your fellow stitcher a comment!  And since we don't have the luxury of visiting the Colonial Patterns building in person be sure to visit the Colonial Pattern's shop online!
  
As always, I invite all of you to join the New Embroidery with Vintage Patterns group.  There are lots of new embroideries with vintage patterns being added on a regular basis.

1.  Please tell us about yourself, your job title, and your role at Colonial Patterns.

photo provided by Colonial Patterns
Brooke:  My name is Brooke and I am the Art Director for Colonial Patterns Inc.  I work designing new patterns, creating our catalog, packaging and any other design work we have.  I have been with the company for four years and I just love it.  I have been a crafter all my life, this job was a perfect fit for me.  My grandmother taught me to embroider when I was young, using Aunt Martha's patterns, so this job holds a special place in my heart because I know it would make her proud.  

photo by barncat1
Hillbillies and chickens

2.  Please tell us the first names of the other people you work with, their job titles, and what they do.

Brooke:  We are a small family owned company, so I think a lot of the time people are surprised how few of us there are.
  • Bud is the President/Owner (and has been since the late 70s, only the third owner the company has ever had)
  • Chris is Vice President and in charge of shipping, new product development and general warehouse management.
  • Matt is also our Vice President, he is in charge of wholesale accounts and inventory.
  • Sondra is our accountant as well as helping with wholesale as well as retail orders and customer service.
  • Angie is in charge of all our phone in orders, she talks to customers, fills orders and gets them all shipped out. 
We are all in the office and all help answering phone calls. So if you call to place an order you will talk with any one of us!
  • Then we also have 6 more employees in the warehouse that fill the wholesale orders, Angie (a different one), Melody, Margaret, Lisa, Vicki, and Jeremy.

photo by kittykill
Vintage tinted embroidery


3.  What is a typical day or week like for you and your colleagues?

photo provided by Colonial Patterns
Brooke:  Well that is the best part about working for a small company, each day is different! In the front office we all start our mornings checking voicemails.  Since we are on central standard time, we have a lot of people who call after hours, so we return all those calls.  Then Angie works in the mornings fulfilling the orders that came in over night, Matt inputs all the wholesale orders that come in by mail or email, Sondra takes care of all our payroll and bills, and Chris oversees the shipping in the warehouse as well as international communication with our suppliers.  My job is very different from day to day too.  I might be working on 1-5 different projects at a time depending what we have going on.  I just finished up new boxes for our glitter paint as well as a new Stitcher's Revolution pattern SR22 Retro Fruits. 

photo by lisa leggett

Tea pot embroidered hot pad


4.  Does Colonial Patterns offer tours to the public?  If so, what is the tour like?
Chris:  We don’t offer tours of our facility for safety reasons.  However our office is open to the public for shopping Monday through Friday, 10am – 4pm.  We have a small showroom but it is loaded with patterns, linens, scrap fabric, floss, and stitching accessories.  We also have lots of samples on display of items that we have stitched up for photography so that is kind of inspiring to see.


photos provided by Colonial Patterns


5.  Your company has been around for a long time, since the 1930s!!  What are some of the oldest, in-print patterns still being sold on your site?

photo by stitchin'kat
Chris:  #129 – 8 Kitten Motifs
#675 – Bunny Rabbit
#9773 – Love in Bloom
#9475 – Down Mexico Way
#9180 – Mischievous Kittens
#9637 – Birds for Varied Uses


6.  With all the current Aunt Martha iron-on embroidery patterns currently in-print, do you have a favorite one?  

photo provided by Colonial Patterns

Brooke:  My favorite classic pattern # 3981 Dog Days Cowboy ( if you are really going to make me pick just one)

My favorite new pattern #SR15 Movie Munchies.  This one holds 
a special place in my heart. I got the inspiration for it from this 
local Soda Fountain in my folks' hometown.  We went there two 
summers ago and they still had their original hand painted food 
characters on the wall from when my parents were young. It was 
a magical place for me as a kid, and it still is as an adult.


photo by xperimentl
Owl Love


7a.  How often do new Aunt Martha patterns issued in the yellow envelopes come out during a calendar year?
Chris:  A lot of it depends on what type of projects we are working on but we try to do at least 5 per year. 

7b.  How often do Stitcher's Revolution patterns come out during a calendar year?
Chris:  The Stitcher’s Revolution patterns take a little more time to create because we have to design a stitch and color guide with it.  I think last year, 2012, we published 3 new patterns, and the prior year, 2011, we published 8 new patterns.

photo by AlwaysInspired
hillbilly 004


8.  Tell us more about the Aunt Martha Vintage Pattern Collection (AMVC20) bundle on your site.  5 patterns in that collection (4014 Baby Chicks4015 Adorable Puppy4016 Barn Animals4017 Kooky Kitchen4020 Happy Homemaker) were re-issued (which I assumes means the patterns were brought back out of retirement).  Please tell us more about these patterns.  With the 5 that were re-issued, in what year(s) did they go out-of-print and what was the motivation to re-print them again?  

photo provided by Colonial Patterns
Chris:  It is hard to say exactly when those patterns went out of print, but they were most likely drawn and first produced in the late 1940s early 1950s.  We have thousands of retired patterns that are out of print so periodically we will go through our archives and pick out things that we think our customers will like. 

 In most cases, new patterns are drawn based upon current trends and/or customer suggestions, so we may pull from our archives and modify certain designs.  We reintroduced those patterns in particular because “retro” designs are pretty popular right now.


9.  What factors lead to the decision of retiring an embroidery pattern?   
Brooke:  Most of the time we let the public tell us!  If sales on a pattern have been consistently bad for a few quarters we will consider retiring it.  Then we also base it on new ideas.  For example, If we know we have a lot of new patterns coming in the red category (Days of the Week Tea Towels) then we might retire a few more in that category to make room for the new ones coming out.


photo by loves stitching
6th dow stitch along


10.  Tell us about the re-print project.  I heard vintage, out-of-print patterns are now available for purchase, just the iron-on sheet though, no envelope.  How and why did this come about?  Is it very popular?

fruit trio -  strawberryBrooke:  Well, like I said we get a lot of calls from people looking for a specific pattern.  So Chris started researching a printer that we could have in house to print individual patterns for customers.  There are just too many patterns in our archives to have them all in production, so this is a way we can still offer patterns and not have to stock them all.  The hardest part has been getting them all in digital form.  Many of the older patterns have never been digitized for modern printing.  Slowly, but surely we are getting more and more added to our archives.  

We are currently working on a new website, and on the site we will eventually get a list and images for all the old patterns.  So, one day you will be able to browse all the out of production patterns!  They are some very neat and unique ones in there.  I can't wait for this project to be available to you all!  For now, if you know the name or number for the pattern you want, give us a call and we can tell you if we have it available to reprint.


both photos by bookwormbethie


11.  For those of us that may have original vintage Aunt Martha patterns in our stash, is there an easy way to date them by either envelope design or color of ink used on the pattern sheet?
                                      photo by Colonial Patterns
Chris:  The best way to get an approximate date of issue is by referring to the pattern number as follows:


#9000s are the earliest, most likely these were first published in the 1930s and 1940s
#3500 or smaller – 1950s and earlier
#3500-#3600 – 1960s
#3600-#3700 – 1970s
#3700-#3800 – 1980s
#3800-#3900 – 1990s
#3900-current – year 2000 and later


3rd Patch photo by beetastic
12.  Any secrets to the success of your company since it has been around since the 1930s?  
Brooke:  I think the secret to our success is offering a wonderful product and being family owned. We are all looking out for the interest of the company, whether or not we are part of the family that owns it.  

We all value it and I think that shows in the work we do and the products we put out.


13.  I like to think of embroidery as a wholesome, old-fashioned, yet fun hobby. Why do you think hand embroidery continues to thrive in today's modern world? 

Brooke:  I think the main reason is that it is portable and inexpensive. You don't have to invest hundreds of dollars to get started, you can take it anywhere with you to work on it, and it is not hard to learn.

photo provided by Embroidery Buddy
Too funny . . .


photo provided by Colonial Patterns


14.  What kinds of "contact us" questions or comments do you receive?  Do you get tons on a daily basis?
Brooke:  We do! Calls and letters come in daily.  Most of the time it [is] customers who are new to the craft and may not know how to iron off a pattern. We also get lots of questions about how to remove the pattern if they mess up, and I would say the rest of the calls are people looking for a specific pattern they used to have and now can't find in stores.

Chris offers the following steps for getting your transfer out of your project when finished (or if you mess up when ironing):  

1) Most importantly, use COLD water when washing. The hot water will only further set the transfer onto the fabric.
2) Don’t dry your project on high heat in the dryer if you want to try more stain removing techniques. The heat will only further set the transfer pattern.
3) Try using a stain remover like Zout, Spray N Wash or a good soaking in OxyClean.
4) Natural and artificial light will make the lines fade, so you can set your design out in the sun for a few hours to help lighten them.
5) Repetitive washings will make the lines fade gradually.
6) It is  much easier to get the ink out of 100% cotton. It is more difficult to remove the ink from poly-cotton or other synthetic blends.


photo by Danidot
Anniversary present 


15.  Anything else I forgot to ask that you would like to comment about?

Brooke:  The only thing I can think of to tell your readers is to pass on the art of handwork to anyone interested!  Children, friends, coworkers....anyone!  There is so much to say about learning to work with your hands and having patience and perseverance to finish a project to the end.  It may seem like a small thing, but obviously if it has survived this long, there must be something magical to it ;)

Find us on Facebook!   http://www.facebook.com/stitchersrevolution

photo by stitchin'kat
December SAL

February 22, 2013

Sweet snail

New Year, Mixed Media "Slow it down"
stitched by xperimentl

I have to say, I agree with this sentiment! So much of our current world is about viewing and acting and consuming life at top speed. One of the loveliest things about crafting is that it puts you in touch with impulses that are the opposite of that. Thanks, xperimentl, for your wonderful stitching, and Happy Friday to you all! :)

Hi, I'm floresita, editor of Feeling Stitchy. I'm an avid stitcher, knitter, and crafter. You can see more of my stitching on Instagram and my blog. My vintage transfer collection is on Vintage Transfer Finds.

Feel free to email me with any ideas for the blog!

February 21, 2013

Playing with running stitch

Olá! Last weekend I decided to make a gift for a sweet girl completing her first anniversary. Embroidery was my first (and only) thought... But I was not in a "pattern" mood... Do you have those days??? I wanted something simple, as simple as possible!

Then I thought... What can be simpler than using running stitch? So I decided to play with running stitch... As I didn't know the colors of her room, I used what I had at home, it was easier, too...

If you like it and want to make something similar you'll see that it's impossible to make something simpler...

closer...
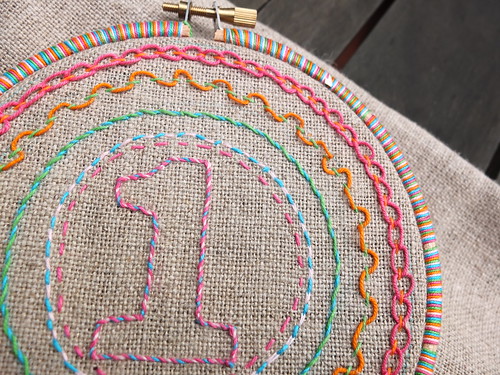
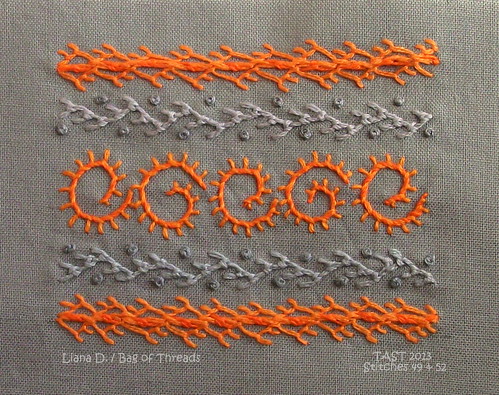
Playing with running stitch, my photo

I traced five circles using objects I had at home... If it was today I would have done it differently...
Each day I love more and more using tracing paper in embroidery... When the patterns and the stitches are simple or, above all, when the fabric is hard to trace, using tracing paper is perfect!

  • So... You can draw your circles in your computer, print them on tracing paper and then embroider the five circles with running stitch through tracing paper and the fabric.
  • Each stitch you see in this piece of embroidery is a variation of running stitch...And all variations begin with these straight stitches...
  • After embroidering all the circles with running stitch you can remove the paper. Be careful not to pull it all at once, it's better to remove it piece by piece. It will work...


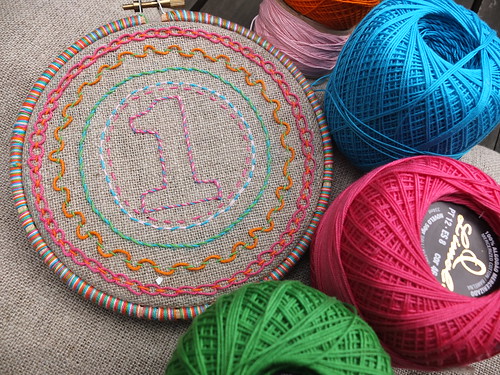
Beginning with the first circle (in the center), these were the stitches I used: 1) running stitch, 2) Holbein stitch, also called double running stitch or reverse running stitch, much used in blackwork, but here I filled the spaces with a different color; 3) whipped running stitch; 4) laced running stitch; 5) double laced running stitch - sometimes called interlaced running stitch. (Do you use different names?)

Actually I began with the last stitch but it's better to begin with the common running stitch so you can practice and have regular stitches, which is very important in double lacing stitch. Beginning with the most difficult stitch was certainly not a wise decision!!

Finally... to embroider the "number one" I tried the double running stitch, but the colors didn't work, so I decided to whip it and I liked the final result. After that, I read that the whipped backstitch is great for lettering and as the final look is so similar I decided that I made the right choice...

As it was going to be a finished work to hang up, I wanted the hoop to have a beautiful look. Recently I've been finishing my hoops by wrapping them with the threads used in my embroidery and I have to say that I'm very proud of that final look...

First year gift - variations on running stitch
Final look with the wrapped hoop, my photo 
Now that no one is listening to us, I must confess that this work is not as I would like it to be... The double laced running stitch is not perfect and the circles... You know what I mean... As we learn with our mistakes, I can give you a piece of advice... Print your circles first and begin with the easiest stitches... Next time I'll do that!!

Some months ago I was asked about the threads I use... I always use a Portuguese manufacturer, they make a very beautiful no.8 pearl cotton for Guimarães Embroidery. But usually I work with crochet thread no.12 (in this case) and no.6 - yes it's true...

Next week I'll tell you how I use my computer to make embroidery patterns with letters and numbers as I did this time with the "One".

Just to end... this beautiful fabric is also made in Portugal and here we call it "estopa"!!

February 20, 2013

Nice and Toasty

Toaster cover (2)

How adorable is this toaster cover from Spunky5775? A kitty with toast. Help me Rhonda, killing me with the cuteness! 

February 19, 2013

Tutorial Tuesday

Happy Tuesday, everyone!

Today's tutorial came to me while I was away on a trip and bought some very aromatic lavender from the Los Poblanos Farm in Albuquerque, New Mexico. I knew I wanted to make a sachet, but I wanted to combine a St. Patrick's Day theme into it, as well. St. Patty's sachets it is!


Lavender is very good for soothing and calming stress or anxiety. Which means this sachet has multiple uses. It can either be placed in a drawer with socks or unmentionables to add a fresh scent, or it can be placed under a pillow to ease headaches or insomnia. 


I bought this lavender in Albuquerque, but you might be able to find it at a local health food, farmer's market or organic grocery store near you. Maybe you have some growing in your garden that you could use! If you would like some of this lavender from the Los Poblanos Farm, it's available in their online shop, here

To make this quick and very lovely smelling sachet, you will need the following supplies:

-cotton fabric cut into two 5x5 pieces (I used white cotton muslin)
-shamrock pattern (available for you here)
-Lavender 
-embroidery floss
-scissors
-iron & ironing board
-sewing machine


Step 1: Transfer the pattern (available for you here) to fabric. I used 2 strands or 2-ply of a 6-strand floss on each of these shamrocks. I used the satin stitch with a running stitch on the stem for one, and a back stitch with a satin stitch on the stem for the other. This is where you can mix up your stitches to create fun and lively shamrocks.


Step 2: Once your stitches are complete, take the blank 5x5 piece of fabric and place the stitched side face down on top of it. Align it so all the edges match. 


Sew these pieces together, using a 1/2-inch seam allowance, leaving a space on one side for turning it over, about 1.5 inches. 


Step 3: Clip the corners and turn the sachet. Push the corners out and press. I don't recommend ironing directly on the embroidery,  I just go around the edges.


Step 4: This step is somewhat optional. You could either use this stitch option, or fill the sachet and slip stitch the opening to seal the sachet. I opted to sew an edge using a 1/2-inch seam allowance, leaving an opening to match the space I used to turn the sachet.


Step 5: Take a funnel or make a cone out of paper, and place it at the opening of the sachet. Pour in the lavender until it's substantially full. I used half of the little bag of lavender to fill two sachets. 


Step 6: Close up the outline stitch and the sachet is ready to enjoy!


I wish I could share the fantastic aroma this lavender has infused into the room, through the computer. It really is lovely and I hope you give it a try!

Have a great day!

Hi, I'm Kristen! I am a lover of all things stitchy and crafty. I have been sewing for as long as I can remember. My grandmother taught me how to sew Barbie clothes when I was young and I have been sewing ever since.

You can find me at Bobbypin Bandit, on Instagram, and my Etsy shop.

February 18, 2013

We are all in the gutter

oscar wilde embroidery
Stitched by bricolagelife

I adore this Oscar Wilde quote just as much as I love the little details, color, and sweetness in this piece by bricolagelife. Something about it reminds me of The Little Prince... Beautiful to see, first thing this week!

Hi, I'm floresita, editor of Feeling Stitchy. I'm an avid stitcher, knitter, and crafter. You can see more of my stitching on Instagram and my blog. My vintage transfer collection is on Vintage Transfer Finds.

Feel free to email me with any ideas for the blog!

February 17, 2013

Patterns: Kelly Fletcher

Full Blooms

Full Blooms by Kel Fletcher

Kelly Fletcher has a lovely range of patterns out, containing variations on the same motif, for example blooms as above but also pattern sets containing hearts, stars, leaves and paisley. I think each set works so well together and I love the colours she's chosen in her stitched examples, how each design compliments each other. But each design in the set could work just as well on its own.

Hi, I'm Jo - I feature new embroidery patterns Sundays on Feeling Stitchy. I also post on our Twitter and Pinterest.

Is there a new pattern you'd like us feature? Email me!

February 14, 2013

New Sitches with Portuguese Soul - part V

Olá! This week I bring you embroidered hearts with Portuguese Soul... From three very different embroiderers I've found very beautiful pieces paying a tribute to the importance of the heart pattern in Portuguese traditional embroidery. Today love is in the air...

Of course linen has been the traditional support for Portuguese embroidery. But as times changed new materials were used and Vânia, from The spotless loopuses a very original one... Wood!!! She loves to draw using thread as the pencil and wood as the paper, resulting in a very "textured" and appealing "drawing", a true tactile experience (sometimes a Zen experience, too).

And she went further with that tactile experience with an original collection of braille jewelry. In her words: "creating jewelry for whom can't see but can feel incredible well, was a great experience. "  Follow the links, I can assure you'll also like her work on wall decor and handmade jewelry.

Would you like to know how Vânia embroiders on wood? See here and you'll become aware of what might happen if you try doing the same...

Brooch "Heart of Viana" in blue
Embroidery on wood inspired by Viana's hearts, by Vânia

I have to admit that the most difficult job so far was to choose one photo from Joana's work. I'm a profound admirer of her stitches... Maybe because it's so easy to identify the influence of Portuguese traditional embroidery and culture but still her embroidery is completely different from anything we have already seen.  No doubt her stitches have a Portuguese soul...

Joana uses embroidery, buttons, and crochet to make necklaces, brooches, and headbands.
I love how she can be as great in simplicity as with profuse stitching, in blue, in red or using bothShe is a great photographer and an inspired designer, too. 

Once again I don't know how to explain why I've chosen this photo to illustrate Joana's work, but I believe my heart was touched by that heart and the fiancé kerchief, both so typically Portuguese.

What else can I say? No words would be enough... I know you will not resist to browse her blog- Jubela, follow the link!


Embroidered heart and fiancé kerchief, by Jubela

We can't trust Felizarda's word when she says she isn't a great embroiderer. I believe she is a very inspired stitcher. All her hearts are so charming that each one is more beautiful than the next. That's the reason why I've chosen this photo with so many of them... Could you choose only one? 

They are inspired by different types of regional Portuguese embroidery and even when she uses different techniques, love seems to be her primary inspiration.

Sometimes she mixes her passions: embroidery and patchwork and the final result is beautiful, especially when she uses it to tell a story: do you know "Little Red Riding Hood"?
Felizarda's hearts, in her blog
And "with love in the air" I've finished this series of New Stitches with Portuguese Soul... And I'm so proud of all the great embroiderers I've found!!!

SITE DESIGN BY RYLEE BLAKE DESIGNS