May 30, 2013

Linen with Portuguese Soul

Olá! Could you imagine your life with a distaff and a spindle always at your side? If you were a woman born in Portugal 150 years ago you would know what I mean… At that time spinning was the most popular and common occupation for women.

The use of flax as a textile fiber is lost in time… Spun, dyed, and knotted wild flax fibers were found dating 30,000 BC. And the Pharaohs used linen cloth, found in their tombs. In the territory which is now Portugal, the cultivation of flax and its use in textiles also dates from prehistoric times. In different places, capsules of flax seed and a small scrap of linen have been found dating back to 2500 BC and 2000 BC.

Portuguese Linen
Portuguese Linen - white, estopa (tow) and handmade linen

Flax culture and linen production are a part of Portuguese history… From 1014 in Guimarães, many people were directly or indirectly involved in linen production. Linen from this region was well known for its excellence - from the farmers to those that prepared the fibers, to those who were responsible for the spinning and weaving.

But flax culture was spreading all over the country. From the poorest to the richest family, all grew flax. And women did domestic spinning, too, which was associated with other domestic activities. Weaving was usually done outside the home, which implied some professional specialization.

Portuguese white linen
White linen from Guimarães

"From the North to the South of Portugal, there was no farmer who did not cultivate the flax, no woman who did not spin and no village (from the poorest to the richest) which did not have one or more looms."

From the 13th century to 15th century, linen, which was used as payment to lords and the church, was the prime industry in Portugal. Linen cloth was used intensively in daily life, in household linen, in clothes, in church… A local popular saying is very illustrative of linen's importance: “after gold is linen”!!

Portuguese Linen
Portuguese linen

The importance of linen in Portuguese culture is stated by the fact that in Madeira Island, until the 19th century, the number of linen fabrics determined the value of a bride's dowry. And most linen production was aimed at that end. Since it is a very complex and labor-intensive activity, there were times when a decline in flax culture occurred, as during the Portuguese Maritime Exploration, when many tried their luck overseas. The demand of the fibers did not totally diminish as linen was used not only in thread and fabrics, but also in treu - used in cloth for boats’ sails – and rigging.

Some identify the decline in flax culture at this age. With the coincidence of the beginning of silkworm culture, followed by alternative uses of the soil, ending in 19th century with the “royal” preferences for cotton. The complexity of linen production that for so long had justified the overpopulation in the North region contributed to its decline once cheaper fabrics like cotton, became widespread. In many regions of the interior of the country, cotton use only occurred after the arrival of the train, which contributed to the price of cotton becoming unbeatable. After World War II, the Portuguese government tried to intensify linen production, but without success.

Portuguese "Estopa" - tow flax
Estopa (tow) from Guimarães

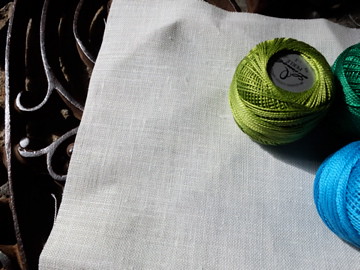
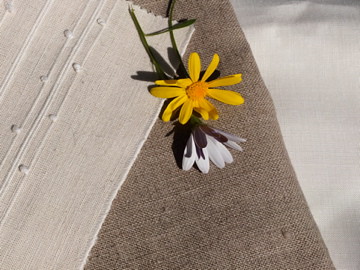
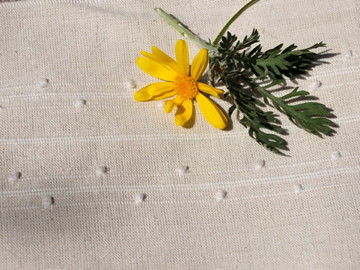
Nowadays there is localized industrial linen production and there are still population groups that manually produce linen, with some producers organized into cooperatives. However, most of these initiatives support local tourism rather than supplying the market with handmade fabrics. These photos show two different types of linen fabrics, produced by one of the most well-known and antique Portuguese linen manufacturers from Guimarães. The darker piece of fabric is my favorite linen cloth. We call it estopa (tow), and it is made of the shorter flax fibers. It’s known for being of less quality, but that’s not important to me… I also have with me a small sample of handmade linen to share with you. This kind of work, weaving and pulling the thread, is very traditional in our country.

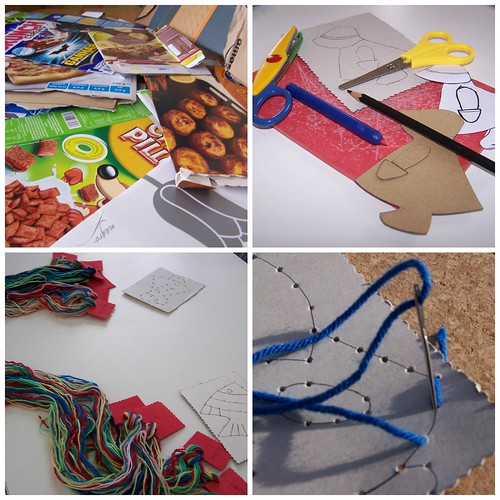
The entire cycle of linen production is incredibly beautiful… I wanted to describe it here… And I began doing that… But soon I understood that it would be foolish… Someone has already done it in such an incredible manner… Alice did a great work…

Promise me you’ll read this (and this) description of the linen production cycle, written both in Portuguese and English and documented with marvelous photos.You’ll also find a beautiful description of how to make a spindle… And do not forget to browse these photos – You won't regret it!!

Handmade Linen
Handmade Linen

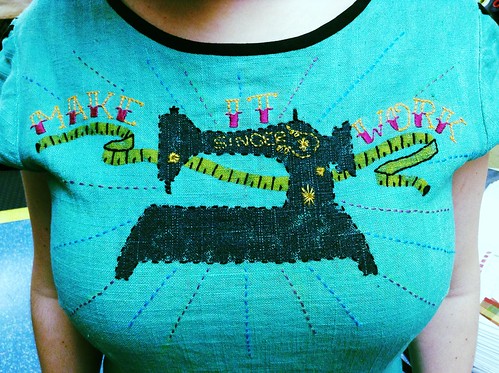
Flax is also used to produce twine and rope, linseed oil used in industry, nutritional supplements (always in my breakfast) and it is also grown as an ornamental plant in gardens. But... why am I talking about linen? Talking about Portuguese traditional embroidery and not talking about linen would not be possible. Almost all traditional Portuguese embroideries use linen and, usually, its replacement by cotton is only due to price. So the history of linen is the history Portuguese embroidery and, of course, the History of Portugal.

I believe that the inspiration that comes from linen exceeds the beauty of fabrics… That linen has also inspired popular poetry is very richly and well documented. The feeling of community that was present in the linen production cycle made people’s lives happier, creating rituals and legends that last until our days.

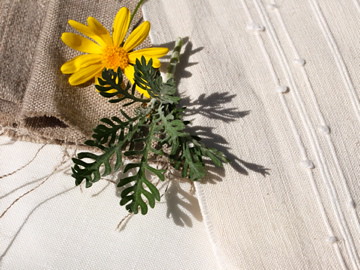
Linen's natural beauty can be an incredible source of inspiration as stated in these words that describe a flowered flax field, attributed to villagers who lived near a convent where the nuns cultivated flax:
Has the convent been lifted into heaven? Or have our good little sisters succeeded in pulling down heaven to them?

* Words are interesting… Let me try to explain you what I mean by that… In Portuguese we use the word linho meaning the cloth (linen) and the seeds/fibers (flax). In English the equivalent word, “linen”, is used for the cloth and its utilization – home linen.

May 29, 2013

Oh Deer!

Dear Deer

My friend Lisa has no idea what a fabulous stitcher she is (or is it embroider-er?). This deer is absolutely amazing!

Don't believe me? Check out the front and back of this deer.
oh deer Collage

Okay, how crazy is that? When I first saw it, I thought that she had stitched up two of the same deer.

Check out her other amazing embroidery on her blog, Cuppa Tea With Me.

May 25, 2013

Guest Tutorial: Embroidered Gadget Cozy

This guest tutorial is brought to you by Melissa of Sew Sweet Stitches. I think you'll agree that her gorgeous colors and stitching are extraordinary!


Embroidered Gadget Cozy Tutorial

Materials:
  • DMC embroidery floss in 318 (gray), 3011 (dark green), 352 (coral), 818 (pale pink).
  • Small scraps of wool felt in gray, butter yellow, light yellow, avocado green, blush pink, ecru, and coral.
  • 8” x11” piece of wool felt in aquamarine blue. (A kit with all the felt pieces and pre-cut flowers is available at http://www.etsy.com/shop/feltonthefly)

Step 1: Cut out the felt pieces- front inside, front outside, back, back pocket, and strap. Measure about a half inch around your gadget on all sides. I used my iPod for the photos, but your measurements may be different. The width of the strap will be whatever is left over from your front and back pieces, and the length of the strap is the entire width of the felt sheet. The pocket is about 3” x 3”, allowing for adjustments according to your gadget size.


Step 2: Use a scrap of thread to gather the bottom of the back pocket. Pin it to the back piece, and stitch the pocket down on the bottom and left and right sides.


Step 3: Sew the button to the back piece just below the bottom of the pocket. Cut a small slit in one end of the strap for the buttonhole.


Step 4: If you are not using the felt kit, cut a 2” x 3” oval from the ecru felt. Cut an assortment of five-petal flower sizes from the yellows, pinks, and gray. Cut a few tiny leaves from the avocado green.


Arrange and pin the flowers however you would like around the oval, letting them overlap onto the blue front. Leave room in the center for a monogram.


Step 5: Use daisy stitch, backstitch, and french knots with three thread strands to embellish the flowers and secure them to the front. Use a backstitch or fly stitch for the leaves.


Use french knots around the edge of the oval wherever there are not flowers.


Step 6: After all flowers and leaves have been stitched down and embellished, use a single strand of the green thread to make tiny leaves with daisy stitches and straight stitches for berry stems. Use three strands of pink thread to make french knots at the end of each stem.


Mark your initial lightly in pencil, and backstitch over it in three strands of gray thread.


Step 7: Center the strap on top of the inside front piece, with about a half inch overlapping. Lay the embroidered outside front piece on top of these two, lining up the edges. Pin the strap in place.


Use a straight running stitch to close the top of the two front pieces, catching the strap in the middle. Pin the back piece behind these two pieces and place a pin on each side and bottom. Use a straight running stitch to sew together the three pieces on the sides and bottom.


Insert your phone or mp3 player, tuck your earbuds into the back pocket, and button it all together with the strap. You’re finished!


Thank you, Melissa, for sharing this wonderful post with us! 
If you would like to purchase a kit with all the pre-cut felt pieces, you can find the kit here.

For more on Melissa, visit:
Her blog: Sew Sweet Stitches
Her Etsy shop

Hi, I'm floresita, editor of Feeling Stitchy. I'm an avid stitcher, knitter, and crafter. You can see more of my stitching on Instagram and my blog. My vintage transfer collection is on Vintage Transfer Finds.

Feel free to email me with any ideas for the blog!

May 24, 2013

Birth announcement

enjolie's birth announcement
stitched by Cicely Siller

This series of embroidery with ribbon on wooden panels by Cicely Siller is just gorgeous. See more embroidered loveliness in her shop.

Hi, I'm floresita, editor of Feeling Stitchy. I'm an avid stitcher, knitter, and crafter. You can see more of my stitching on Instagram and my blog. My vintage transfer collection is on Vintage Transfer Finds.

Feel free to email me with any ideas for the blog!

May 23, 2013

Girls' stitching

Olá! Continuing on last week's theme, Child's day celebration... I bring you this week an idea that you can try with girls, I would say girls older than 8 years old... I believe that at this age it's very important to choose projects that they can use in their daily life...

Last month I've coordinated a workshop with some girls and boys... The girls were all 9 years old and they told me they would love to make a hairpin! The boys were younger and not so enthusiastic about having a new hairpin. :)

Some time ago I developed a kit to make an embroidered hairpin using, as always, Portuguese materials and patterns. I adapted motifs from this book and burel or cork fabric were the materials chosen. These are great materials, not only because they are Portuguese, but above all because they don't unravel, what makes them very easy to work with.


Hairpin made of burel
Embroidered hairpin in burel
With these girls I "re-adapted" the motifs, making them easier. The most difficult part was transferring the pattern. Burel is very similar to felt... I used the same technique as explained here, embroidering through both tracing paper and burel. I have to admit it was not too easy, but they managed to do it all by themselves.

Proud of their hand embroidered hairpins
GIrls and their handmade hairpins
They were very proud with the results and all the color choices worked really well. Mothers loved the final work, too. You can't see their faces, but believe me, they were smiling!!

Girls and their handmade hairpins
Proud girls...
Last week I was with my younger daughter and we met one of these girls, I hadn't noticed, but my daughter told me: "she's using her hairpin"!!! 

I hope this can inspire you to make a project with your girls, and please let me know if they liked it!!!

May 21, 2013

Tutorial Tuesday

Hello Everyone! Hope you are having a great Tuesday.

Today's tutorial was inspired by my darling friend, Nadia. She mentioned that cactus embroidery would be fun. Since I live in Tucson, Arizona, and we have cacti in abundance here, I thought it would be fun to create a little pincushion with a cactus embroidered onto it. Pun intended!


I drew some prickly pair cacti, using the ones surrounding my mailbox as a model. The pattern is available for you here. To make this little prickly pear pin cushion you will need the following:

-Two pieces of fabric cut into 6 by 4.5-inch rectangles
-One piece of felt cut into a 6 by 4.5-inch rectangle
-Sand or Emery Sand to fill the pincushion (I found some at the craft store)
-Scissors
-Embroidery hoop and coordinating floss
-Sewing machine

Step one: Transfer the cactus pattern onto one fabric piece and stitch. I used DMC No. 8 floss on natural cotton muslin.


Step Two: Cut and prepare the pieces of the pincushion for sewing. Place the blank piece of fabric down first, then the embroidered piece of fabric face down, and the felt on top of that. Using a 1/2-inch seam allowance, sew around the pin cushion leaving a 2-inch opening along the bottom edge. 


Step Three: Clip the corners of the pincushion and flip through the space that was left open in the prior step. 


Step Four: Take the sand and carefully pour it into the pincushion between the blank fabric and the felt. You want to make sure the felt stays on the underside of the embroidery. Once the pincushion is filled to your liking, use a slip stitch to close opening. 


Step Five: Stick your pins into the pincushion and use it up!


Hope you enjoy and have a happy Tuesday!


Hi, I'm Kristen! I am a lover of all things stitchy and crafty. I have been sewing for as long as I can remember. My grandmother taught me how to sew Barbie clothes when I was young and I have been sewing ever since.

You can find me at Bobbypin Bandit, on Instagram, and my Etsy shop.

May 19, 2013

Patterns: Embroidery Journal

Embroidery journal

Something slightly different this week, I'm in the middle of working on a series of embroideries using patterns from Little Dorrit & Co, they're bigger patterns than I normally do, with a wider range of stitches and a large palette of colours, so I needed something to organise myself. Cue the Embroidery Journal printable from Kimberley Ouimet, a series of printable pages where you can record patterns, materials and other information about your embroidery. I don't know about anyone else but the number of times I loose track of the floss number of the thread I just happened to have run out of, so this is a life saver! I'm not sure I'm so organised as to do this for every piece of embroidery I do, but for large embroideries it's proving really useful!

Hi, I'm Jo - I feature new embroidery patterns Sundays on Feeling Stitchy. I also post on our Twitter and Pinterest.

Is there a new pattern you'd like us feature? Email me!

May 16, 2013

First Stitches...

Olá! Here in Portugal in some weeks will be celebrating Child's Day, on June 1st. The same day is also celebrated in many other countries. So I thought of showing you some pieces made by children and explain why I believe their first stitches are very important...

First stitches

Many, many years ago little girls learned counting and reading at the same time when they learned how to embroider....

Embroidery requires counting, develops concentration and logical thinking and has benefits on reading and writing by developing fine muscle coordination. Artistic skills are also at play. Deciding which pattern to embroider (sometimes making their own drawing), which colors to use and which stitches suit the image is a very powerful way of developing creativity! And of course all of us that have already taught a child how to embroider know that it is so important to be gentle- that embroidering teaches us to be patient, to be focused and to accept our own mistakes and the importance of correcting them. Most of all, stitching is great fun! And we want our children to have fun!!!

First stitches

I believe that from age 5 beyond the use of needles is safe and children may start embroidering on cardboard, for instance. By painting and hole-punching the cardboard a child can make their own lacing card. Finished works can be framed, glued on a notebook or given as anniversary cards...

First stitches

These cards were made reusing cereal boxes and you won't need much more material to try this with your children. They can make their own patterns, but as I was doing this at a school it was easier to make the motifs with molds. Children had to hole-punch and than use back stitch to embroider the pattern. Coloring was very fun, too!!

Preparing first stitches

These photos show a class I had some time ago with 5 year old children.

At the end the teacher summed up what kids had learned: "we learned how to: thread the wool yarn, knot the end, embroider back stitch, and secure the stitches. We also learned that sometimes we make mistakes and that is very important to go back and try again. It was very fun!"

In memoriam: Kathreen

I was so sad to hear today of the death of our crafting friend and fellow blogger, Kathreen from Whip Up. Her blog was one of the first crafting blogs I ever read, and continues to be an inspiration for me. Her guest post series in 2012 is one of the most inspiring group of crafting posts I've ever read.

I will always remember her blog as a happy place that celebrates life - to her family and her partner who remains missing, we send our prayers. Thank you for the love and talent you shared with our community over the years, Kathreen, and may you rest in peace.

An interview with Kathreen on FS, last year.

Hi, I'm floresita, editor of Feeling Stitchy. I'm an avid stitcher, knitter, and crafter. You can see more of my stitching on Instagram and my blog. My vintage transfer collection is on Vintage Transfer Finds.

Feel free to email me with any ideas for the blog!

May 8, 2013

Make It Work

The latest laurel

How clever is Sew Sewcial? I love the combo of embroidery with the silkscreen printing. Help me Rhonda, this is so stinking cute! Don't forget to check out her other creations.


May 7, 2013

Tutorial Tuesday

Happy Tuesday, everyone! Today's tutorial is a little homage to the 80's, the 1980's, that is. A time when we would make mixtapes for each other and drink something called, Tab. I bought this Rock 'N Roll embroidery pattern pack from Sublime Stitching a while back, and the cassette has been calling my name ever since. Since I have this new fancy cell phone that needed a case, I figured it couldn't hurt to reminisce about the 80's every time I answer the phone. 


This is a quick and easy tutorial, with no sewing machine involved.  It's completely hand-stitched and protects that expensive little telephone. Because we are stitching on felt, there is no need to use an embroidery hoop, as the fabric maintains its shape while stitching. To make your own cell phone case, you will need the following:

-two pieces of felt cut to 3x5-inch pieces (you may have to adjust sizing to fit your device)
-embroidery pattern 
-embroidery floss
-wax paper 
-a fine tip permanent marker
-a pair of tweezers
-scissors

I am going to show you how I transfer embroidery patterns to felt or dark fabrics. This isn't the only way, and it might not be the right way, but it works for me, and I think it will work for you, too. If you want something a little more sophisticated, visit Sublime Stitching for the How-To on using transfer paper or Future Girl for her tutorial on using tear-away stabilizer


Step 1: Transfer the pattern to the wax paper using the fine tip marker.


Step 2: Using a running stitch, attach the wax paper to one piece of felt. This doesn't have to be a beautiful stitch, because you will be removing it later. 


Step 3: Embroider your pattern making sure to pull all the way through the layers of felt and wax paper. Don't make them too tight, but you don't want loose stitches, either. Sometimes your stitch might break the paper, and that's okay. Your stitches are creating the perforations that will make it easy to remove the paper once complete. 


Step 4: Once your embroidery is complete, remove the running stitch and carefully, begin tearing away the wax paper. Use the tweezers to pull the paper out of smaller stitched areas.


Step 5: Take the second piece of felt, and place it directly underneath the piece you just stitched, wrong sides together. Pull the needle and thread in between the pieces of felt in order to hide the knot, and use a blanket stitch to connect the two pieces of felt along three sides. 


Step 6: Slip your phone into the case and enjoy!


Now if only I had a boom box to enjoy real cassettes with...


Hope you enjoy and have a great Tuesday!

Hi, I'm Kristen! I am a lover of all things stitchy and crafty. I have been sewing for as long as I can remember. My grandmother taught me how to sew Barbie clothes when I was young and I have been sewing ever since.

You can find me at Bobbypin Bandit, on Instagram, and my Etsy shop.

SITE DESIGN BY RYLEE BLAKE DESIGNS