Showing posts with label freehand embroidery. Show all posts

September 19, 2013

Inspired by olives?

Olá! I truly believe that traditional embroidery from Portugal tells the history of our country… And you already know how much I like my patterns to be inspired by Portuguese traditions and culture… Of course I love many other types of embroidery motifs, but I have to say that the ones rooted in the “Portuguese soul”  inspire me the most…

I believe you also have those unique kinds of patterns that are special to you… Haven't you?

The pattern I bring today is not a traditional one but it reveals a bit of Portuguese history and a lot about Portuguese culture.

It was inspired by a pottery piece from Alentejo and embroidered by Maria Alice. And it was the perfect tip to show you a little more about my country…

Olives and Olive trees

The olives reproduced in that simple and beautiful embroidery takes part of our gastronomy, agriculture production (Portuguese olive oil is among the best of the world), crafts - using olive trees' wood or ceramic  - and even popular music (one of the most traditional songs here sung by Portuguese singers)...

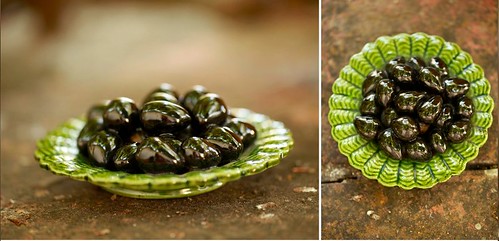
Traditional Pottery Inspired by Olives...

Our Mediterranean type climate is very supportive of the growth of olive trees and olive oil, obtained from the fruit of the olive tree, has been produced in Portugal for many, many years. There is evidence that olive trees existed in Portugal back in the Bronze Age and the exportation of olive oil dates back to Portuguese maritime explorations.

Did you know that an olive tree can live thousands of years? And that Niel Armstrong left a golden olive branch on the moon as a symbol of peace?


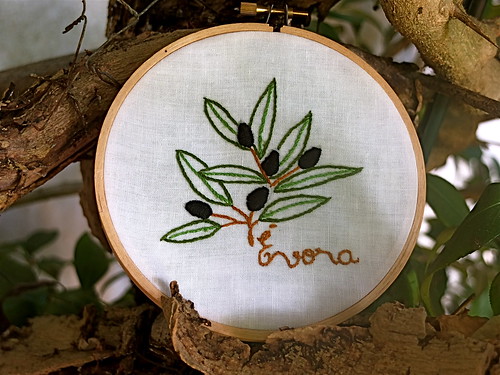
Olives embroidered by Maria Alice
As you see a very simple pattern can be full of meaning... That's another reason why art, in this case, embroidery, makes our lives so special...


December 4, 2012

Tutorial Tuesday

Happy Tuesday, everyone!

Today's tutorial is a little bit more of a How-to. I spotted some gloves in the $1.00 bin at the fabric store, and decided to add embroidery to them. This tutorial will show you how to embroider on stretch knit gloves. I opted for a simple snowflake pattern in white, on red gloves, for some holiday festivity.


Supplies needed for this project:
- A pair of gloves
- Embroidery floss
- A pencil or water soluble pen
- Scissors

Step 1: Determine the placement of your stitches. The body or palm size of my gloves, without being stretched out, was 3-inches by 3-inches. I marked this sizing on a piece of paper, then sketched snowflakes within the space where I would want them on the glove. If you would like to use my snowflake sketches as a guide, you can access them here.


Step 2: Using a pencil or water soluble pen, sketch the snowflake onto your glove. Because the glove is stretchy, there is no real easy way to transfer the pattern, as we won't be placing the glove in a hoop to stitch. If you aren't comfortable with sketching directly onto the glove, Jenny Hart of Sublime Stitching has some awesome tutorials on how to transfer an embroidery pattern to dark fabric or how to transfer an embroidery pattern to stretchy fabrics, in case you want something more stable.

As you can see from the pictures, my finished stitches aren't an exact match to the sketch. I explain this a bit more in step 4.


Step 3: Prepare your floss for stitching. Double or triple knot the end of your floss so that it doesn't slide through the knit once you stretch the glove. Fit your hand into the glove just enough to stretch it slightly. Make sure not to over stretch it, as you don't want the stitches to morph once you take your hand out of the glove.

Step 4: Begin stitching. It is important that you don't pull the floss tightly as you are stitching. Just be gentle and move slowly, making sure to achieve the look you like. I found that using stitches that are a bit longer than I would make when stitching on cotton, worked better with the fabric of the gloves. This is the main reason why my actual stitches aren't the same as the sketch - the longer stitches gave me a larger snowflake. When you need to knot your stitches, turn the glove inside out and double or triple knot the end so it does not move through the knit of the glove.


Step 5: Once you finish one glove, move onto the other.


Step 6: Cover those digits!


Hope you enjoy and have a happy Tuesday!


Hi, I'm Kristen! I am a lover of all things stitchy and crafty. I have been sewing for as long as I can remember. My grandmother taught me how to sew Barbie clothes when I was young and I have been sewing ever since.

You can find me at Bobbypin Bandit, on Instagram, and my Etsy shop.

January 7, 2012

Doilies, not just for crocheters

faux doily nearly done, originally uploaded by Smallest Forest.
I love this piece by Smallest Forest. Absolutely beautiful.

The combination of stitches is just right and it's just so very doily-ish!

Read more about it on the Smallest Forest blog. :-)

February 18, 2010

Little girl + Yeti + Embroidered Soup = Awesome

 
I love how little Zadie is spoon feeding the appliqued Yeti, soup...

... from this freehand embroidered soup bowl in a dream bubble! On her blog Beth shares details of this  Yeti Dreams of Soup project.


November 12, 2009

Our umbrella

Our Umbrella
Stitched by Laura Amiss

I'm really loving these elegant machine-stitched works, they have such a gorgeous, hand-drawn quality...

Hi, I'm floresita, editor of Feeling Stitchy. I'm an avid stitcher, knitter, and crafter. You can see more of my stitching on Instagram and my blog. My vintage transfer collection is on Vintage Transfer Finds.

Feel free to email me with any ideas for the blog!

SITE DESIGN BY RYLEE BLAKE DESIGNS