August 28, 2015

Friday Instagram Finds No.18 with Sewn by the Beach


This is the last Friday in August, and for those of us in the Northern Hemisphere, it means that summer is coming to a close. (Does this mean that winter is coming to a close in the Southern Hemisphere?) This makes me unbelievably sad, because I adore warm weather - the hotter, the better! Today, let's take a look at Lauren of the Instagram account @sewn_by_the_beach so that we can extend the summer feeling :)

@sewn_by_the_beach
I found Lauren's account because she tagged some of her photos with #feelingstitchyig. Lauren creates beautiful embroidered pieces and needle felted artwork. Take a look!

These coral necklaces are so unique in these neat pocket watch pendants! The blue felt background is vibrant, and reminds me of the water near Clearwater, Florida. The red of the coral really pops against it.

Image By Lauren Beach
Lauren's toucan is a beautiful piece of art. I have a lot of respect for embroidery artists who fill in all of their work with stitches. I do it sometimes, but not often. When you look at Lauren's feed, you'll see that she fills in most of her subjects.

Image By Lauren Beach
Lauren's ribbon embroidered sunflower is awesome! I enjoy how she used different shades of brown to form the center of the sunflower. By only showing a part of the sunflower, it makes this necklace very visually appealing.

Image By Lauren Beach
How adorable is this fawn?!? Lauren's felted art is stunning. I've never tried felting, don't even know the first thing about it, but it looks like painting with felt instead of paints. The detail that Lauren's able to achieve are stunning.

Image By Lauren Beach
That's it for this week's edition of Friday Instagram Finds! Join in the conversation by commenting below. While you're on Instagram checking out Lauren's work at @sewn_by_the_beach, make sure you follow Feeling Stitchy! We'd love for you to stop by and say hello. You can find Feeling Stitchy on Instagram at the handle @feelingstitchyish. You can find Amy @randomactsofamy on Instagram.

Want to be featured in Friday Instagram Find? Tag your best stitch-related photos with #feelingstitchyig!

Hi, I'm Amy - I feature interesting embroidery and stitch-related photos I find on Instagram. I'm a hand embroiderer and maker.

You can find my embroidery and crafts on:
Instagram | Random Acts of Amy | Facebook

August 27, 2015

Thimblenest Thursdays: Summer/Winter Stitchalong--The Finished Banner


Do you have all of your letters stitched? If not, no worries, autumn doesn't officially begin until September 23, so you have plenty of time! Fall is my favorite season, so I am eagerly awaiting its arrival, although I am actually sorry to see summer go this year!

PATTERN/EMBROIDERY DESIGNS


One more time, here is the pdf with all of the letter/motif designs, as well as enlarged versions of most of the motifs.

MATERIALS


Let's put the bunting/banner together. If you weren't here for Week 1 of the stitchalong, gather the following materials:
  • 6* (or more)  9" x 7" (23 cm x 18 cm) fabric rectangles for backing**
  • 6* (or more) 8.5" x 6.5" (21.5 cm x 16.5 cm) rectangles of lightweight iron-on interfacing**
  • 1 package/3 yards extra wide double-fold bias tape (or make your own)
  • scissors
  • pins/sewing clips
  • sewing machine
*Cut more than 6 if you want to add extra autumn motifs or blank "flags" to your bunting (in addition to the letters).

ATTACH INTERFACING


Affix lightweight interfacing to the wrong side of each quilting cotton rectangle. These will become the backing for your embroidered pieces. Center the interfacing so that there is approximately 1/4" between it and all edges of the fabric.

SEW FRONTS AND FACINGS TOGETHER


With right sides together, sew an interfaced quilting cotton rectangle to the back of each embroidered rectangle using a 1/4" seam allowance. Sew only the sides and bottom. The top edges are left open to turn the embroidery right side out; the raw edges will be enclosed later. To make turning the fabric easier, take the corner stitches at a 45 degree angle, rather than making them square.

TRIM EDGES & CORNERS; TURN TO OUTSIDE; TOPSTITCH


Trim the corners close to stitching. You could trim along the other stitching as well; I opted not to because I felt like the seam allowance was already small enough and I didn't want to compromise the strength of the seam/fabric.

Flip each stitched rectangle right side out. Take your time here--use a turning tool (I use a chopstick) and a hot iron to make sure the edges are straight and the corners as sharp as possible. If needed, roll the edges of the rectangle a little toward the back to keep the quilting cotton from showing from the front.

Once you are happy with the turned edges, topstitch (1/4" from edge) around the sides and bottom to hold everything in place.

Trim any loose threads from the top of each rectangle.

PREPARE BIAS TAPE


Remove bias tape from the package and iron out creases. Find the center of the tape by matching the short edges together; mark with a pin at the center fold.

CENTER & SPACE RECTANGLES; PIN/CLIP


I had an even number of rectangles to sew onto my bunting, thus, the T and the second U needed to be on either side of the center of the bias tape. 


To achieve a 2" space between each rectangle/flag, start by placing the right edge of the T and the left edge of the second U 1" away from the center of the bias tape. 


Sandwich the top of each rectangle inside the bias tape and pin or clip securely in place. Be sure that the shorter edge of the bias tape is on top (on the front of each rectangle) and the longer side is towards the back.


Keeping a space of two inches between the rectangles/flags, continue to work from the center towards the outside edges, sandwiching each new rectangle inside the bias tape and pinning or clipping securely in place.

STITCH


Slowly and carefully, begin stitching at the far left end of the bias tape; with the short side up, stitch through to the back, closing the bias tape as you go. Stitch a continuous seam from the left side of the banner to the right. Each time you reach a rectangle/flag, backstitch a time or two at each edge for added stability. Be sure that the raw edges of each rectangle are fully enclosed within the bias tape.


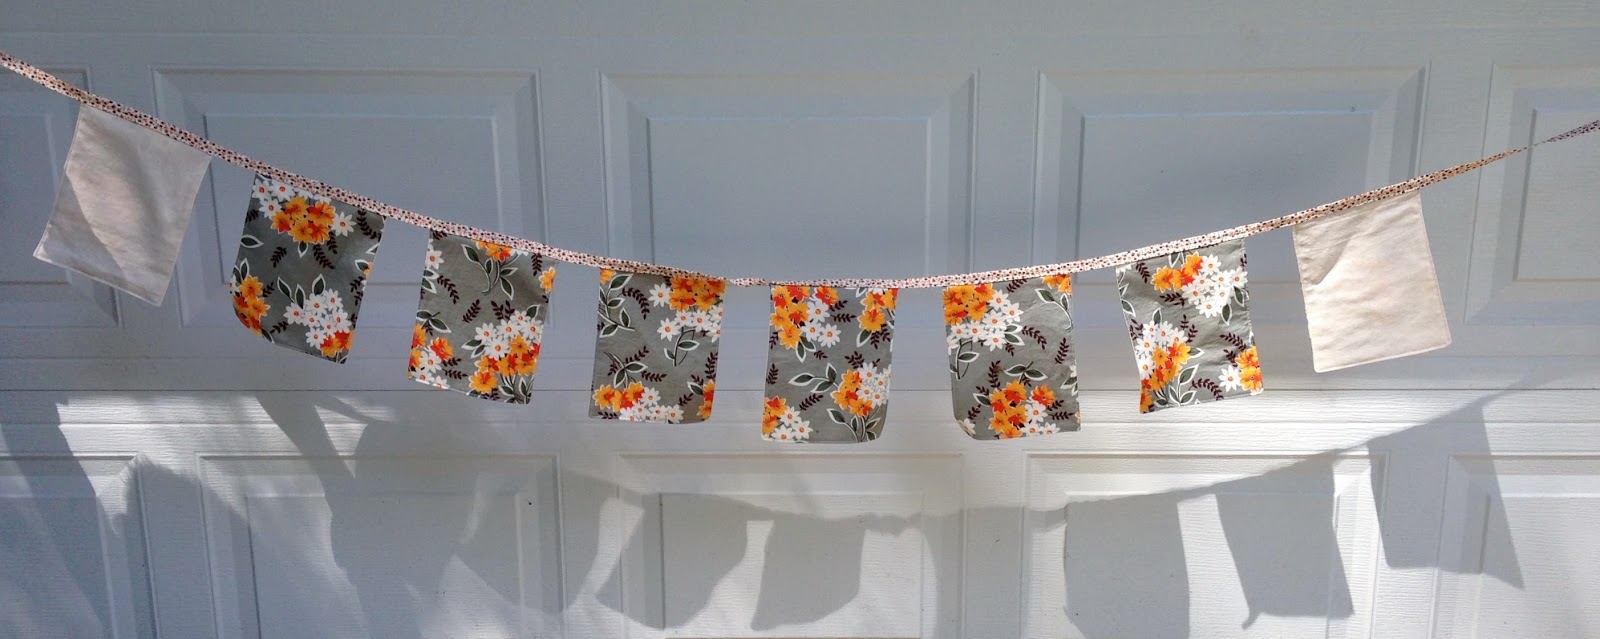
Your banner/bunting is finished! As you can see, I flipped my two end rectangles around so that the quilting cotton showed on the front side at each end. I'd waited to long to use that Flea Market Fancy to hide all of it in the back!

Thanks for following along this summer as I brought you this stitchalong; I had fun preparing each letter and I'm super excited to hang up my new autumn banner!

As always, we'd love to see this or any other project inspired by a Feeling Stitchy post on Instagram (@feelingstitchyish) or in the Flickr Group!


Hi, I'm Wendy - I've been embroidering since age 9 when my grandma gave me some blank tea towels and a set of Aunt Martha’s transfers. I blog at ThimbleNest.

You can also find me on Pinterest.

August 25, 2015

Stitchy Snippets: Penguin by Hand

Jenny Hart

A new series of beautifully illustrated books are soon to grace your shelves. Do you recall the Penguin Threads Deluxe Classics that were published in 2011? The set features special embroidered book covers by Jillian Tamaki and Rachell Sumpter.

Jillian Tamaki

Rachell Sumpter

Next month Penguin will publish their latest craft inspired collection: Penguin by Hand which celebrates the work of six prominent, female authors of contemporary fiction. The stunning book cover designs are truly a feast for the eyes. The production includes an array of hand craft techniques: embroidery, paper art, pyrography and string art.


The six contributing artists are: Jenny Hart, Brenda Riddle, Emma Ruth Hughes, Genevieve Dionne, Dominique Falla and Helen Musselwhite.

Art work by: Jenny Hart & Helen Musselwhite

Art work by: Brenda Riddle & Dominique Falla

Art work by: Emma Ruth Hughes, Genevieve Dionne

To emphasise the tactile art work, the sumptuous covers have once again been sculpt embossed. The incredible detail in the embossing plate below illustrates how the intricate elements and fine textures of embroidery have been translated well to paper.


Such appealing covers call out to be handled, re-connecting readers to the tangible experience of thumbing a paper page, where the only concern is spilling coffee onto such a spectacular book cover. Whilst discovering the latest Penguin by Hand range, let’s remind ourselves of the three fantastic book covers that won a prize in the Feeling Stitchy ‘Covered in Stitches’ contest.

The Invisible Mountain by SpidersPaw

Contes des Mille et Une Nuits by Coeurdefreesia

Wynken, Blynken and Nod by Lisa Leggett

August 22, 2015

Jessie Chorley book giveaway!

Hello all! Once again we have a lovely guest post and giveaway from Karen Thiesen, of Woman With a Needle. Read on for her review of Jessie Chorley's latest book, and stay tuned at the end of the post for a giveaway!

I am a huge fan of Jessie Chorley, so I was very excited to find out that she was writing a book! Jessie Chorley: The Story of a Maker describes how Jessie became the artist that she is, as well as giving you a glimpse into her incredibly creative mind. I’ll just tell you some of my favorite things that I learned about Jessie from the book.


Jessie is a collector with a capital C! She loves rummaging through Paris flea markets and Welsh charity shops (usually with her mum, textile artist Primmy Chorley), and can often be found at Spitalfields market in London (sounds like fun to me!)


She displays her ever-changing collection at home, or incorporates it into her work and passes it on through her shop. She considers it her visual sketchbook. She is such a well-known collector that people leave her gifts of vintage items on the doorstep of her store!


I am a textile lover through and through, but when I took one of Jessie’s altered book workshops, I found a new passion. I love the story about how she started making them! When she was a student (in Fine Art Textiles at Goldsmiths College in London), she was required to create research books for her course work. She didn’t like using the usual white paged sketch books everybody else was using, so one day she passed a pile of books on the side of the road that someone had thrown out…..and that was the beginning of her altered journals!


This is a lovely description of Jessie by Louise Presley of Hope and Elvis workshops, where Jessie often teaches: “As a petite Edwardian-esque woman with a shy charm, she was utterly entrancing… Her clothes are so interesting and full of verve, with brooch-embellished jackets and hand-embroidered aprons covering her beautiful vintage frocks.”


If you are feeling inspired by all the beautiful pictures of her work, (and there are many more pictures in the book!) Jessie has included instructions for two of her signature pieces: a stitched bow and a covered button. She also talks about how her shop (on London’s famed Columbia Road) came to be, her process in making her stitched pieces and brooches, and how she tells a story with mended and embellished vintage clothing.


If you would like to read more about Jessie Chorley, there are two recent articles about her: the May/June 2015 issue of Somerset Studio Magazine and one in the upcoming Sept/Oct 2015 Embroidery Magazine. Jessie’s book can be purchased through her website www.jessiechorley.com. You can also follow Jessie on Facebook, Instagram and Twitter. Jessie will be teaching for the first time in the US, in Santa Fe, New Mexico, September 15-19, 2015. For details go to www.womanwithaneedle.com.

***
Thank you, Karen, for this review of Jessie's book - and thank you for giving us the chance to give one copy of Jessie Chorley: The Story of a Maker to our readers!  This giveaway is open to all of our readers.

To win, leave a comment on this post by Monday, Aug 24, 9 PM US CST - please answer this question for us - Are you a collector of fabrics, notions, haberdashery, or stitching tools? If so, what do you collect? (Photos would also be wonderful!) We will choose 1 random winner after the comments are closed, and notify everyone soon after!


Hi, I'm floresita, editor of Feeling Stitchy. I'm an avid stitcher, knitter, and crafter. You can see more of my stitching on Instagram and my blog. My vintage transfer collection is on Vintage Transfer Finds.

Feel free to email me with any ideas for the blog!

August 21, 2015

Friday Instagram Finds No. 17 with Erin McMom


Welcome to your weekly edition of Friday Instagram Finds! Today I'd like to introduce you to @erinmcmom! Erin's embroidery is beautiful, and she has gorgeous and unique designs.

@erinmcmom

I'm a sucker for typography of any kind, but most especially when it's embroidered. The sentiment of this quote is darling, and I love the French knots made to look like confetti. Staging the photo on a bed of tissue paper confetti is brilliant!


Image By Erin McMenemy
This Home Sweet Home hoops is my favorite of all of Erin's hoops. I love the design, and the colors on the grey fabric stand out so beautifully. Erin's stitches are so well done! They're tiny and tidy.


Image By Erin McMenemy
Isn't Erin's skyline of Vancouver, Canada beautiful?! It's cross stitch, but without any Xs on the Aida cloth. And there's the confetti again! 

Image By Erin McMenemy
When I saw this, and then read that it's a cross stitch globe that Erin created, I was blown away! I mean, WOW! I've never even seen a cross stitch globe before this one. Erin also sewed it together evenly and beautifully. She's got a lot of talent! 

Image By Erin McMenemy

That's it for this week's edition of Friday Instagram Finds! Join in the conversation by commenting below. While you're on Instagram checking out Erin's work at @erinmcmom, make sure you follow Feeling Stitchy! We'd love for you to stop by and say hello. You can find Feeling Stitchy on Instagram at the handle @feelingstitchyish. You can find Amy @randomactsofamy on Instagram.

Want to be featured in Friday Instagram Find? Tag your best stitch-related photos with #feelingstitchyig!

Hi, I'm Amy - I feature interesting embroidery and stitch-related photos I find on Instagram. I'm a hand embroiderer and maker.

You can find my embroidery and crafts on:
Instagram | Random Acts of Amy | Facebook

August 14, 2015

Friday Instagram Finds No. 16 with Nicole Hendley


I hope you have all enjoyed your week, and are looking forward to a fun weekend! Today I'd like to introduce you to Nicole of the account @nicole_hendleyhoops. I "discovered" Nicole's work because she tagged some of her pictures with #feelingstitchyig. Nicole uses beautiful fabrics to embroider words and phrases with embroidered floral motifs. I greatly enjoy the way Nicole stages her photos. They are eye catching, and certainly made me stop to take a look.

@nicole_hendleyhoops

This is a great picture of this hoop! The staging is so pretty and feminine, with a dreamy quality. The embroidered flowers are so cute with the colors in the sunflowers and bright colors of all of the others. I like how the text, "embrace change" is positioned into the flowers at the top and bottom.

Image By Nicole Hendley

Another super cool staged picture! The fabric and colors are so pretty against the dark floss, "be still." Nicole's stitches look so pretty, and the thicker lines on some of the letters finish the phrase off to really look great. I think the typography in the font is great, too.

Image By Nicole Hendley
These hoops make me so happy! I just love it when artists embroider words and phrases around pictures in fabric. Putting the immortal Ms. BeyoncĂ©'s lyrics in embroidery with kitties is just plain clever.

Image By Nicole Hendley
This is the kind of picture on Instagram (or anywhere) that makes me stop and take a closer look. The hoop against the sky is so pretty, and the sun is shining so prettily through the fabric. I like the contrast of the dark text against the dainty and muted pastels of the fabric. And the way Nicole placed the text gives it a different and great flow.

Image By Nicole Hendley

Here's a bonus picture of Nicole's adorable Labradoodle Plato

Image By Nicole Hendley

That's it for this week's edition of Friday Instagram Finds! Join in the conversation by commenting below. While you're on Instagram checking out Nicole's work at @nicole_hendleyhoops, make sure you follow Feeling Stitchy! We'd love for you to stop by and say hello. You can find Feeling Stitchy on Instagram at the handle @feelingstitchyish. You can find Amy @randomactsofamy on Instagram.

Want to be featured in Friday Instagram Find? Tag your best stitch-related photos with #feelingstitchyig!

Hi, I'm Amy - I feature interesting embroidery and stitch-related photos I find on Instagram. I'm a hand embroiderer and maker.

You can find my embroidery and crafts on:
Instagram | Random Acts of Amy | Facebook

August 13, 2015

Thimblenest Thursdays: Summer/Winter Stitchalong, Week 6


Can you believe it? We've reached the sixth and final week in our Summer/Winter Stitchalong. Today we're stitching up the letter N, and in two weeks we'll put the final autumn banner/bunting together.

Click here for the letter "N" pattern   OR

Click here for ALL of the letters in AUTUMN + enlarged motifs for extra flags on your bunting/banner all in one handy file


I coasted to the finish with letter N. Once again the letter is outlined in chain stitch with three strands of DMC 327. The interior is simply running stitch in DCM 3852.


And, of course, autumn just isn't autumn without some rosy apples backstitched in DMC 350. I hope you've enjoyed stitching this seasonal title and the accompanying motifs. Be sure to check out the full pdf file if you want to embroider some extra fall designs for your banner. I'm looking forward to seeing the final bunting come together in two weeks. Happy Stitching!


Hi, I'm Wendy - I've been embroidering since age 9 when my grandma gave me some blank tea towels and a set of Aunt Martha’s transfers. I blog at ThimbleNest.

You can also find me on Pinterest.

SITE DESIGN BY RYLEE BLAKE DESIGNS