June 29, 2007

Green crafting

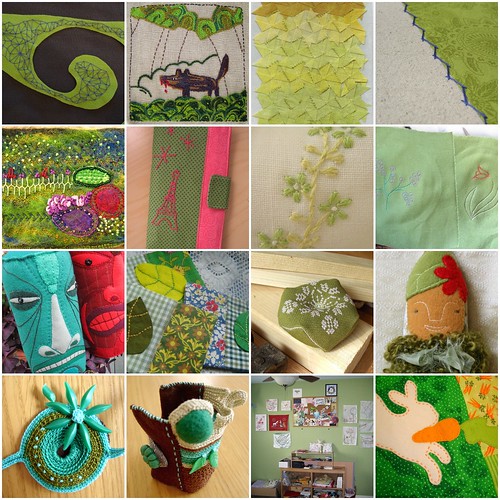
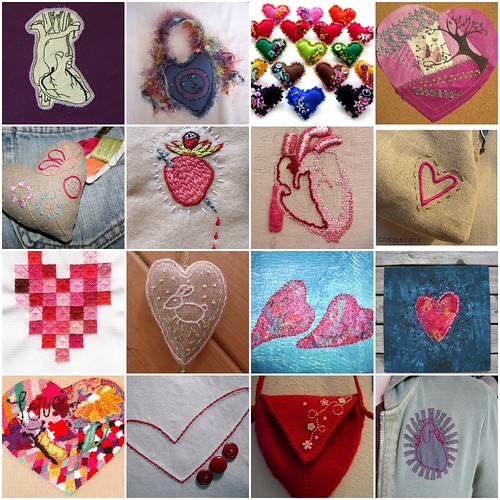
Today I went looking for embroidered art in the pool in one of my favourite colours. I found some wonderful pieces of art. One photo is not really an embroidery, but I thought the photo of merwing's studio looked so inspiring and since it was green I had to allow it in my mosaic. And it shows a simple and good looking way of hanging your works in progress. If you want more inspiration for your craft room, there is a flickr group for this purpose as well. Happy crafting!

Find out more about the individual photos in the mosaic:
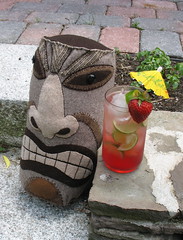
1. Untitled, 2. The Beast in the woods., 3. embroidery swatch 3, 4. Stitch Detail, 5. With added french knot (WIP), 6. Travel Wallet - Front, 7. Meadow bird, flower detail, 8. Lappar, 9. 2 tikis, 10. leaf coasters., 11. biscornu, 12. Noah the Travelling Gnome, 13. #105, 14. #107", 15. studio3, 16. mini carrot the 4th closeup

June 28, 2007

Featured book: the Cute Book

The Cute Book, featured on Feeling Stitchy by floresita
Here's my latest crafty find, The Cute Book. It is indeed, very cute. Our friends in Japan have discovered that we love their craft books, so I'm sure this is just the first of many Japanese craft books translated into English: yay!

There are many patterns for tiny softies, or, as the book calls them, "felt mascots". They're all a bit bizarre and fun, and include a squirrel, sprite, sheep, bunny, fish, frog and tadpole, kidnapper, liar, bad guy, panda, and a hippo-looking creature called "Pinky." (yes, I did say "kidnapper" and "liar") :)

A quirky bio at the top of every page even tells you your mascot's personality. Also many ideas of things to sew your felt mascot onto - basically everything under the sun is suggested, and you guessed it, those fuzzy guys look cute on everything. For sample pages, or to see a few felt mascots in action, visit their blog.


My one challenge when making these guys is size and my crappy sewing skills (as you can see from my lumpy efforts above). My advice is to choose a thread that blends in easily with your felt unless you are a sewing god, like for example, cupcakes for Clara... Also, if the size and tiny stitches frustrate you, march that book over to the copy machine and enlarge it! I produced a very huggable monkey that way:


Bravo Felt Mascots!

Hi, I'm floresita, editor of Feeling Stitchy. I'm an avid stitcher, knitter, and crafter. You can see more of my stitching on Instagram and my blog. My vintage transfer collection is on Vintage Transfer Finds.

Feel free to email me with any ideas for the blog!

June 25, 2007

The French Knot

Did I hear a moan? Many of us love the look of the French Knot but have struggled to master this stitch but once you get the hang of it, the possibilities are endless. It is a wonderful stitch for adding a three dimensional look to a pattern that might otherwise appear flat and it is also great for mimicking the natural elements of nature.


Instructions for making for making a French Knot:

1. Bring the thread out at the required position, hold the thread down where it emerges with the left thumb and encircle the thread twice with the needle (see A).

2. Still holding the thread firmly with your thumb, twist the needle back to the starting point and insert it close to where the thread first emerged (not in the exact place or it will simply pull back through).

3. Pull the needle through to the back, leaving a small knot on the surface, as shown, or pass on to the position of the next stitch as at B.

There is also an extremely helpful video tutorial at Needle N' Thread demonstrating how to make the French Knot. Watching the stitch in action will definitely help in making written instructions comprehensible.


The image above comes from the flickr photostream of Stephanie also known for her great blog, ruby-crowned kinglette. It is a beautiful way to highlight the French Knot in a simple and clean design.

Flickr member Tanya, created this adorable knotted sheep. It is a prime example of adding a three dimensional element. Plus you can pet this fuzzy guy!

So grab a piece of scrap fabric and practice the French Knot. Once you get the hang of it, you will be adding it to all of your embroidered designs!

June 23, 2007

Breaking the rules

I have a bad(?) habit of not following instructions and making up my own as I go along. I do it with embroidery patterns all the time. I look at them more as a guide. I chose this pattern to embroider on a vintage hanky to use on a doll-sized quilt. It's from the 1966 Better Homes and Gardens Stitchery and Crafts.
I wanted a quick result and opted for a split stitch and back stitch, rather than the satin and stem stitches suggested. The result is just what I wanted.
I completed this in about 6 hours. Embroidered with 2 strands for the stems and leaves and 4 strands for the berries and flowers on a vintage hanky. Next time you see a pattern that looks like it's too much for the time you have consider breaking the rules.

June 21, 2007

Crafty Blog School: How to Take Better Pictures of Your Crafts

Crafty Blog School, a 2007 series of posts on blogging for Feeling Stitchy by floresitaWelcome to the 6th (and final?) Crafty Blog School post - today I'll show you simple ways to take better pictures of your crafts. Want more Crafty Blog School posts? Just leave a comment with your suggestions, and I'll put as many more together as you want!

Why don't my crafts get the love they deserve?
Let's say you just finished this amazing craft. I mean, you look at it and say to yourself - "this is a freaking work of art, self." You snap a picture, upload it into Flickr or write a blog post and then... nothing happens. No comments, no faves. Absolutely no love for your masterpiece, which is looking sadder and lonelier by the minute. Has this happened to you? If it has, don't be sad or disappointed! Faves and oodles of comments are by no means a measure of greatness - if you love what you made, in my opinion, mission accomplished.

Could it be... the pictures?
Maybe one reason your crafts don't get the love they deserve is the pictures you post of them? You don't have to be a professional photographer with an expensive camera, or a Photoshop wiz with mad computer skills! There are a few simple things anybody can do to make their pictures better. I promise anybody can do it, and that means you too!

How to Take Better Pictures

  1. Always use daylight to take your pictures - try snapping pics of your crafts outside or by a bright window.
  2. Turn off that flash! It creates a nasty glare on your stuff, especially if it's bright or reflective.
  3. Use your macro setting for close-ups! (Don't know where your macro setting is? Almost all digital cameras have it- usually it's a little flower symbol... mine looks like this)
  4. Put your crafts in fun and interesting settings - here are just a few examples...

Advanced: How to Tweak Your Pictures in Photoshop
These 2 tweaks can make any picture look better! For example, this picture is way too dark:
too dark!

  1. Adjust levels: how do I do that?
    levels adjusted - still too dark
    Sometimes this does the trick - but our pic is still too dark, so now we'll...


  2. Adjust brightness using Screen: how do I do that?
    nice bright critters
    Done! Yay!
Voila! After 2 simple tweaks, we have a much better picture! Now it's nice and bright, and the colors and contrast really pop!

That's All, Folks
Well, that does it for Crafty Blog School! I hope you enjoyed all the posts, learned a little something, or were inspired to try something new. This doesn't have to be the last post, I'm just tapped out for ideas... Let me know if there's something you'd like to see!

All The Crafty Blog School Posts:
week 1: Where Do I Blog?
week 2: Choosing a Template
week 3: Name Your Blog & Create a Header
week 4: Blogging Photos from Flickr
week 5: How to Put that Darned Thimble Guy in Your Sidebar
week 6: How to Take Better Pictures of Your Crafts
week 7: Getting Noticed

Hi, I'm floresita, editor of Feeling Stitchy. I'm an avid stitcher, knitter, and crafter. You can see more of my stitching on Instagram and my blog. My vintage transfer collection is on Vintage Transfer Finds.

Feel free to email me with any ideas for the blog!

June 19, 2007

Inspiring Crafty Pics

Feeling Stitchy has been looking bare since many of our blogging peeps are on vacation / enduring gale force winds and pet illnesses. :( So, here's a quick preview of Thursday's Crafty Blog School post: Taking better pictures of your crafts...

What makes a crafty pic inspiring, you may ask? Allow me to introduce the following elements for your consideration...

use props
wool tiki pillow

a fancy fabric backdrop
clara and macy

hang em' high (from the stairs or chairs)
Toddler Tote - Happy Fruit

throw in some flowers
Follow your heart - toilet bag 2

model it!
Skirt

if all else fails, throw it on a cute kiddo
Kitty Love


Thanks to Mimi K, cupcakes for clara, golly g, sykossa, lucy robinson, and amyleigh, whose inspiring pics you saw above!

Hi, I'm floresita, editor of Feeling Stitchy. I'm an avid stitcher, knitter, and crafter. You can see more of my stitching on Instagram and my blog. My vintage transfer collection is on Vintage Transfer Finds.

Feel free to email me with any ideas for the blog!

June 15, 2007

June 14, 2007

Crafty Blog School: Hosting Graphics on Photo Bucket

Crafty Blog School, a 2007 series of posts on blogging for Feeling Stitchy by floresita

Welcome to Week 5 of Crafty Blog School - today I will answer the most asked question on Feeling Stitchy, and that is, how do you put that darned thimble guy in your sidebar to link to us!


Since the Feeling Stitchy guy is a web graphic and not a real photo, we'll be hosting him on Photo Bucket.

How To Put That Darned Thimble Guy in Your Sidebar
  1. Save the image to your computer
  2. Upload the image to Photo Bucket (it's possible with Flickr, but it's against the rules- so don't do it!).
  3. Copy the URL link for the image (in Photo Bucket, it's displayed right under the image)
  4. In Blogger, add a new HTML/Javascript element to your sidebar, and paste your code using this setup (you can use this code in any blog that lets you edit the HTML):

    <a href="URL OF YOUR PAGE"><img src="URL OF YOUR IMAGE" alt="YOUR PAGE TITLE" border="0"/ ></a>

    URL OF YOUR PAGE - http://flickrembroidery.blogspot.com/
    URL OF YOUR IMAGE - this is the URL link you copied in step 3
    YOUR PAGE TITLE - Feeling Stitchy

    An example of what your code might look like:
    <a href="http://flickrembroidery.blogspot.com/"><img src="http://i152.photobucket.com/albums/randomperson/thimble.gif" alt="Feeling Stitchy " border="0" /></a>

Why can't I do this on Flickr?
Because they said so -scroll on down to the "Don't" section where it says:

Don’t use your account to host web graphics like logos and banners.
Technically, it can be done - but if they let you do that every Tom, Dick and Harry would use Flickr to host web graphics and images for their websites. Then Flickr wouldn't have any real pictures for you to ooh and ahh over. So, use sites like Photo Bucket to upload any old web graphic you please without cluttering your Flickr photo stream...

Why don't you give me your Photo Bucket code so I can copy and paste that?
Bandwidth, my friends. If your first experience on the internet was Flickr (like me!) it's hard to understand bandwidth. Flickr gives you unlimited bandwidth, for free, which means if a gazillion people want to look at your pictures, a gazillion people can look at your pictures with no extra charge to you. But in the real world, bandwidth costs money! Ever visit a popular blog that posts a notice that they've exceeded their bandwidth? This means they are on a paid hosting site (like Typepad or others) and they've exceeded their allowed monthly traffic.

I Don't Want to Exceed My Bandwidth!
Photo Bucket works in a similar way, but you don't get a big ol' bill when you exceed your bandwidth. They just yank the rug out from under you, so to speak, and instead of displaying your image, there's a little image saying you exceeded your bandwidth. Their limits are really high and it seems hard to go over. But if I give you the code, you give somebody else the code, and they give it to their family and pets, between all of us sharing the same image we'll definitely exceed my bandwidth!
More on bandwidth and bandwidth stealing.

Next week: Taking Better Pictures of Your Crafts

Leave a comment with any questions or email me!

All Crafty Blog School Posts:
week 1: Where Do I Blog?
week 2: Choosing a Template
week 3: Name Your Blog & Create a Header
week 4: Blogging Photos from Flickr
week 5: How to Put that Darned Thimble Guy in Your Sidebar
week 6: How to Take Better Pictures of Your Crafts
week 7: Getting Noticed

Hi, I'm floresita, editor of Feeling Stitchy. I'm an avid stitcher, knitter, and crafter. You can see more of my stitching on Instagram and my blog. My vintage transfer collection is on Vintage Transfer Finds.

Feel free to email me with any ideas for the blog!

June 11, 2007

Interview with Geninne


Q. Geninne, when did you know you wanted to become an artist?

A. My parents say that coloring and drawing was my favorite thing to do since I was two years old. A big box of Crayola crayons was paradise! I guess I've known that arts & crafts was my thing since I was very little. Art/Craft class was always my favorite at school.

Q. How long have you been embroidering and how did you get started?

A. I inherited my grandma's love for embroidery since I was a kid, she worked professionally in New York embroidering fancy cocktail dresses. I started embroidering in school when I was about 11 years old. I was in a British all girls school in Chile at the time. My classmates and I were very much into sewing and knitting our own sweaters for the winter. We had a wonderful teacher that showed us how to make lots of things for our dolls. I wish I still had all the beautiful things we embroidered at school.

Q. What is your primary medium of work? Do you feel that embroidery is another medium of art for you?

A. I definitely think that embroidery is just another way to express myself. I love to embroider my own designs as much as I enjoy doing my watercolors. I'm always doing something with my hands like painting,sewing, cooking, etc...

Q. What inspires you to create?

A. My inspiration comes from all sorts of places, primarily from nature. I live in a beautiful wooded area so I'm surrounded by all sorts of cute little birds, flowers, and trees. My kids are my everyday inspiration as well.

Q. So tell me anything about your embroidered totes, they are great and admired by many. You have made a few but one can never have too many totes, right?

A. Lots of people have asked me what I use all those totes for... The truth is I only have a couple of them because I always end up giving them as gifts to friends and family. I love them because they're just so darn easy to make and so useful. Function and beauty are great partners in my book. I keep one in kitchen for my baked whole wheat bread and I have another one with my current knitting project.

Q. You have beautiful pictures of your home on flickr; your home is as wonderful as your artwork, they seem to reflect each other. Do you try to surround yourself with art or objects that make you feel creative?

A. Thank you so much. Creating a comfortable and beautiful nest is very important to us. Decorating is just another way of expressing our design sensibility. I like to keep things clean and simple and let all the surrounding natural elements inspire my work.

Q. What is an average day like for you?

A. My average day involves home-schooling my two boys, cooking, organizing, going for walks, and spending every spare time I have doing the things that I love, like painting, doing crafts and freelance illustration work. I spend a lot of time at home.

Q. Do you read any crafty blogs or view any crafty web sights? If so, would you share some of your favorite spots to visit?

A. Hoo boy, there is so much inspiration on the web! One of my favorite craft blogs is The Purl Bee and Feeling Stitchy, of course :). I mostly visit illustration and decoration sites but my crafty fix comes from Flickr, there are so many crafty girls out there doing wonderful stuff.

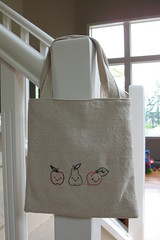
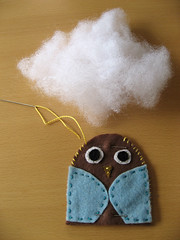
This is something I designed for one of my totes. I love using chain stitch because it makes nice neat lines. The flowers were made using lazy daisy stitch and a little french knot for the center.

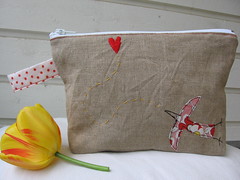
This is a tree I made for a pillow case using chain
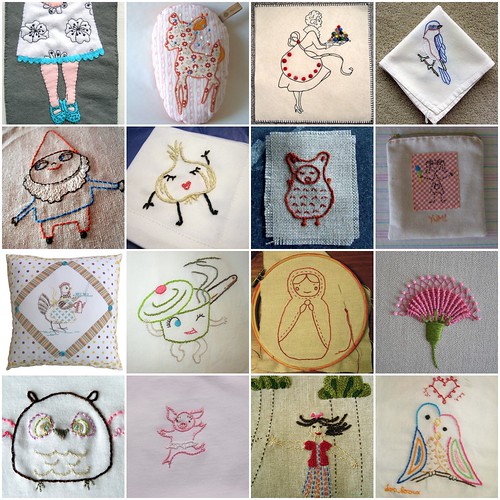
 stitch again. I used cotton DMC floss on a wool blend fabric. I can't wait to get my hands on some linen embroidery thread and work on natural linen fabric.
-
To see more of Geninne, visit her blog, Geninne's Art Blog, and her view her photos at Flickr.

A big thanks goes out to Geninne! We appreciate getting a glimpse of your life as a stitcher and artist.

June 7, 2007

Crafty Blog School: Blogging Photos from Flickr

Crafty Blog School, a 2007 series of posts on blogging for Feeling Stitchy by floresitaWelcome to Week 4 of Crafty Blog School - today I'll show you how to blog photos from Flickr.
I'll also go over a trickier aspect of blogging on the internet, and that is, blogging someone else's Flickr photos... So, let's get started!
2 Ways to Blog Photos From Flickr
1) Cut and Paste Code from Flickr
  1. Log in to Flickr, and find the photo you want to blog.
  2. Just above the photo, click on "All Sizes"
  3. Choose a size from the top where it says "Available Sizes"
  4. Scroll down to where it says "Copy and paste this HTML into your webpage:" and copy and paste the code into your blog post!
    under a white cloud (small size)

2) Set up Blogging from Your Flickr Account Page
  1. Log in to Flickr, and go to your blogs page
  2. Add your blog information, and configure the size and layout of your photos.
  3. Once your blog is set up, return to your pics, and click "Blog This" just above your photo
  4. Fill in a title, and the body of your post, and voila, you've blogged a photo!


    under a white cloud
    Originally uploaded by floresita.
Blogging Other People's Flickr Photos
Now, here comes the tricky part! Let's say you've found a really great photo in someone else's Flickr stream and you're dying to blog it. You click "All sizes", and copy and paste the code or just click "Blog This." But, do you have this nagging feeling that maybe you've done something wrong? Are you scared they'll chase you down and accuse you of stealing their photo?
Photo Blogging "Nettiquette": Is Blogging Stealing?
Most people view it as a compliment when someone blogs their photo, and are flattered. But be aware that not everyone is flattered! Some people don't know that people can blog their Flickr photos, and they're not comfortable with it. Other people may even accuse you of stealing their work! But, if you use the 2 methods I showed you above, technically, you've done nothing wrong. The photo is on your blog, but you haven't "stolen" the image because it clearly links back to the user's Flickr stream.
Suggestions for blogging someone else's pics:
  • Blog photos from people who are your contacts, or someone you've traded emails or comments with.
  • Email people you don't know and ask for permission! They'll probably say yes and become a Flickr friend of yours.
  • Always credit the photographer and link back to their Flickr stream, blog, or Etsy store.
  • Never blog a photo to make critical remarks about it. That will make people mad for sure!
What do you think?
I'd love to see what people think on this topic - I've had my crafty pics blogged a few times by people I don't know and I enjoyed it! However, when one of my wardrobe pics was blogged on a porn blog, I definitely was not flattered! To specify who can blog your Flickr pics, go to your Privacy and Permissions page. Always remember that Flickr is a very public place. Post only photos you're comfortable sharing!

Next week: Want to find out how to put this little guy in your sidebar?

Tune in next week to find out!

All The Crafty Blog School Posts:
week 1: Where Do I Blog?
week 2: Choosing a Template
week 3: Name Your Blog & Create a Header
week 4: Blogging Photos from Flickr
week 5: How to Put that Darned Thimble Guy in Your Sidebar
week 6: How to Take Better Pictures of Your Crafts
week 7: Getting Noticed

Hi, I'm floresita, editor of Feeling Stitchy. I'm an avid stitcher, knitter, and crafter. You can see more of my stitching on Instagram and my blog. My vintage transfer collection is on Vintage Transfer Finds.

Feel free to email me with any ideas for the blog!

June 6, 2007

Featured Book: Treasures of Kalocsa

Here is a guest post from Sharon - safischer1 on Flickr. She volunteered a post at the perfect time since our Wednesday blogger is on vacation! Thanks Sharon!

Treasures of Kalocsa

I’ve been looking for a book on Hungarian embroidery (in English) for some time and while Treasures of Kalocsa is not strictly about embroidery, but rather the variety of folk art from this region of eastern Hungary, embroidery certainly figures prominently.


While I have yet to read it cover to cover, I’m pleased that my mom agreed to give this rather pricey ($77 including shipping from Hungary) volume to me as a birthday gift. At least half of the book is devoted to background on the area, the role and development of the folk arts (focused on embroidery and decorative painting). The author Kati Fejer takes you on a tour of the town and profiles the “women and one man” who are involved in continuing this tradition and keeping it current. Some aspects are a bit scholarly and are enhanced if the reader has some knowledge about the history and politics that impact the area.


The book is generously illustrated with full color photographs of gorgeous examples of regional embroidery on clothing, household and religious items in a wider range of styles and color schemes than I was previously aware of, from white on white cutwork and Madeira to riotously colored flat stitched pieces. While there are some drawings and stitch diagrams in the hand embroidery section, I found it to be more of a source of inspiration than a how-to manual. The section on Kalocsa “machine embroidery” (which has NOTHING to do with fancy new-fangled machines and computerized templates) does provide step by step instructions for a unique style which uses a straight stitch machine to create lace like creations in combination with hand embroidery.

Hi, I'm floresita, editor of Feeling Stitchy. I'm an avid stitcher, knitter, and crafter. You can see more of my stitching on Instagram and my blog. My vintage transfer collection is on Vintage Transfer Finds.

Feel free to email me with any ideas for the blog!

June 5, 2007

Technique: Or Nue


Or Nue (or shaded gold) is a form of goldwork embroidery using couching where different colored silk threads are stitched over the metallic base of gold threads to form patterns or designs, often figures or narrative scenes. The finished product is a definite pattern, deliberately stitched so that the metal shows through. The density and placement of the silk over stitching makes the design. The entire design, background and foreground, is stitched, using small upright stitches.

The technique was worked particularly in Belgium, France and the Netherlands in the Middle Ages. Embroiderers in Italy and Flanders developed this technique to an impressive level of sophistication.
Materials Used

  • Gold-covered thread
  • silk couching thread
A basic couching stitch was used. Shading was achieved by the spacing of the silk couching thread over the base of gold thread. The closer together the threads are, the denser or stronger the colour. Spacing the threads further apart gives a softer colour, it also allows more of the base gold thread to show through.
Design

This style of embroidery was particular popular for depicting narrative or figural scenes. Some of the greatest examples of this style involve figures, often taken from religious settings.

Some extant examples are:

June 4, 2007

Embroidered Buttons

The Japanese craft books are filled with wonderful embroidery projects and these buttons are a great example. So why not make a quick and simple embroidered button?


Here is an easy method I used to make my button:

1. Choose a shank button that will be large enough for your embroidered design.

2. Use a piece of scrap fabric, lay your button on it, and draw a circle around the button about one centimeter or so away from the edge. This measurement will vary so you just want to make sure that the circle will cover all of the front and most of the back of the button.

3. Cut out the circle drawn on the scrap fabric, measure it to the button, and make sure it fits correctly. Use the scrap as a template for the fabric and embroidered design that will cover the button.

4. After cutting around your embroidered design baste a running stitch about a 1/4 of an inch from the edge. Pull on the end of the thread to gather the stitches and place your button in it. Gather it securely and tie off the thread. Note: You might want to use a strong thread that can withstand the pulling. I chose a hand quilting thread.


Nothing to it! Please feel free to comment if you have any tips for covering buttons, we love to hear from readers!

June 2, 2007

Necessities

I was thinking this week of all the things I *need* when I'm embroidering. Not just the needle and thread, but the extra somethings.

I learned the hard way that the arm of my chair is not the best choice for a pincushion. I like to use a pretty small needle for embroidery and too many times I've unknowingly set something on a needle stuck in the chair and down she went. Ugh.

Small scissors are important, too. I use Fiskars Softouch Micro-Tip Scissors. The smaller the scissors the more control you have. This is important for cutting close to fabric. You don't want to cut the thread AND the fabric.

And the 2 orange capsules? Ibuprofen. If you've ever sat hunched over an embroidery project for hours you know what I'm talking about. And I figure it can only help alleviate a little of the pain from all the times I stab myself with the needle.

So, what are your necessities?
SITE DESIGN BY RYLEE BLAKE DESIGNS