
 Welcome to the 6th (and final?) Crafty Blog School post - today I'll show you simple ways to take better pictures of your crafts. Want more Crafty Blog School posts? Just leave a comment with your suggestions, and I'll put as many more together as you want!
Why don't my crafts get the love they deserve?
Let's say you just finished this amazing craft. I mean, you look at it and say to yourself - "this is a freaking work of art, self." You snap a picture, upload it into Flickr or write a blog post and then... nothing happens. No comments, no faves. Absolutely no love for your masterpiece, which is looking sadder and lonelier by the minute. Has this happened to you? If it has, don't be sad or disappointed! Faves and oodles of comments are by no means a measure of greatness - if you love what you made, in my opinion, mission accomplished.
Could it be... the pictures?
Maybe one reason your crafts don't get the love they deserve is the pictures you post of them? You don't have to be a professional photographer with an expensive camera, or a Photoshop wiz with mad computer skills! There are a few simple things anybody can do to make their pictures better. I promise anybody can do it, and that means you too!
How to Take Better Pictures
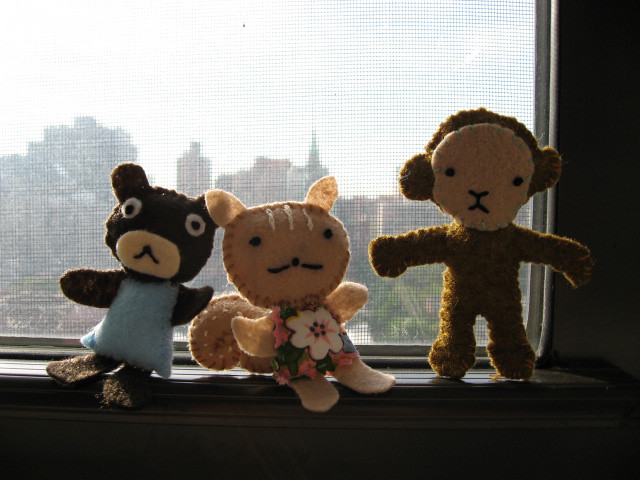
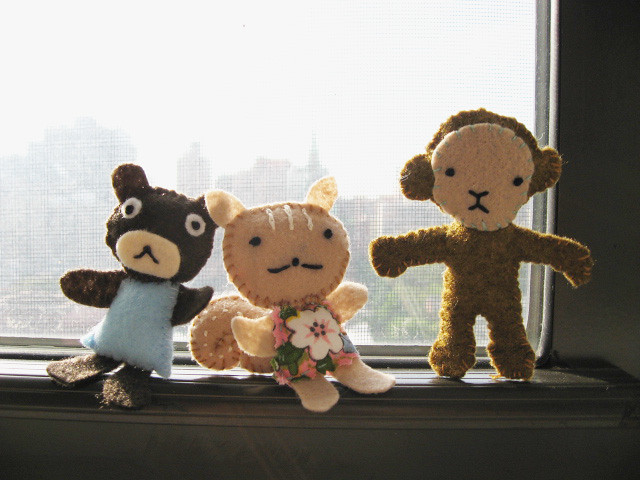
- Always use daylight to take your pictures - try snapping pics of your crafts outside or by a bright window.
- Turn off that flash! It creates a nasty glare on your stuff, especially if it's bright or reflective.
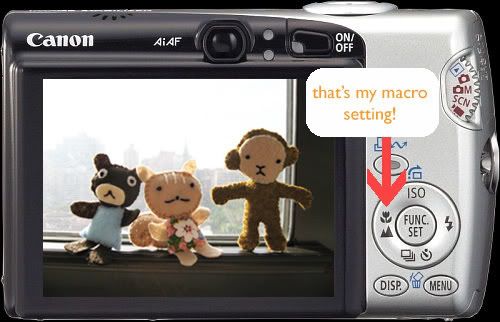
- Use your macro setting for close-ups! (Don't know where your macro setting is? Almost all digital cameras have it- usually it's a little flower symbol... mine looks like this)
- Put your crafts in fun and interesting settings - here are just a few examples...
Advanced: How to Tweak Your Pictures in Photoshop
These 2 tweaks can make any picture look better! For example, this picture is way too dark:

- Adjust levels: how do I do that?
Sometimes this does the trick - but our pic is still too dark, so now we'll...
- Adjust brightness using Screen: how do I do that?
Done! Yay!
That's All, Folks
Well, that does it for Crafty Blog School! I hope you enjoyed all the posts, learned a little something, or were inspired to try something new. This doesn't have to be the last post, I'm just tapped out for ideas... Let me know if there's something you'd like to see!
All The Crafty Blog School Posts:
week 1: Where Do I Blog?
week 2: Choosing a Template
week 3: Name Your Blog & Create a Header
week 4: Blogging Photos from Flickr
week 5: How to Put that Darned Thimble Guy in Your Sidebar
week 6: How to Take Better Pictures of Your Crafts
week 7: Getting Noticed


Thanks for the awesome tutorials. It has been interesting to read yoru recommendations. I started a blog in January, but I'm still trying to get noticed. Perhaps a post on how to get your site linked, listed in blogrolls, and popping up on Google. I've created some unique tutorials on my site, but when I google either the title of the tutorials, or some simple combinations of words, I don't get any hits.
ReplyDeleteThank you, thank you! This has been very helpful, when I get a chance I will refer to your tutorials. My blog needs help, but there are other matters that are in the way of me having fun on the computer lately. Thanks again.
ReplyDeleteThat's it! I can't love without photoshop any more!
ReplyDeleteOh, my...I do need this. Of course I have to get back to making something soon.
ReplyDeleteThanks so for the help. I am going to put these into practice.
Thanks!
Thanks kneek - I'm glad you found these helpful! And wow, you do have some awesome tutorials on your blog! I will brainstorm on the "get your blog noticed" topic!!!
ReplyDeleteThanks billie - glad you enjoyed these posts!
Ha ha Susie - would you believe those 2 things I showed are the only thing I do in Photoshop? But, there's still no online software around that can do what Photoshop does. Buy a cheapo version, you can't go wrong!
Thanks ellen! Happy crafting!
Very nice! Thanks so much for sharing these tips. :)
ReplyDeleteI just wanted to say THANK YOU for the tutorials on how to make your banner. I have always wanted to make a new banner and new knew how to do it.
ReplyDeleteSO THANK YOU SO MUCH, I really enjoyed your lessons.
Thanks for this!
ReplyDeleteI agree with kneek, it would be great to see some tips on how to get my new blog noticed. Also, as new blogger, I'm not sure of the blogging etiquette. I've posted a few times to basically say "check out this cool ______ I found on such-and-such blog," with a link. I like to include one or two of their photos to entice my readers to link over, but I'm not sure if I can do that without asking them first, so I'm trying to email them all for permission. Not every blog has contact info, though, and some of them have a copyright notice, which I take to mean "don't use my photos." Does that still hold true if I'm only using them to advertise the original blog?
I can't figure out how to use trackbacks either...
I know it's been a year since you posted this, but I just want to say THANK YOU. I've been trying to figure out how to make a blog for my own crafts, and this definitely gave me the help (and the push) I needed to get started. Thanks!
ReplyDeleteGreat series of tutorials! I've just started blogging and this was a big help. Thanks :)
ReplyDeleteSuch a wonderful tutorial! Very helpful. I have put a link in my recent post to this tutorial. If this is not proper blog etiquette please let me know and I will remedy it! Thank you so much!
ReplyDeleteThis tips helps me how to take better pictures also very helpful tutorial for me.
ReplyDeleteCanvas Prints uk
yeah that happens ): after finishing a craft, or a piece of work that I love, I feel sad when i post it up and nothing happens! ): thank you for this tutorial, maybe its the pictures that are not taken well enough.
ReplyDeletethanks! :)
I know I'm a bit late to the party, but I just wanted to say thank you for such a lovely series of posts. I'm in the process of setting up my own blog and there are some really good pointers in here (especially about custom headers - I'll bear that in mind!)
ReplyDeleteAlso, what about the GIMP as a free alternative to photoshop? It doesn't have quite the same functionality, but I'm pretty sure you can adjust levels and lighten things in it. And it's free - can't really go wrong with that :)