July 21, 2012

July Stitch Along


Summer Blooms
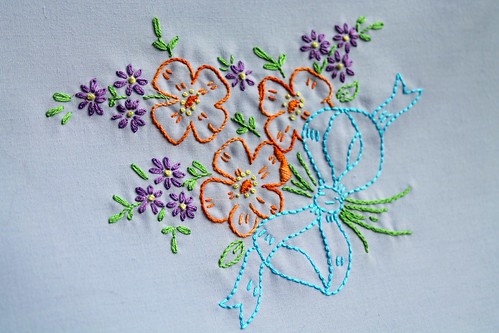
I love what Lisa did with the flowers from this month's stitch along. The colors are so beautiful! Thanks for joining in on the fun, Lisa! Check out her blog for more details.

I am busy stitching the bees-what are you stitching up? Are you almost done? Show us your stitching!

July 19, 2012

Arraiolos needlewomen - connecting the house to the street

Olá! This week I'm going to talk about the needlewomen that create Arraiolos Carpets and Tapestries, one of the most famous embroidery traditions in Portugal. Its name comes from a very beautiful village in Alentejo, a region in the south of Portugal. And I could not find a better way to begin than translating a piece of a school work done by very small children that live there, in Arraiolos. I'll try to remain faithful to their words...

"An embroiderer is the woman who embroiders rugs and must have patience and ingenuity. The visitor that comes to Arraiolos will easily find women and girls embroidering rugs at the doorstep of their homes. In ancient times, embroiderers copied directly from the patterns that were hanging on the wall ahead. Nowadays they copy down the pattern from a graph paper. There would be no Arraiolos Carpets without embroiderers. A resourceful and experienced embroiderer needs 15 days to complete one square meter."(1)

Drawing representing a needlewoman from Arraiolos made by the authors of the text

Arraiolos is type of counted thread embroidery using wool thread on fabric which can be jute or linen. The world-famous Arraiolos Stitch is a long-armed cross-stitch, the basis of the technique used in making these carpets, but it was not born there. The first documentation on the use of this technique comes from the 12th century in Spain, while the first reference to a rug made in Arraiolos dates to 1598. Only later this stitch gained the "Arraiolos" designation but nowadays it is known as that almost everywhere.

And history tells us more... The first embroiderers of these rugs were middle class women, living in the urban area of Arraiolos for whom embroidery was a domestic and not commercial activity.

Arraiolos-Portugal
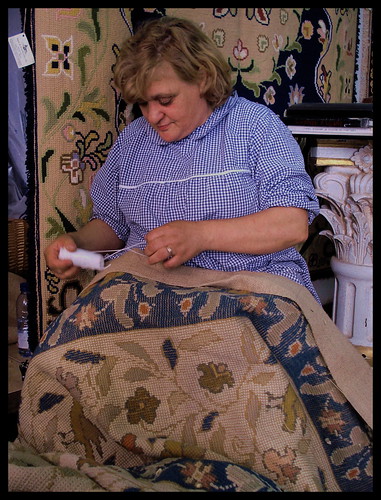
Needlewoman from Arraiolos, photo by Cida Garcia

But how is that we find such an impressive craft treasure from long long ago in a small village, far from the capital? History explains it...
With the expelling of Jews and Moors from Spain by the Catholic kings and the beginning of the exodus, along with the temporary settlement of these peoples in Portugal, until 1511 -- when Manuel I forced them to resume their journey to the north of Africa -- various people decided to settle down in Arraiolos, due to the warm welcome, the abundance of herds, of excellent wool and the diversity of plants, indispensable to the dying and making of canvas, together with the sensitivity and work capacity of the villagers. (2)


ARRAIOLOS, BORDADOS
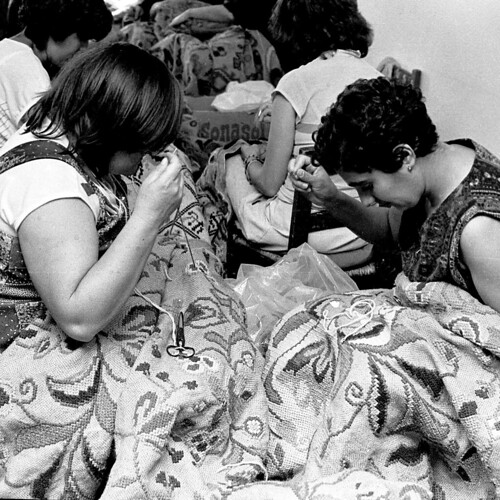
Women embroidering, photo by Fernando Ricardo

Documents also show that in addition to the local importance of wool production, there was an intensive textile activity with the presence of many professionals needed to the rug's execution. It was known that carpets were made by Jews and Moors in Lisbon before they left the town. So it is plausible that the coincidence of experienced carpet makers joining the materials and textile professionals gave birth to this treasure of Portuguese culture.

However...In the end of the 19th century, the making of Arraiolos rugs practically did not exist... With the beginning of the 20th century, the "rebirth" of the Arraiolos rugs occurs -- a group of women from the village recreated models, based on those which, in different eras, had been unsurpassed examples of the Arraiolos rugs, thus creating a new era.(2)


"O tapete está na rua"
An Arraiolos Carpet in the street, photo by Rosa dos Ventos

Recently in Arraiolos a monument was built paying homage to Arraiolos' needlewomen. The author of the monument justifies it:
"(the embroiderers) patiently dominated the motifs of birds, flowers, medallions, geometrical bars, developing a decorative art that settled in the daily life of population. Carpets are intimately related to the way of life and sociability of Arraiolos providing unique moments of familiarity: we see groups of women sitting in the shade of the houses and walls, in the long and bright days, patiently embroidering rugs then installed in the interior of homes. The needlewomen are, still today, the foundation of a cultural circuit that connects the house to the street and Arraiolos to the rest of the world."

Embroiderers in the streets of Arraiolos, photo from here

Let me end with a legend, the Forever Bride, which show us how rugs are so deeply rooted in local traditions.
There was a young damsel who was engaged at the time when there was ongoing wars between the Christians and the Moors. As the village was attacked, her betrothed had to leave for combat. It was a long time before the groom returned and grieving at the loss of youth it took him a long time to resurface. When the bride eventually showed up for the wedding, she covered herself with a rug to hide the marks of time. (3)

Arraiolos
Arraiolos Carpets in the streets of the village, photo by Rosa dos Ventos
Now talking about new Portuguese words... Tapete means rug and tapeçaria means tapestry...

(This "story" on Arraiolos Carpets History is not closed. Other theories have been proposed and new evidence were discovered - here and here you'll find more information.)

July 18, 2012

Galaga Sampler

Galaga cross stitched
Stitched by NDBex

This Galaga sampler blows my mind. Just looking at it, my palms get sweaty and I'm 7 years old, one quarter in hand, getting ready to wipe out in 1 minute. This sampler would be right up my alley as I'm 100% better at embroidery than I am at video games.

Awesome work, Bex! You can see more of her creations in her shop.

Hi, I'm floresita, editor of Feeling Stitchy. I'm an avid stitcher, knitter, and crafter. You can see more of my stitching on Instagram and my blog. My vintage transfer collection is on Vintage Transfer Finds.

Feel free to email me with any ideas for the blog!

July 17, 2012

Tutorial Tuesday

Happy Tuesday, everyone!

Today's tutorial is a way to toast the summer evenings, have a tasty beverage, and keep track of the time. An embroidered clock made using an embroidery hoop surely means it's time for happy hour!


To make this clock, you'll need:

-7-inch embroidery hoop
-fabric of choice with your embroidery
-felt
-quilt batting
-cardboard
-a clock kit (found this one for $10 at the craft store)
-hot glue gun and glue sticks
-box cutter
-scissors
-pencil

I used some patterns from Jenny Hart's Embroidered Effects book. Copies of her book (along with other fantastic stitching patterns and accessories) can be found in her shop at Sublime Stitching.


Once you have all these items ready, it's time to get started!

Step 1: Begin by setting up your embroidery patterns within the hoop. Mark the four areas of the clock at 12, 3, 6, and 9, and stitch. I used my own hand writing for the "happy hour," which is why it's a little crooked, but that's okay.


Sorry this photo came out a little awkward. It started to rain and I couldn't seem to get the lighting right. I am hoping you can see where I marked the four areas of the clock to indicate the 12, 3, 6, 9.


Once you have your stitching ready, it's time to add the layers of batting, felt, and cardboard.


Step 2: Take apart your finished embroidered item and use the inside section of your embroidery hoop to trace the inside of the circle onto a piece of card board (Sorry, forgot to take a picture of the cardboard at this stage). Use that as a template to cut the same size circle out of two pieces each of the felt and batting.


Step 3: Put your stitched piece of fabric back into the hoop and find the center. Use your box cutter to cut a small X shape right in the middle.


Do the same thing for one piece of felt, two pieces of batting, and one piece of cardboard.

Step 4: Layer one piece of felt, the two pieces of batting, and the cardboard into the back of the hoop, right behind your stitches.  Use the pencil to push through each layer and make sure the holes are centered. Pull the fabric over the cardboard and hot glue into place.


You may want to trim your fabric a little more. I was apprehensive to cut too much off.


Step 5: Take the second piece of felt and hot glue it to the back to cover the cardboard and folds of fabric, making sure to cut a small hole in the center to match the holes with the rest of the layers.


Step 6: Take the clock kit out of its packaging. Remove the nut from the clock contraption and push it through the layers of fabric and cardboard.


My kit did not come with instructions, if the same thing happens to you, layer the components with the nut first, to tighten the clock on the base you have created.


Next, place the hour hand and the minute hand on the base. Screw the small gear-like nut on top of that.


Then place the second hand on last. It should look something like this now.


Step 7: Add a battery and set the time.


Step 8: Use the hook on the clock component to hang on the wall and enjoy!


I hope you enjoy this tutorial. I used a Happy Hour theme, but you could use any image or theme you like. I thought it might be good to use one of the July stitch along images for this, too. Hope you give it a try.
Cheers!

Hi, I'm Kristen! I am a lover of all things stitchy and crafty. I have been sewing for as long as I can remember. My grandmother taught me how to sew Barbie clothes when I was young and I have been sewing ever since.

You can find me at Bobbypin Bandit, on Instagram, and my Etsy shop.

July 15, 2012

Patterns: Four Seasons Embroidery

Four seasons embroidery patterns by SeptemberHouse

Is it too early to think about Christmas stitching? I can hear everyone groaning from here. Ok, so this may be one to download to save for a little later but I think this free embroidery pattern by SeptemberHouse not only goes fantastically on top of her fabric calendars but it would also look good on so many other things to.


Hi, I'm Jo - I feature new embroidery patterns Sundays on Feeling Stitchy. I also post on our Twitter and Pinterest.

Is there a new pattern you'd like us feature? Email me!

July 14, 2012

Are You Stitching Yet?

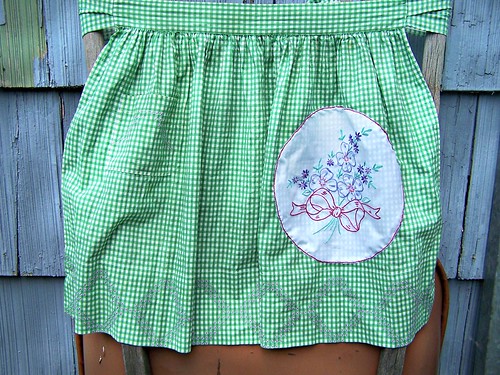
The July Stitch Along is under way. Have you picked a pattern and started stitching? I decided to stitch the patterns in order. This week, I embroidered the flower bouquet. I forgot I had this great apron that was just dying to have something added to it. I love the way it turned out.

Feeling Stitchy July 2012 Stitch Along


I can't wait to see what everyone stitches up! C'mon guys! Don't leave me hanging!

July 12, 2012

Portuguese Fiancé kerchiefs

Olá! This week I’ll continue talking about Minho embroiderers, showing how feelings inspired their ingenious work. Did you know that a piece of embroidery can be a love letter? That's what happens with Portuguese "fiancé kerchiefs"...

I believe that nowadays the “fiancé kerchiefs” are the only kind of Portuguese traditional embroidery that all Portuguese people know and care about. Maybe I’m being too harsh, but for better or worse, fiancé kerchiefs became fashionable!

Let’s try to understand the history behind them… Many, many years ago, when a girl was close to marrying age she made an embroidered handkerchief of fine linen or cotton cloth. To carry out this work, the girl used the knowledge she had acquired about cross-stitch in childhood. The handkerchief was proof of the embroiderer's devotion to the man she was in love with and was, for such a purpose, offered to him, the 'boyfriend'. It was in accordance with his attitude of using or not using it publicly, over his Sunday best suit or as neckerchief, that the dawning of a love connection was decided.

Cortejo Etnográfico das festas de Nossa Senhora da Agonia em Viana do Castelo -Portugal
A reproduction of original cross stitch kerchiefs, photo by Cida Garcia

Originally they were embroidered using cross-stitch in red and black. But as it was very time consuming, representing weeks and sometimes months of patient evenings spent by the embroiderer, girls were compelled to find a quicker way of doing it. So, with time, free embroidery stitches replaced cross-stitch and many other colors were added to the red and black, bringing much more folklore; but the feeling behind them remained the same, along with their primitive symbology, too.


Lenço de Namorados
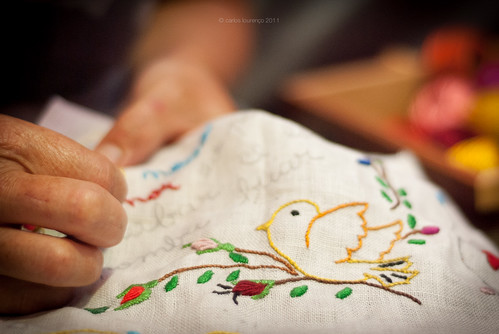
Embroidering a fiancé kerchief, photo by Carlos Lourenço

The kerchiefs have portrayed various kinds of sentiments felt by marriageable girls, expressed through symbols of faithfulness or religious devotion in regard to the wedding act, and through quatrains that in most cases reveal the illiteracy of the embroiderers, as bad spelling or misspellings were common. Here you have a quatrain that I tried to translate... I know I cannot be faithful to the genuine beauty of these words and above all to their simplicity, but I did my best!!

Escreve-me, amor, escreve.
Lá do meio do caminho;
Se não achares papel,
Nas asas de um passarinho.

Write to me, my love, write to me
In the middle of the way;
If you don’t find a sheet of paper
Write on the wings of a little bird.


Recently the fiancé kerchief became the symbol of another kind of love: the people’s love for their culture and traditions. In 2009 the initiative of joining together to embroider a giant fiancé kerchief was born in order to attract public attention to the government's intention of replacing the Museum of Folk Art, that had been closed and abandoned for many years. The objective was achieved, the Museum was not closed, and nowadays this kerchief is a part of the Museum. You'll find a video on this great initiative here... The meaning of the embroidered words is (more or less...): Museum of folk art, without you what will I be. You want to replace me by another one, but still you will regret. (In Portuguese these are rhymes and some words are intentionally misspelled)
LENÇO NAMORADOS MAP
The giant fiancé kerchief embroidered by many hands, photo from this blog

*You can find more about fiancé kerchiefs here... (scroll down to read in English)

July 8, 2012

Patterns: Mythical, Magical & Oh so Cuteness!


I love this cute trio, stitched up by 1.2.Stitcharoo, the captions she's added are fabulous and the crayon tinting is brilliant! You can find the patterns here on Urban Threads.

Hi, I'm Jo - I feature new embroidery patterns Sundays on Feeling Stitchy. I also post on our Twitter and Pinterest.

Is there a new pattern you'd like us feature? Email me!

July 7, 2012

July Stitch Along

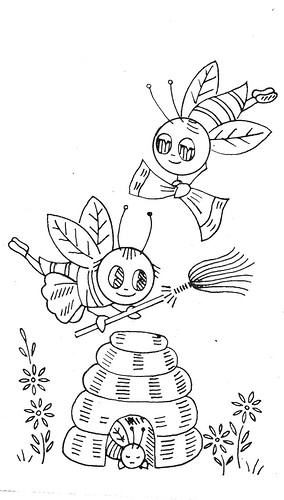
Yahoo! Summer is here! The temperature is off the charts! This month's stitch along is all about summer and the joys it brings...of course in typical Pam style..vintage patterns!


One of my favorite things about summer are all the beautiful flowers in bloom.
SCAN0341

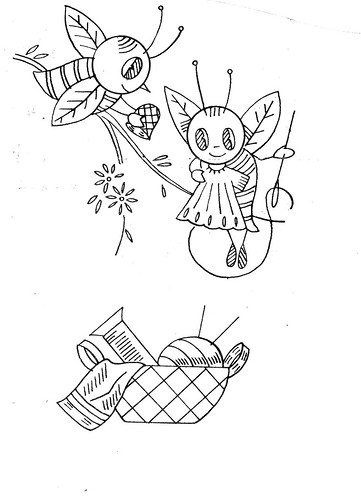
Everyone knows that summer flowers bring bees! I love bees! They help pollinate the world and who knew they were so good at stitching?

SCAN0342

SCAN0343

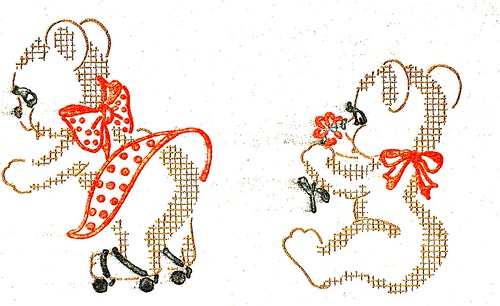
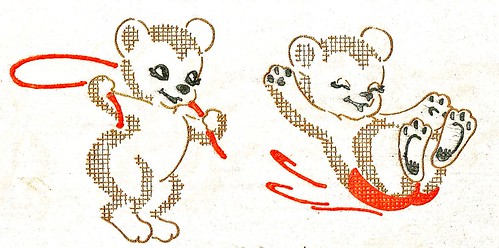
Of course the bees and their honey bring out bears...on roller skates. These bears are having too much fun in the sun!

Bear pattern for Feeling Stitchy Stitch Along

SCAN0344

These patterns are so much fun and would look great on a tea towel, kid's clothes or even a quilt. Use your imagination! Combine them or alter them, it's totally up to you!

Don't forget to tag your photos July Stitchalong2012 and add them to the Embroidery Group on Flickr.  I love seeing in progress shots, so post those too! Through out the month I'll be featuring your photos. Have fun in the sun stichin'.

July 5, 2012

Sweet stitches

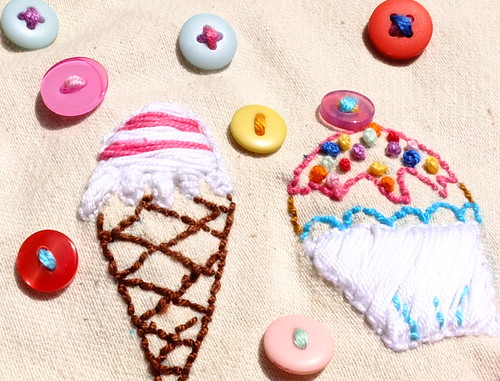
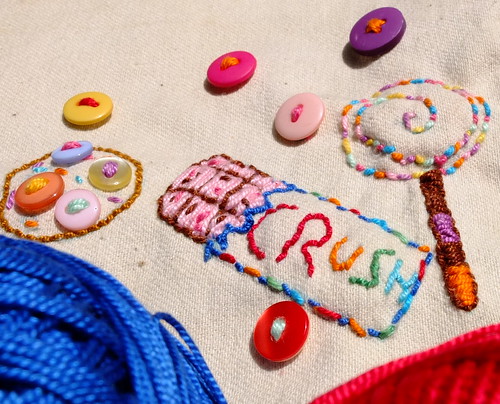
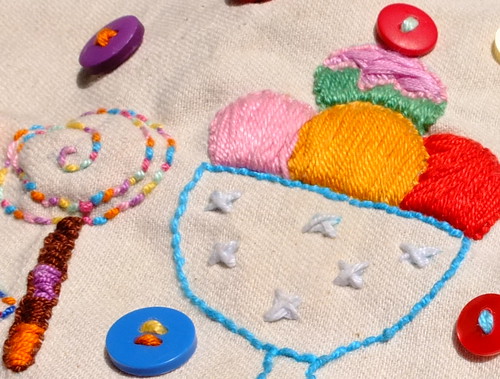
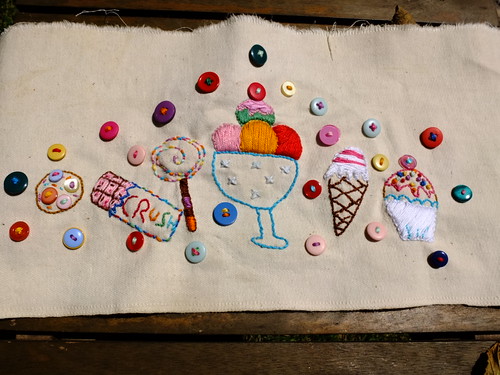
Olá! This week I have special stitches to show you... Very sweet stitches...
I believe they have a Portuguese soul once they were made by very little hands belonging to a 9 years old Portuguese child.

The last two weeks I was out of town, working far away from home... (Sorry for not posting last Thursday...)

Yesterday, when I arrived, I had this surprise waiting for me! My youngest daughter made this piece of embroidery by herself... The drawing is hers... Stitched by her little hands... I can assure I was not there to help her!

Ice cream and Cupcake made by my daughter

Chocolate and lollipop made by my daughter

Ice cream and lollipop made by my daughter

I'm so proud that I couldn't resist to publish her work... I hope you like it!!

For our Portuguese class I've chosen two great words... Mother and daughter - "mãe" and "filha".

Wish you all a sweet week!

So sweet... (made by my daughter)

July 4, 2012

Patriotic Embroideries


Look at these wonderful, WWII-era embroideries! I believe they were up for auction on ebay some time ago. Tend that victory garden! Do your duty! Go to it! Happy Fourth of July, everyone!

found via Anonymous Works (there are more photos!)

Way Back Wednesday

I am hosting the stitch along this month. I can't wait to get started! Don't forget to come back this Saturday to see what we are doing. Can't wait until Saturday....here's a little hint.

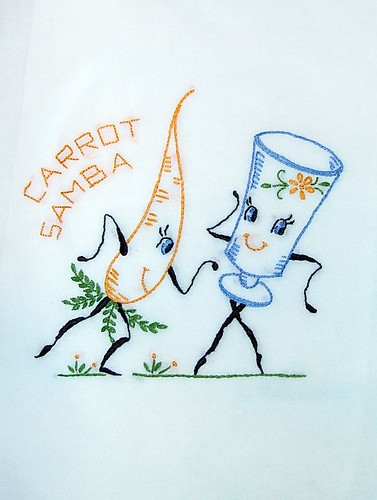
CARROT SAMBA - Hand embroidered flour sack tea towel with vintage embroidery design


Needle-n-Me's cute carrot samba will fit right in for the stitch along.


See ya on Saturday for the big unveiling!

July 3, 2012

Tutorial Tuesday

Happy Tuesday, Everyone!

This week's tutorial has quickly become one of my favorite items to use. When I am on my bike, I have to be able to have quick access to my bike lock, water, keys, and sometimes a cell phone. Occasionally there's an impromptu stop at the Thursday Farmer's Market, and if I buy some fruit or flowers, I need somewhere to put them so they don't get crunched or bruised in my backpack. A basket helps out in that department, and now I have a cute bicycle basket liner to tote my items in.


My goal with these tutorials is to help you find unique and fun ways to infuse embroidery into different places, so I added some embroidery to this bike basket liner. You can add any image or words you like, but I used the word bicycle in French. If you would like to use my handwriting as a template it's available for you, here.

A note before we begin: My bike basket is sort of awkwardly shaped, it isn't round or oval, and it isn't square either, it's an odd combination of all of the above. If you have a completely oval basket, you may want to omit the sides and use the front, back, and bottom panels. If you have a square shaped basket, you may want to omit the angles I have here.

If you're up to trying this out, here's what you'll need for a double-sided/ reversible bike basket liner:
-Paper
-Measuring tape
-Pencil
-Pins
-Fabric (a yard and a half will be enough)
-Ribbon or seam binding (3 yards)
-Sewing machine with thread and needles
-Embroidery floss, hoop, and needle

I also used a rotary cutter and a cutting mat, but if you don't have one, make sure you protect the table or work surface you'll be cutting on.

** I used a 1/2 inch seam allowance for all sewing machine stitches, unless otherwise noted.**


Step 1: Create a pattern using the paper and your basket. Lay the basket directly on a piece of paper with the middle at the straight edge of the paper and draw along the angle of the outer edge. Cut it with the rotary cutter to create a straight line. You'll be placing this piece on the fold of the fabric in order to create the front and back panels. (My measurements are 7.5 inches across the top, 4.25 inches across the bottom, 11inches long on the straight side, and 11.5 inches long on the angled side).


Step 2: Create a pattern for the base by placing the basket on a piece of paper and trace completely around it. (My measurements are 10 inches across on the wider side, 6.5 inches across the shorter width, and 8 inches deep).


Step 3: Create the last pattern piece for the side of the basket. I biffed it a bit here and placed the basket directly on the fabric. I used the template I had cut from Step 1 to angle this piece.


Step 4: Now you can use your pattern pieces to cut the fabric.

**NOTE: Make sure to add 1-inch around each pattern piece you cut to account for seam allowances.**
For a double-sided basket, cut 4 of the front and back panels with the straight edge on the fold of the fabric.
Cut 2 of the bottom pieces.

Cut 4 of the side panels.


Step 5: Time to sew both sides of the bike basket liner. Stitch the front panel to each of the side panels, then stitch those to the back panel, right sides together. I laid this inside of the basket to make sure I got the overhang I wanted.


Step 6: Pin the bottom to the pieces you just sewed, making sure to line up the corners and sides, with right sides together. You can see from mine, that there were some gathers because of the extra inch I added to the pattern. I tried to make pleats at the corners so it wouldn't tug at the corners once I placed it in the basket. Once you have pinned this to your liking, sew it all the way around with a 1/4-inch seam allowance.


Your basket liner should look something like this now.


Step 7: Repeat steps 5 and 6 for the lining, but leave an opening at one of the seams between the back panel and side panel in order to turn the piece once you have connected the two basket liners.


Step 8: Now it's time to add your embroidery. You can add your embroidery prior to cutting your fabric, but I wanted to make sure I measured everything correctly, so I added stitchery at this step in the process. I used a pencil to sketch out the word on the fabric and stitched through with a split stitch.


Step 9: This is where we begin to finish the major part of the bike basket liner and its reverse side. Take one liner and place the other inside of it, right sides together and stitch all the way around. Flip it through the space you left in the side seam.

This is what the outer edge seam will look like after you flip it.


Sew that open seam shut with a stitch close to the edge of the fabric. You could also slip stitch this if you'd like to, I preferred to use the sewing machine for this.


Some baskets don't have handles, but mine does, so I needed to make an opening to account for the handle, and then this required ties. I cover this in the steps that follow.


Step 10: Place the basket liner in the basket and mark the length of the hardware with the basket handle. I cut through both layers of the liner in a squared off angle. Then created a hem all the way around that cut.


You can see that hemmed seam in this image.

Step 11: I used seam binding tape as the ties for liner. I cut the binding in exactly half and stitched the open end. I strung it through the basket liner, placed the liner in the basket and tied it over the basket handle.


Step 12: Enjoy your bike basket liner!


I know there are few steps here, but once you get started they go somewhat quickly. Hope you have a chance to try this out!

Hi, I'm Kristen! I am a lover of all things stitchy and crafty. I have been sewing for as long as I can remember. My grandmother taught me how to sew Barbie clothes when I was young and I have been sewing ever since.
You can find me at Bobbypin Bandit, on Instagram, and my Etsy shop.

SITE DESIGN BY RYLEE BLAKE DESIGNS