Showing posts with label Valentine embroidery. Show all posts

February 13, 2017

MooshieStitch Monday: Valentine's Stitching Project Ideas


I love searching the Feeling Stitchy archives to find inspiration and project ideas.

Recently I searched the blog for Valentine's Day and found some really great tutorials I thought I would share!

But first - here are a few photos of the heart I stitched.


I traced a heart, worked the outline in stem stitch and added detached chain stitches around it for leaves.


Then added a red flower in the center and french knots around the leaves.


Now here are those tutorials I found...

Up first - this Valentine's Day treat bag with a cool negative space heart.

Tutorial Here


Make your self a Cupid's Arrow pin!

Tutorial Here


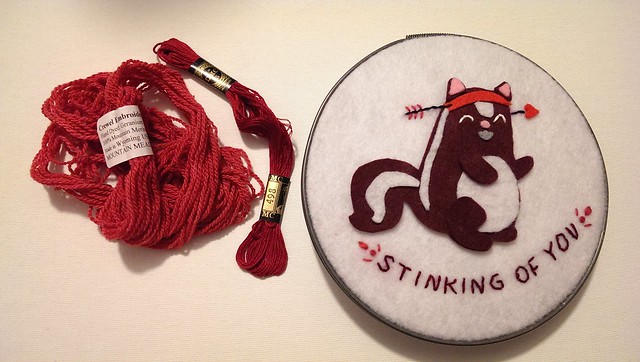
I love this silly skunk pattern  - stitch it up with your own personalized Valentine's Day message!

Find It Here


How about stitching a Valentine's Day coffee cup cozy?

Tutorial Here


Or try experimenting with wire! This "All you need is Love" project looks quick and easy - especially if you already know the couching stitch - and could be also be personalized with your own message.

Tutorial Here


Happy Valentine's Stitching!!


February 11, 2014

Tutorial Tuesday

Hello everyone!

Valentine's Day is quickly approaching and, if you are anything like me, you want to give your loved ones more than just a store-bought card. I decided on embroidering and assembling muslin treat bags to add some handmade love to my Valentine's Day gifts and goodies.


I used negative space embroidery for this treat bag, but I think any little hearts or embellishment would look adorable. 

To make this Valentine's Day treat bag you will need the following supplies: 

- unbleached muslin in two 8x7-inch pieces
- embroidery floss, needles, scissors, and related supplies
- iron and ironing board
- sewing machine and related notions
- scissors
- safety pin

Step One: Transfer a heart shape onto one piece of muslin. I free-handed this heart, but if you prefer to follow a pattern, there are various heart shapes available here


Step Two: Use a running stitch to out line the heart with 3-stranded floss. 


Step Three: Using a seed stitch, fill the space outside of the heart. Overlap the stitches close to the heart, and space them out as you move away from the main heart shape. 


Step Four: Press the two pieces of muslin and place them right sides together. Stitch an 1/4-inch seam allowance around the three sides of muslin, leaving one edge unsewn 2-inches from the top.


Step Five: Keeping the treat bag reversed, fold the top down 1/2-inch and press. Fold down another 1/2-inch and press. Sew along the bottom of this fold to create the area for the drawstring. I changed the bobbin thread in my sewing machine to red to create a contrasting stitch once I reverse the bag out. 

Step Six: Turn the bag inside out and tuck the unsewn edge of the drawstring fold into the bag and press. Take six-stranded floss, knot the end, and attach the safety pin to the knot. Use the safety pin to pull the string through the top of the treat bag. 


Step Seven: Knot the end of the string and your treat bag is ready. 


Step Eight: Add treats and goodies and your treat bag is ready for Valentine's Day!


Hope you enjoy and have a great Valentine's Day!

Hi, I'm Kristen! I am a lover of all things stitchy and crafty. I have been sewing for as long as I can remember. My grandmother taught me how to sew Barbie clothes when I was young and I have been sewing ever since.

You can find me at Bobbypin Bandit, on Instagram, and my Etsy shop.

January 22, 2013

Tutorial Tuesday

Happy Tuesday, everyone! It seems Valentine's Day is everywhere I turn. In order to join in on the Valentine's Day prep, I searched for some vintage embroidery patterns perfect for the day o' love and found some fantastic ones at French-Knots

Once I had decided on which pattern to stitch, I thought it would be cute for a Valentine's Day coffee/tea cup cozy. I used the lazy daisy pattern of the heart with an arrow through it, which is available here. I scaled the pattern down to 35% and printed it to fit the center front of the cozy.


In order to make a Valentine's Day coffee cup cozy of your own or to gift, you'll need the following supplies:

-fabric for front and back of the cozy (approximately 10x5 inches of each)
-embroidery hoop
-embroidery pattern of choice
-embroidery floss (I used DMC floss No.8 in red 666 and Perle Iris No.8 in 5064)
-batting
-2-inches of elastic 
-one button
-sewing machine
-scissors
-iron

Step One: Transfer and stitch your pattern onto your fabric of choice. I scaled down my pattern of choice to 35%, before printing and transferring it to the fabric. 


Step Two: Once your stitching is complete, take the template and place it over your stitches, making sure the stitching is centered. Using the template, cut one of each of the front, back, and batting.


Step Three: Layer the pieces so they can be sewn together starting with the batting, then fabric back right side up, and fabric front with right side down. Take the elastic and form a loop. Place the loop side between the front and back pieces on one of the shorter sides. Pin the three pieces together. Stitch around the edges with a 1/4-inch seam. Make sure to leave a 2-inch space open so you can turn the cozy. 


Step Four: Clip the corners, turn the cozy, and press. 


Step Five: Stitch around the edge of the cozy to finish off the edges and close the space used to turn it right side out. 


Step Six: Place the button on the short edge of the cozy, opposite the side with the elastic, and stitch in place. 


Step Seven: Wrap the cozy around your next coffee or tea cup, and you have instant Valentine's Day flavor.


Hope you enjoy and give this tutorial a try! Have a great day!

Hi, I'm Kristen! I am a lover of all things stitchy and crafty. I have been sewing for as long as I can remember. My grandmother taught me how to sew Barbie clothes when I was young and I have been sewing ever since.

You can find me at Bobbypin Bandit, on Instagram, and my Etsy shop.

SITE DESIGN BY RYLEE BLAKE DESIGNS