Showing posts with label embroidery collage. Show all posts

September 14, 2013

Interview with Artist Olga Ezova-Denisova

I'm not sure how I first stumbled on the beautiful work of artist Olga Ezova-Denisova on Flickr, but her embroidery immediately captivated me. There's something so serene and lovely and composed in her work, and the her stitchwork is just gorgeous. It's an honor to introduce her to you today - I hope you all enjoy this brief interview with Olga!
Dog Franz_Sailor. Collage, fabric, embroidery

How long have you been embroidering?

My first embroidery I made about six months ago. I found very old silk threads my mom bought them in the 80s, and I wanted to make something beautiful with them. I embroidered my first brooches with dogs. One, two, three ... I was very fascinated by the process, and I didn’t expect it to be so beautiful. Since then, embroidery began to appear in my illustrations in combination with collage, and as an independent work.
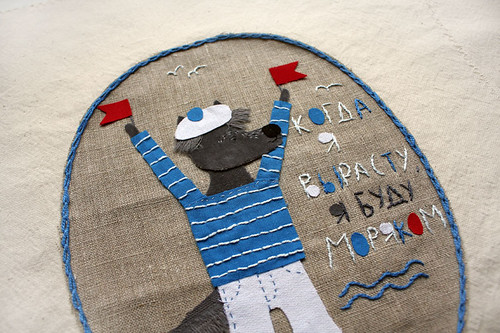

Collage (Fabric, embroidery).

What is it about wolves and dogs that inspires you?

I have long been thinking about it, trying to understand what is that inspires me about these animals. But I don't get it yet. Maybe I'm living with an image that itself has come up with. The image of the animal that defies to be somebody. That is - to be the master of the dog is a challenge for a man. A wolf… The wolf is a dog too, just wild. And this defiance excites me, and awakens something inside me. Although in my pictures there is no defiance, my dogs and wolves are kind, loving, and sometimes melancholic.


brooch

Did you attend art school? If not, would you like to?

No, I didn’t. As a child, I attended art school for children, but, unfortunately, I didn't finish and that is why I couldn’t get a degree in art education.

But I would like to learn, I am open to new knowledge. Most of all I like to study in hands-on workshops with the artists. In Russia I regularly attend creative workshops for illustration and art techniques. My dream is to meet and attend a workshop with some cool artists from America or Europe.


wolf

I love your process shots - so many different tools and artforms! What other types of art do you enjoy?

I enjoy to work in collage-techniques. I love to mix and match different materials: paper, fabric, cutting, embroidery. I like hand-printing techniques like linocut and stamps. I am experimenting with this, and admiring the work of other authors.

In addition to visual arts I like to take pictures. I have an old Soviet film camera Kiev-19. I take it with me on my trips.


wolf and kitten

What is your favorite piece you’ve created, and why?

It's not a very simple question. Every new work as soon as it is finished becomes the most favorite. But maybe most of all I love my collage work, those in which there are mix of textures, fabrics and embroidery, because they are hard work and take so long to create and I get the greatest satisfaction from the result.


Dogs_sailors_Process. Collage, fabric, embroidery


Do you have a favorite color? A favorite thread?

Yes, I have a favorite color. It's blue and its shades. My favorite thread is Iris. Though of course for different tasks I choose different thread.


***

Thank you, Olga, for sharing a little bit about yourself and your inspiring work with our readers!

To see more of Olga's work, visit:
Her blog: http://www.ezovadenisova.blogspot.com
Her Flickr: http://www.flickr.com/photos/ezovadenisova/

Hi, I'm floresita, editor of Feeling Stitchy. I'm an avid stitcher, knitter, and crafter. You can see more of my stitching on Instagram and my blog. My vintage transfer collection is on Vintage Transfer Finds.

Feel free to email me with any ideas for the blog!

September 25, 2012

Tutorial Tuesday


Happy Tuesday, everyone!

This week I have a tutorial for you that can be used for almost any time of year. It is a fabric postcard with an embroidery collage. I decided to make one for my friend, Nick, because he is a wonderful person. I found that it did not take me long to finish this fabric postcard, and I was able to use up some of my fabric stash.

Note: This cannot be sent in the mail as is. It has to be placed in an envelope or hand delivered.


To make this postcard you will need:

-Fabric scraps or two pieces of fabric at 8 inches wide by 6.5 inches high
-1 piece of lightweight interfacing cut to 8 inches by 6.5 inches
-Embroidery floss in various colors
-Embroidery hoop
-Embroidery needles
-Sewing machine
-Rotary cutter or scissors
-Iron

Step 1: I decided to sift through my scraps in order to piece together the front panel of the postcard. I used a piece of paper cut to 8 inches wide by 6.5 inches tall and placed the fabric scraps on it until I found a placement I liked. If you prefer, you can use one piece of fabric instead of scraps or multiple pieces.


The image above is supposed to be the paper I used to keep track of my dimensions. I apologize for the blur. 


Step 2: I stitched together my scraps in order to make a rectangle that fit the 8x6.5 dimensions. I used smaller pieces of fabric as patches, I pressed under the raw egdes and stitched them directly onto the fabric I had pieced together. The cherry embroidery was a test stitch I did using a pattern from a Sublime Stitching starter kit. The kit I used is no longer in print, but you can find some new wonderful ones here: Sublime Stitching kits.


Step 3: This is the fun part! Once the piece of fabric is ready, it can be embellished with as many stitches as you like in order to create the embroidery collage. You can add patterns or allow the stitches to come to you organically. 


Step 4: Once this front panel is finished. It needs a little stability. I used one piece of very lightweight interfacing and basted it to the back of the panel using my sewing machine.


Step 5: Now it is time to work on the back panel. I decided to make this look as much like a postcard as I could. I used a pencil and lightly wrote what I wanted the back to say and stitched it up.


Step 6: Now it is time to attach the front and back panel in order to complete the postcard. Place the front and back panels right sides together. Stitch around the edge using a 1/4 inch seam. Leave a small space unstitched so you can flip the postcard. 


Step 7: Before flipping the postcard, clip the corners as close to the stitch without snipping it. Flip the postcard so the right sides face out and press. 


Step 8: In order to close up the small space I left open, I used a running stitch around the entire piece. I made sure to hide my knotted ends in between the front and back panels where I flipped the postcard.


Step 9: Gift to recipient! 


As I was finishing this up, I was thinking about all the ways this could be used for birthdays, holidays, Valentine's Day, or to ask someone to be a maid of honor or bridesmaid.

Hope you enjoy and give it a try!

Hi, I'm Kristen! I am a lover of all things stitchy and crafty. I have been sewing for as long as I can remember. My grandmother taught me how to sew Barbie clothes when I was young and I have been sewing ever since.

You can find me at Bobbypin Bandit, on Instagram, and my Etsy shop.

SITE DESIGN BY RYLEE BLAKE DESIGNS
