Showing posts with label quilting. Show all posts

June 30, 2019

Book Review: All Points Patchwork by Diane Gilleland

Book review of All Points Patchwork by Diane Gilleland as featured by floresita on Feeling Stitchy

Today I'd like to feature a wonderful book by Diane Gilleland called All Points Patchwork: English Paper Piecing beyond the Hexagon for Quilts & Small Projects. This is a book I purchased myself, and I wanted to share it with you because it is an amazing resource for English paper piecing!

Just so you know, the book link is an Amazon Affiliate link - clicking through the link and buying costs no more for you and is one way to support our volunteer reviews.

Here on Feeling Stitchy, we've been fortunate to receive many books to review over the years. Each one felt like a gift - and I will always be grateful to the authors and publishers who have shared the fruits of their hard work with us. This is not a book we received for review, but it definitely deserves a spotlight, both for the hard work of the author and the absolute gorgeousness of this book. I think it's so gorgeous - I'm giving away 2 copies!

A look at the book

I've seen many craft books over the past 13 years of craft blogging, I think I need to say this is the most beautiful craft book I have ever seen!

All Points Patchwork by Diane Gilleland

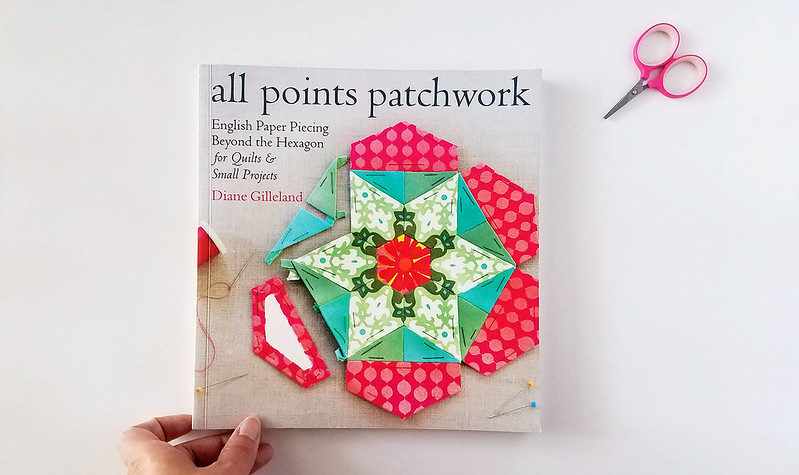
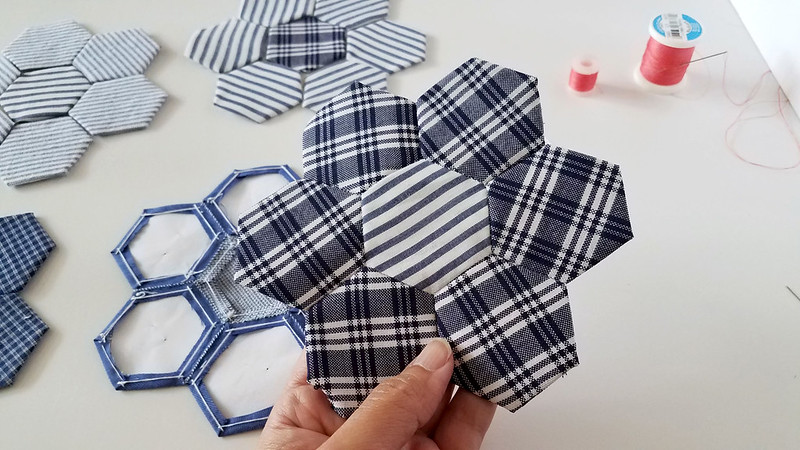
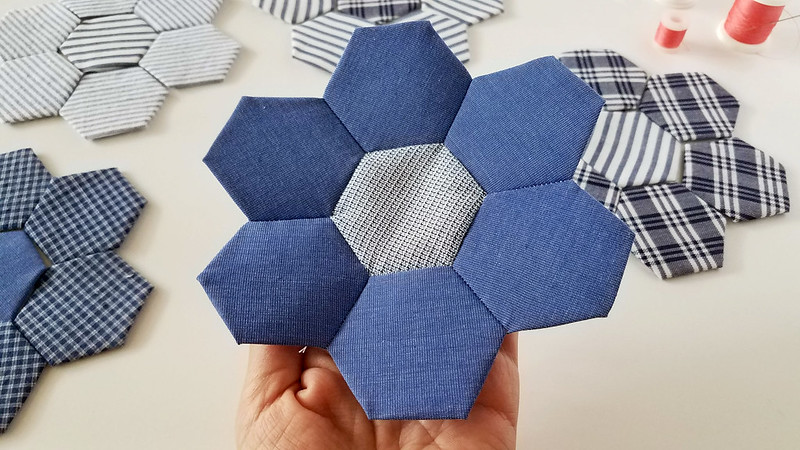
One of my favorite kinds of craft books is the kind that is full of life-sized images of fabrics and tools and projects - you know, the ones that make you feel like you could reach out and grab anything on the page?

All Points Patchwork by Diane Gilleland

The photos in this book are all like that!

All Points Patchwork by Diane Gilleland

Everything is so well laid out and explained - there's nothing intimidating or scary about the process - you get the feeling you are crafting with a a really patient, wonderful friend...

And the colors!

All Points Patchwork by Diane Gilleland

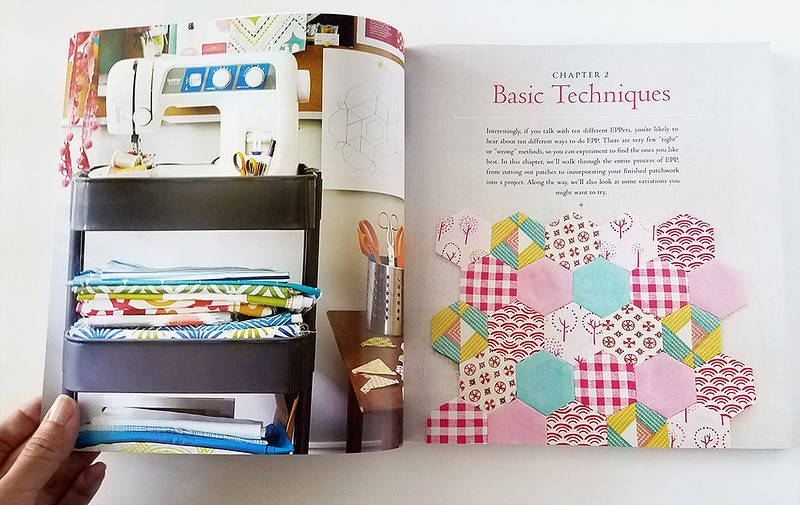
Everything just sings in this book - you get a sense of Diane's natural eye for color and print and texture.

All Points Patchwork by Diane Gilleland

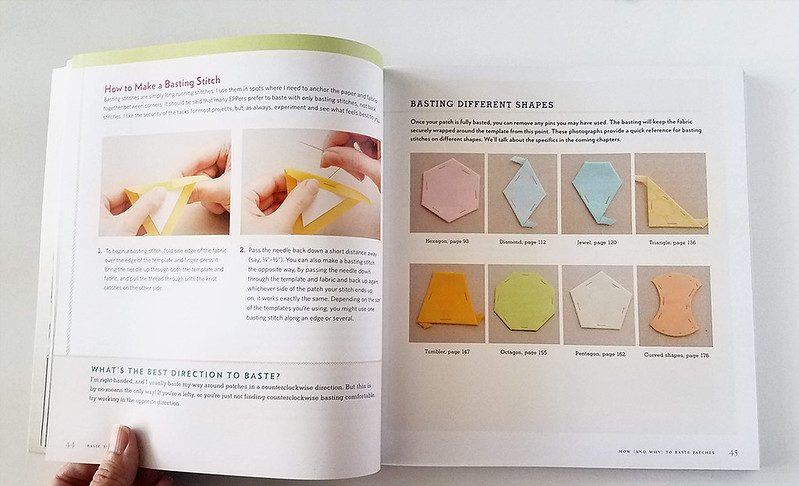
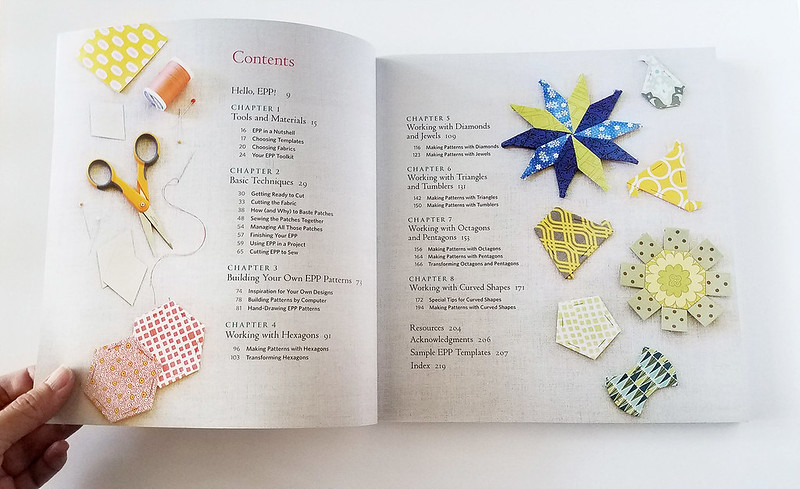
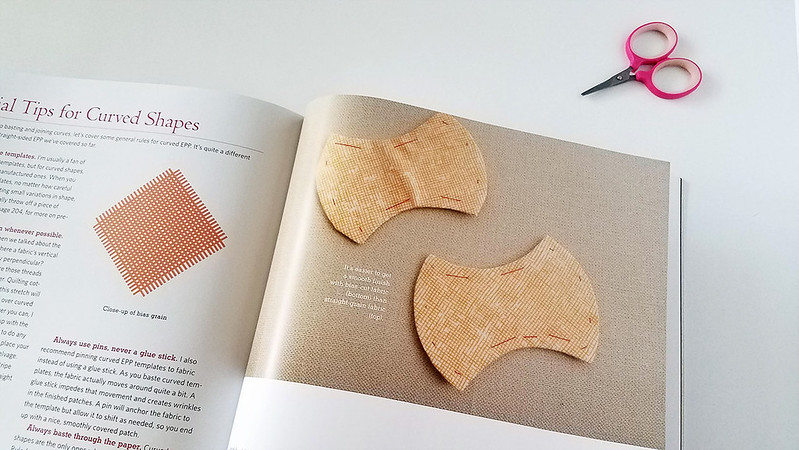
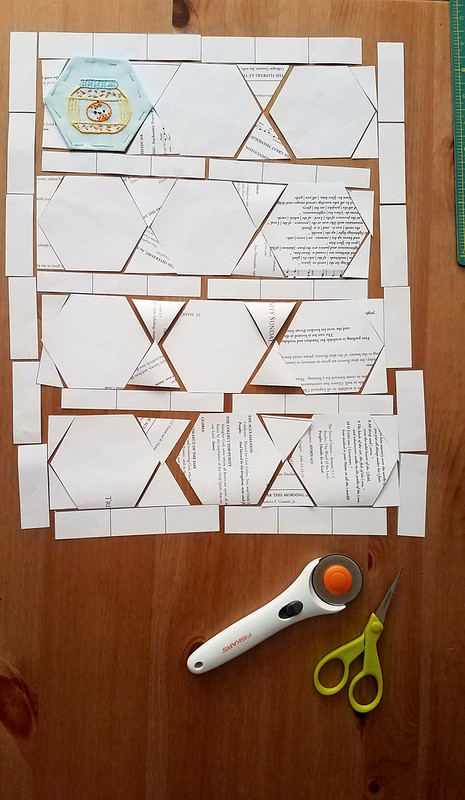
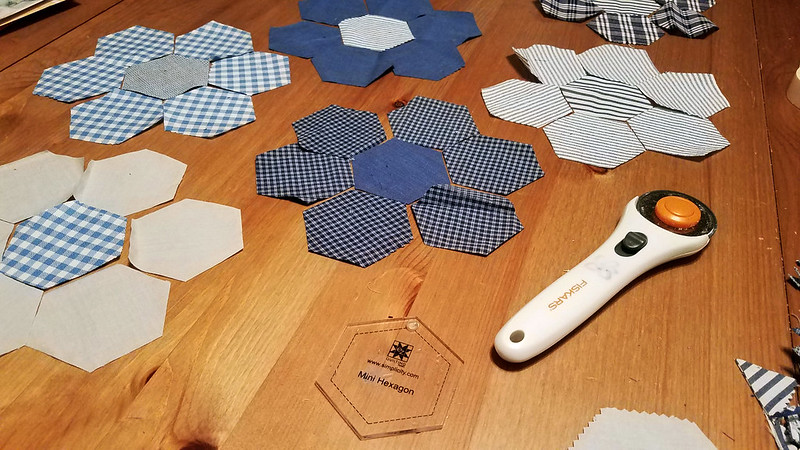
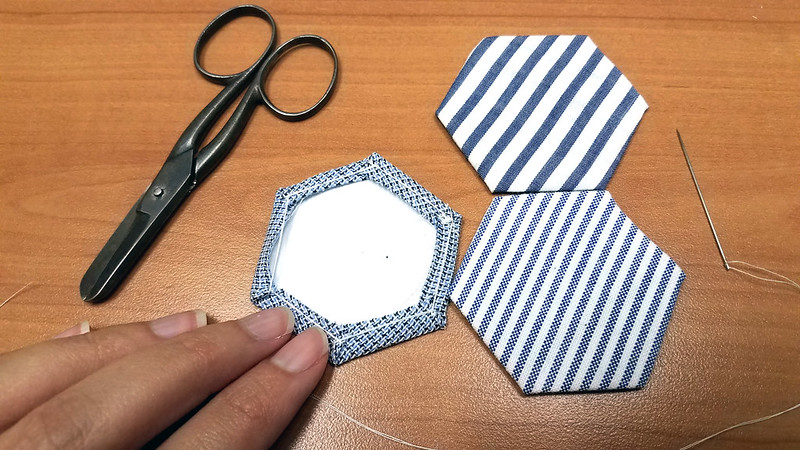
Hexagons, diamonds, jewels, triangles, tumblers, octagons, pentagons, and curved shapes like apple cores and clamshells - this book has sections dedicated to every EPP shape you can think of, with careful explanations of how to baste each and every one...

All Points Patchwork by Diane Gilleland

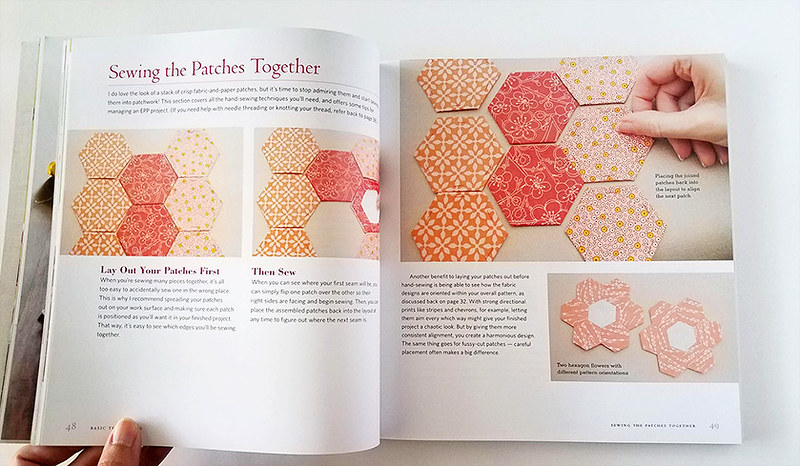
I love how the author also takes the time to explain the basics of color value and the importance of how you lay out your patches...

All Points Patchwork by Diane Gilleland

There's an entire section devoted to creating your own EPP patterns, either by hand, or on computer.

All Points Patchwork by Diane Gilleland

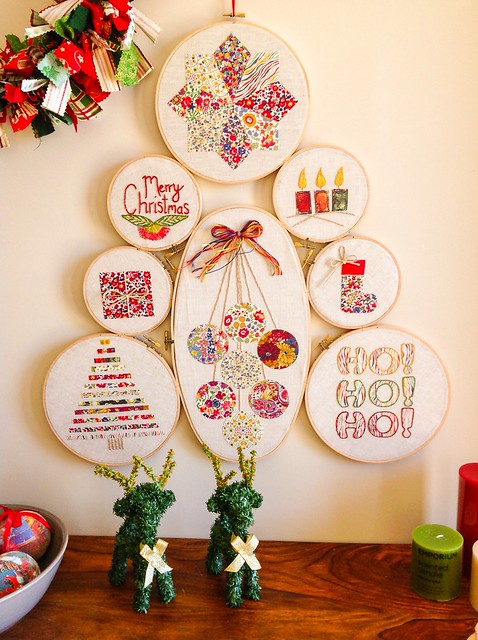
One area where this book really shines is in all the possibilities it gives you - there are no set projects, per se, but just limitless explorations of everything you can do with EPP - your imagination is the only limit!

All Points Patchwork by Diane Gilleland

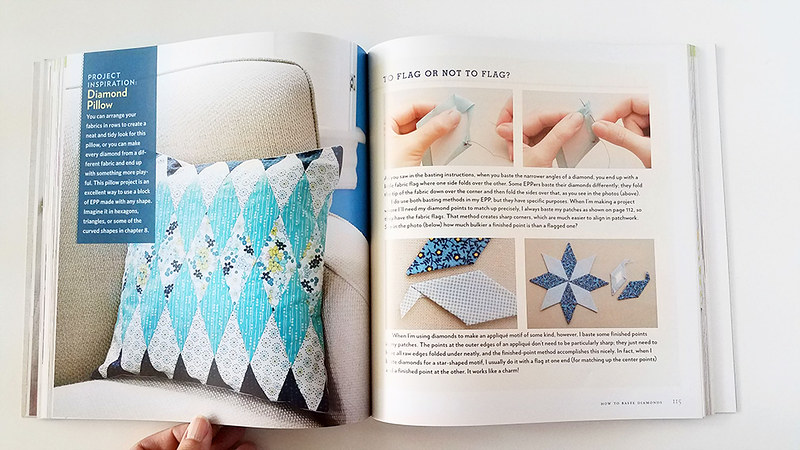
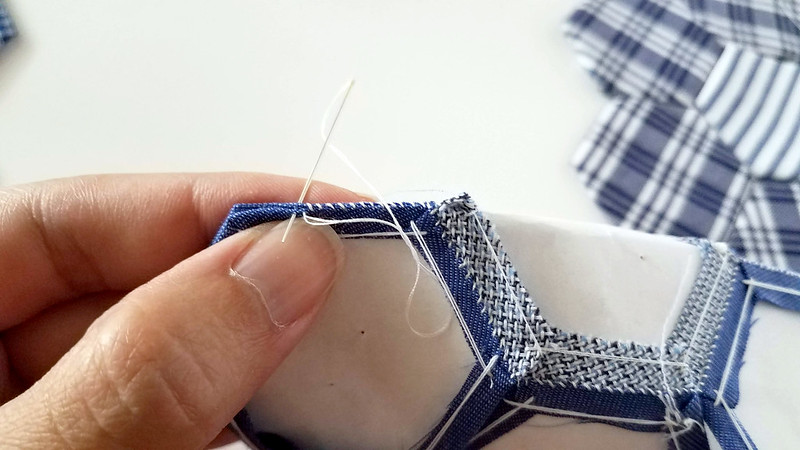
Everything is explained - even those funny little flags you see hanging off of everyone's points on Instagram - what do you do with those? Diane explains what to do with them!

All Points Patchwork by Diane Gilleland

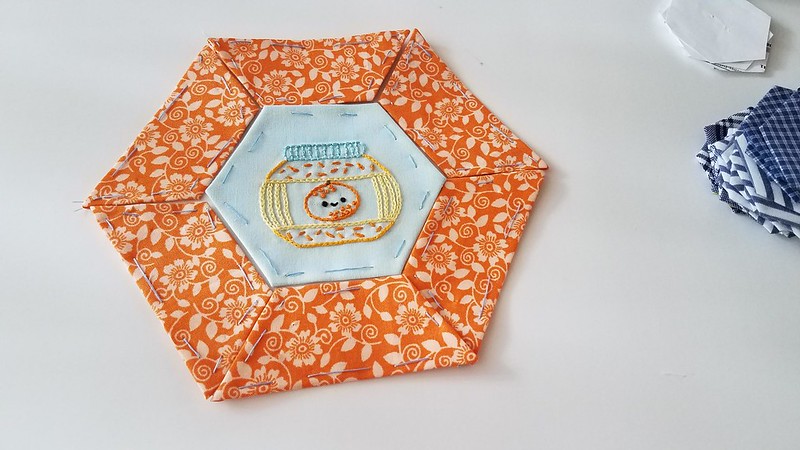
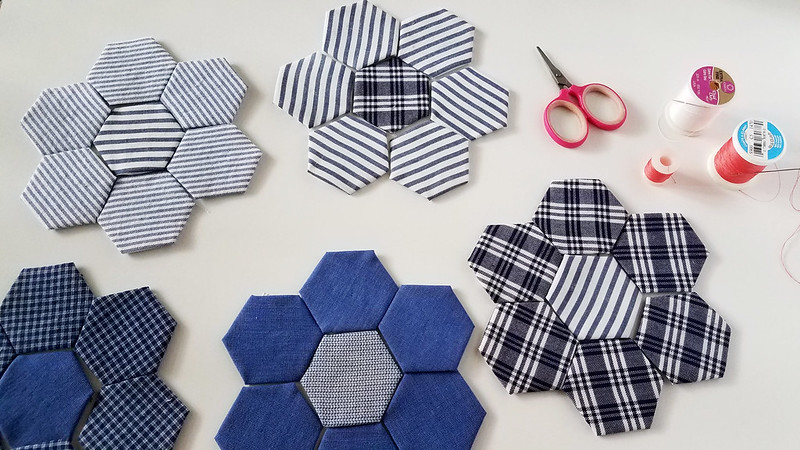
Throughout the book you'll see numerous ideas, photographed so beautifully...

All Points Patchwork by Diane Gilleland

And no detail is too small. I really can't think of one question I had about EPP that this book did not answer...

All Points Patchwork by Diane Gilleland


About Diane Gilleland

You may remember Diane Gilleland from Crafty Pod, a series of podcasts she did on crafting. I am probably the only craft blogger who never listened to Diane's podcasts - I have no idea what I was doing instead of listening to Diane's podcasts, I wish they were archived so I could enjoy them as so many of you out there did! Sadly for us, Crafty Pod is no longer around, and Diane has moved on to other pursuits - but how wonderful it is that she has inspired so many of us, and has contributed 3 wonderful books, of which All Points Patchwork is one.

After writing on this blog for so long, I am starting to think about the crafty legacy Feeling Stitchy has created, and the crafty legacy I have created individually, too. It's not something I ever get much feedback about, but I'd like to think we've inspired you over the years. I've been thinking of this for awhile now, and maybe that's why I found this interview with Diane Gilleland on Crafty Planner so moving: http://www.craftyplanner.com/2016/09/26/diane-gilleland/.

In it, she talks about a few of the reasons she stopped pursuing craftiness full-time. I think it is a wonderful discussion for anyone who is thinking of pursuing crafty goals full-time to listen to. One of the major limitations on the success of full-time craft entrepreneurs, I think, is that the traditional handwork of women remains undervalued - not just by others - but also by us! One of the loveliest takeaways I got from this podcast is that we must set the terms for how we want our work, and the handwork of others (male and female) to be valued. We must decide how much time we want to dedicate to our craft, and not take less than what we know our talents are worth.

It's another reason this year, I've set out to review, purchase, and enjoy things I did not get for free. Again, I value the work of the authors and publishers who send us titles to review (I'm featuring one later this month!) but I also think it's valuable to spend my hard-earned cash on the things I enjoy, so I can contribute to their presence and hopefully keep more of their magic in this world.

For the time being, the best I can do is use this space to say thank you to everyone who enriches our community with their talent, creativity and generosity, so thank you, Diane!

Giveway!

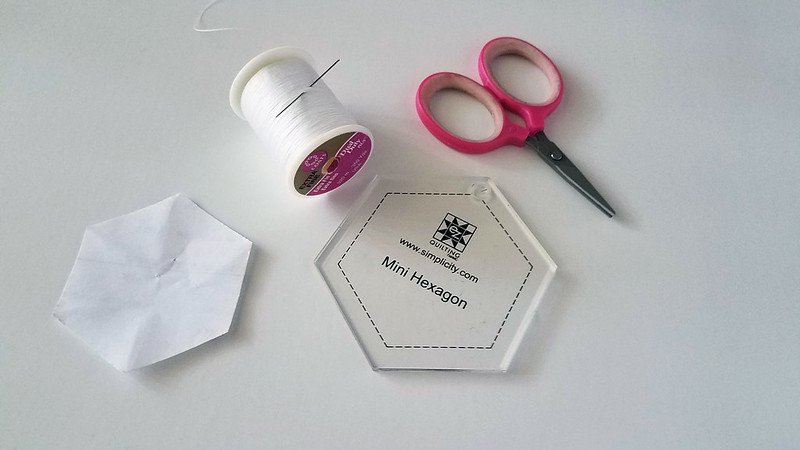
I loved All Points Patchwork so much, that I'd like to give away 2 copies! Seriously, if you have ever thought about trying English paper piecing but didn't know where to begin, THIS is the book to buy!

The rules: Please leave a comment on this post by telling us what your favorite EPP shape is (for me, it's a tie between hexagon, pentagon, and tumbler) , and/or what YOU would make with English paper piecing (assuming you had infinite time, energy and skills of course)!

I'll leave comments up through next Monday, July 8, when I'll close them and draw 2 random winners! Everyone can enter!

Edit July 8: We have 2 winners! Will announce soon!

Hi, I'm floresita, editor of Feeling Stitchy. I'm an avid stitcher, knitter, and crafter. You can see more of my stitching on Instagram and my blog. My vintage transfer collection is on Vintage Transfer Finds.

Feel free to email me with any ideas for the blog!

June 26, 2019

Wonderful Wednesday #76: Wild Olive Stitch Club


While doing some research on incorporating embroidery in English Paper Piecing, I found the perfect way to bring both together - Mollie Johanson of Wild Olive is doing a FREE Jam a Month Stitch Club this year using EPP!

Download the patterns

Mollie has already made the first 6 patterns available on her blog:
January: Orange Marmalade
February: Cherry Preserves
March: Raspberry Jam
April: Grapefruit Jam
May: Blueberry Jelly
June: Pineapple Marmalade

You can try your hand at embroidery and EPP using these patterns or there is also an option for cross-stitch too!

Mollie's Jam of the Month Quilt

This weekend I carefully cut out all the EPP shapes Mollie provided for the mini EPP quilt, so I could try to visualize the size and how it fits together:

Using Mollie's EPP quilt pattern

Ok, I am almost convinced that I should try to make this mini quilt... but I admit I'm intimidated because I've never made a quilt before! But a small one does seem like a good way to start...

Fun with Half Hexagons

In the meantime, I started playing with half hexagons in a nice orange, to match my cute jam embroidery:
Half hexagons and embroidery

When you cut hexagons in half, there are so many possibilities for framing a central hexagon! The arrangement above is one way...

Here is another:
half hexagons and embroidery

And here is yet another possibility!

half hexagons and embroidery

Please note my edges don't exactly match up because I forgot to include the seam allowance in my half hexagons - if you cut your half hexagons properly, they should line up perfectly!

If Only Quilting Was Taught in School

I admit I had a hard time in geometry (they always said in school that you would either be good at geometry OR algebra but not both) algebra was a bit more my thing as it was more like writing sentences and learning a language.

As much as I love shapes and color, drawing them out in geometry and the very dry way they were discussed bored me to death. But sliding these colorful shapes around taught me more about angles and shapes than I ever learned as a child. Maybe basic quilting would be a good subject for school, as it teaches you so much more than how to make a blanket!

Ok, so I've really traveled far afield in this post - suffice it to say EPP has changed my perspective on quilting and handmade items, and I thoroughly recommend it!

If you're looking for an easy, free way to start with English paper piecing, Mollie's Jam a Month Stitch Club is perfect!


Hi, I'm floresita, editor of Feeling Stitchy. I'm an avid stitcher, knitter, and crafter. You can see more of my stitching on Instagram and my blog. My vintage transfer collection is on Vintage Transfer Finds.

Feel free to email me with any ideas for the blog!

June 7, 2019

Project a Month: English Paper Piecing - Liza Lucy on Creativebug

Project a Month 7 - English Paper Piecing a Creativebug class with Liza Lucy as featured by floresita on Feeling Stitchy

Here's something I thought I'd never try - hand-sewing and paper piecing- but after following along with the English Paper Piecing class with Liza Lucy on Creativebug, I finally felt confident enough to give it a try!

About Creativebug

This is not a sponsored post - I've had a monthly subscription to Creativebug since January - and I highly recommend it if you are looking to jumpstart your creativity. Cheaper than Netflix, Amazon Prime, or Hulu, cheaper still than individual crafting books and kits, and time very well spent, in my opinion.

If you have any doubts about a monthly subscription to Creativebug, do look around first and be sure that there are classes that pique your curiosity - Creativebug is light on hand embroidery, but I am enjoying supplementing my creative skills in general, as with this English Paper Piecing class.

My final project will include not just paper piecing and hand-sewing, but also of course, some embroidery!

My Materials

English paper piecing

My materials for this project (a few pictured above):
scrap paper (for piecing)
hexagon template
needle
thread
scissors
rotary cutter
self-healing cutting mat
thrifted men's shirts

This spread in a book called Patchcraft by Elsie Svennas was what first inspired me:
Patchcraft by Elsie Svennas

I got the general idea, but wasn't sure about the little details...

Enter the English Paper Piecing class with Liza Lucy on Creativebug -  her class is so clear, so detailed, so easy to understand. I am sure you can find many online tutorials and resources out there, but I think what sets this class apart is the quality of the content and Liza Lucy's eye for color and detail.

What is Paper Piecing?

Some of you may be wondering (as I always was) what the heck is paper piecing? Just hearing the word gave me jitters, and I'd skip over anything that required this skill because I was so intimidated by quilting in general.

But it's really so easy!

Paper piecing just means using pieces of paper cut to a specific shape to serve as a template to wrap your fabric around and keep it in place while sewing it together. It helps keep your edges sharp and neat and keep your fabric from going all wonky. You tack your fabric around the paper piece using either temporary glue or basting stitches. The last step is removing the papers and basting stitches, just before your item is finished.

My project

Project a Month June

I started by cutting into my 7 thrifted men's shirts - cutting the hexagons with my template and rotary cutter was time-consuming but fun, and I had a good time moving all the pieces around like a little puzzle.

English paper piecing

Then, using scrap paper cut to the size of my template I folded the fabric over the edges of my paper and hand-basted them using long, quick stitches...

English paper piecing

DON'T do what I did here and DO use a heavy thread in a contrasting color - use the cheapo stuff in the wacky colors you never use, since it's all going to come off, anyway. I only had white with me, so I used white, which is a bit hard to see.

English paper piecing

I was three hexagons in, and totally itching to do more! I loved the look of all the contrasting stripes and checks together.

By the next morning:
English paper piecing

I was 35 hexagons in and I was utterly hooked! I'd spent the whole night basting these little hexagons, and only stopped when I was too exhausted to lift my needle. I had so much fun moving the shapes around and experimenting with the flower shape.

Once your hexagons are basted, the next step is to sew them together!
English paper piecing

English Paper Piecing

The paper provides a firm foundation, keeping your shapes crisp and neat as you sew. Don't take them out until you are absolutely finished!

English paper piecing

Here's the thread I'm using, if you're curious - it is extra fine. I used the thinnest needle I had, from a lovely vintage stash I bought recently.

English paper piecing

And here is a completed flower!

English paper piecing

And another!

A word on imperfection

On Instagram, some people commented on the neatness of my stitching - but don't let these pictures fool you - they are far from perfect. I really like that Liza Lucy talks about this in her class and gives you a bit of confidence that even when your shapes don't match up exactly, it's not the end of the world, and you can probably get them to line up just fine when you sew them together.

My scrap paper hexagons were not exact and my edges were wonky, but I still got some nice flowers out of them, so beginners don't freak out if your edges don't completely match. My more advanced stitchers know that the crucial thing to getting pieces to match up are templates of the exact same size - there are store bought pieces if this is very important to you.

What I love about these hexagon shapes is that the possibilities are endless - I'm just using fabric scraps - but imagine what you can do, in your favorite colors and textures! I love the idea of re-purposing something old and making it new again, which is why I'm using scraps, but how many of you have a huge fabric stash waiting to be used? This is the technique to try if you've always wanted to try patchwork or applique!

Stitch along with me!

Again, I am stitching along with the English Paper Piecing class with Liza Lucy on Creativebug, this class is well worth your time if you'd like to learn this method. Next week I'll show you what I did with my hexagons!

Have any of you tried English paper piecing? What are your likes and dislikes? Do you have any suggestions or questions? Leave a comment for us!

Hi, I'm floresita, editor of Feeling Stitchy. I'm an avid stitcher, knitter, and crafter. You can see more of my stitching on Instagram and my blog. My vintage transfer collection is on Vintage Transfer Finds.

Feel free to email me with any ideas for the blog!

July 22, 2016

Friday Instagram Finds No. 62 featuring Ruby Sew Oh


Happy Friday, stitchy fans! On today's Friday Instagram Finds we take a look at @rubysewoh and her Instagram account. Danielle creates beautiful hand embroidery on gorgeous, printed fabric. She also sews and is in the process of creating a gorgeous Liberty hexie quilt. Here are some of my favorites from her Instagram feed. Danielle used #feelingstitchyig, and I'm glad she did so I could discover her fun and creative work.

While you're on Instagram checking out Danielle's work at @rubysewoh make sure you follow Feeling Stitchy! We'd love for you to stop by and say hello. You can find Feeling Stitchy on Instagram at the handle @feelingstitchyish. You can find Amy at @randomactsofamy on Instagram.


Want to be featured in Friday Instagram Find? Tag your best stitch-related photos with #feelingstitchyig!


A photo posted by Embroidery hoop art & more! (@rubysewoh) on

A photo posted by Embroidery hoop art & more! (@rubysewoh) on

A photo posted by Embroidery hoop art & more! (@rubysewoh) on

Hi, I'm Amy - I feature interesting embroidery and stitch-related photos I find on Instagram. I'm a hand embroiderer and maker.

You can find my embroidery and crafts on:
Instagram | Random Acts of Amy | Facebook

January 8, 2016

Friday Instagram Finds No. 34 with Tubaville


Hello Feeling Stitchy readers! Friday Instagram Finds is back! I hope that you had a pleasant holiday season, and are ready for a fabulous 2016.

Today's feature is Torina with the Instagram handle @tubaville. Torina creates beautiful cross stitch pieces and gorgeous quilts. The detail in her cross stitch is so lovely! And her quilting is wonderful. I've started English paper piecing, so it's nice to see such beautiful work to be inspired by. I came across her work because she tagged some of her pictures with #feelingstitchyig. Take a look at Torina's beautiful work!


Image by @tubaville
That's it for this week's edition of Friday Instagram Finds! Join in the conversation by commenting below. While you're on Instagram checking out Torina's work at @tubaville, make sure you follow Feeling Stitchy! We'd love for you to stop by and say hello. You can find Feeling Stitchy on Instagram at the handle @feelingstitchyish. You can find Amy @randomactsofamy on Instagram.

Want to be featured in Friday Instagram Find? Tag your best stitch-related photos with #feelingstitchyig!

Hi, I'm Amy - I feature interesting embroidery and stitch-related photos I find on Instagram. I'm a hand embroiderer and maker.

You can find my embroidery and crafts on:
Instagram | Random Acts of Amy | Facebook

May 7, 2015

Thimblenest Thursdays: How to Display Small Embroidery Designs on Canvas


I've always wanted to try mounting a finished embroidery piece on artist's canvas. However, when I went to display a set of three finished designs on canvases, I discovered that on two of the designs I hadn't left enough surrounding fabric to attach them to the frames. So this week you get two tutorials in one: one for extending the size of small finished pieces and one for mounting the entire piece to a prepared canvas. Let's get started!

MATERIALS 

(dimensions given are for my specific project; this tutorial can easily be adapted for projects of any size)

  • 8" x 10" (20 cm x 25.5 cm) artist's canvas (thrifted or new)
  • 12" x "15" (30.5 cm x 38 cm) piece of quilting cotton or other fabric (base)
  • 7" x 8" (18 cm x 20 cm) piece of quilting cotton (backing/"frame" for embroidered piece)
  • 6" x 7" (15 cm x 18 cm) finished embroidery design
  • Staple gun
  • Painters tape
  • ruler/measuring tape

PREPARE BASE CLOTH & CANVAS


If you are using thrifted canvases and your fabric is light colored, double-check to see if the paint on the canvas shows through. In my case it did, so I painted the canvas white. When I ran out of paint for my three canvases, I ended up affixing a white piece of paper to the canvas instead.


Serge the edges of the large base rectangle (12" x 15") or finish with pinking shears. I will not use the cotton muslin I chose again--it was almost impossible to get the wrinkles out and my iron left marks on the fabric.

EXTEND SMALL PIECES TO FIT CANVAS

(if your finished embroidery piece is large enough to fit on the canvas by itself, you can skip to the "Mount to Canvas" instructions below)


Turn the edges of the embroidered piece (6" x 7") under 1/2"; turn the edges of the backing piece (7" x 8") under 1/4".


Center the embroidered fabric on top of the backing rectangle. You can eyeball this or check it with your ruler. Pin and edgestitch together.


Now center your piece from the previous step in the middle of your 12" x 15" base cloth. It's best to check this carefully with a ruler or measuring tape since you want everything to center nicely on the canvas.

Pin and edgestitch the quilted/patchwork embroidery piece to the base cloth.

MOUNT TO CANVAS


Lay the canvas face down on the wrong side of the fabric. Use painter's tape to hold your fabric in place while you check for centering/evenness. Once you're sure your fabric is positioned where you want it, use the staple gun to secure your fabric on the long sides of the frame.

CORNERS & SHORT ENDS


Bring the corners of the fabric on the short ends up against the canvas much like you would if you were wrapping a gift. Take your time here--this part can be frustrating and a little fussy. The more you can smooth the fabric and get it to "hug" the canvas, the better the final result will be.


Once again, use painter's tape to hold the corners in place until you're ready to staple. Always check how things look from the front of the canvas. Getting misplaced staples out of the fabric without ripping anything is challenging (ask me how I know!).


Nicely finished corners should look something like this!


When you like how everything looks, staple with wild abandon!


Now you have some tailored embroidery pieces to find a spot for!

What is your favorite way to display finished embroidery pieces?


Hi, I'm Wendy - I've been embroidering since age 9 when my grandma gave me some blank tea towels and a set of Aunt Martha’s transfers. I blog at ThimbleNest.

You can also find me on Pinterest.

December 25, 2013

Countdown to Christmas: So many hoops!

Embroidery Hoop Christmas Tree
Stitched by Rhapsody and Thread

I am in love with this festive group of holiday hoops stitched by Tabatha on Rhapsody and Thread. And I think it's the perfect amount of Christmas spirit - a TON - to wrap up the Countdown to Christmas.

Merry Christmas to you all - have a wonderful day with your family and friends, and wherever life may find you, happy stitching to all!

Hi, I'm floresita, editor of Feeling Stitchy. I'm an avid stitcher, knitter, and crafter. You can see more of my stitching on Instagram and my blog. My vintage transfer collection is on Vintage Transfer Finds.

Feel free to email me with any ideas for the blog!

October 24, 2011

State Flower Quilt by Vicki Haninger

State Flower Quilt - turkeyfeathers.typepad.com
Today I'm excited to tell you about a wonderful embroidery and quilt project by Vicki from the Turkey Feathers blog. I just know you're going to love this! Over a period of many months she embroidered every single (US) state flower and then she turned them into a quilt. It's beautiful and inspiring!

You should check out Vicki's blog, Turkey Feathers. And her shop, PatternBee! PatternBee is a wonderful resource for vintage embroidery patterns which Vicki restores and sells both as PDF and iron-on patterns.
She is also an author of two books: Embroidery Craft: Stitching Through the Seasons and Blanket Statement.

I asked Vicki a few questions about the project and here's what she had to say. You can also read more about it on her blog. Thank you, Vicki!


(All images with kind permission of Vicki)

Tell us a bit about yourself
My name is Vicki Haninger, and I live in the beautiful Willamette Valley here in Oregon with my husband and two youngest daughters and various adorable critters, including some that run wild through my backyard on a daily basis!

State Flower Quilt - turkeyfeathers.typepad.com
When did you start stitching?
For as long as I can remember, I’ve been sewing and stitching.  Like most stitchers, the biggest influences I had growing up, came from the women in my family who always seemed to have a project of some kind in their hands, mostly out of necessity. But there was also much joy in the making.  I found this out early when at the age of five, I was handed a needle and thread and completed my first embroidery of a tiny cross-stitch chick.  It was a defining moment for me I guess, because I can still remember the thrill of that simple task (over fifty years ago now, ahem!), and then, to realize where it’s led in terms of what I am doing today.

State Flower Quilt - turkeyfeathers.typepad.com
What inspired you to start the State Flower Quilt?
The State Flower Quilt Project was the result of a basic pattern restoration.  (That’s primarily what PatternBee offers, in an attempt to keep the old vintage patterns, which are under public domain, available so that others can access and use them more easily.)  Sometimes an old pattern has little things about it that could be made better though and this was the case with the state flower patterns.

So I tweaked the typography, changed the awkward shortened state names to two letter abbreviations, and made slight changes to the flower blocks themselves.  Then I began stitching them, one by one, and sharing them on my blog as free pattern downloads.  The finished blocks and free patterns can also be found on the Turkey Feathers Flickr page, and the pattern is also available from the PatternBee website as a PDF and as an Iron-On Transfer.

State Flower Quilt - turkeyfeathers.typepad.com
How long did it take to finish the quilt?
My State Flower Quilt was completed in about 18 months, but I didn’t work on it every day or very fast, so that’s maybe an average timeframe for a quilt like this.   The flower blocks are easily done though, with just a few basic stitches, and being small they are travel-friendly; a nice size to stow in your bag and take with you to pass the time while you wait somewhere.  So the fact that there are fifty of them shouldn’t be too daunting!  But if it is, you can always just omit the lettering and use the flowers individually for other projects.

SITE DESIGN BY RYLEE BLAKE DESIGNS