September 12, 2013

Alison Glass pattern winner!


Lots of people struggled over which Alison Glass pattern they liked best, as they're all lovely! Thank you for all your comments, there were 78 in total (not including a comment from me). The random number generator has spoken and comment number 14 from Margaret Schindler, who wrote  'I like the sewing ones. I need to decorate my sewing room' wins! Margaret if you could email me, Jo (you'll find my email address under the 'email us' tab near the top of the page), I'll pass your email address onto Alison and a .pdf of the Crafts pattern will be on its way to you!


Hi, I'm Jo - I feature new embroidery patterns Sundays on Feeling Stitchy. I also post on our Twitter and Pinterest.

Is there a new pattern you'd like us feature? Email me!

September 11, 2013

Ten is a Magic Number

Last month Craftster.org celebrated their tenth birthday. I can't believe it has been ten years! As part of the celebration the Hoopla Along's theme was the number 10. The gang did not disappoint!
The tenth doctor from  lindyv321


Craftster Show and Tell bypottermouth

10 years of marriage by deathbeforedishes

10 different stitches by bushbaby

10 pips on the die by silentblair


The theme for September is Your Choice. It can be anything of your choosing but it must be round. Come on over and play! 

September 8, 2013

Patterns: Alison Glass - giveaway


How detailed and intricate are these patterns from Alison Glass? They're gorgeous aren't they! Alison has very kindly offered to giveaway a .pdf of one of her embroidery patterns to a Feeling Stitchy reader! You can check out the three pattern sets; Animals, Crafts and Flowers on her website. If you would like to win one of the .pdfs, please leave a comment below stating which pattern you would like! The giveaway will run until midnight on 11th September 2013 UK time and I will announce the winner the next day. Get picking!

Hi, I'm Jo - I feature new embroidery patterns Sundays on Feeling Stitchy. I also post on our Twitter and Pinterest.

Is there a new pattern you'd like us feature? Email me!

September 3, 2013

Tutorial Tuesday

Happy Tuesday, everyone!

Today's tutorial features a darling embroidery pattern designed by Nicole over at Follow the White Bunny. I have loved this Apple Tree pattern for quite some time, and stitched it a while ago, but had yet to put it on anything. I decided on turning it into a small clutch that I can grab quickly when I just need to carry my keys, cell phone, and money or a small notebook. I really like the way this handy clutch turned out, and hope you will, too.


Supplies needed for this clutch purse:

- Two exterior pieces of fabric measuring 8.5 by 9-inches
- Two interior/lining pieces of fabric measuring 8.5 by 9-inches
- Two pieces of Interfacing or Batting measuring 8.5 by 9-inches
- A 7-inch zipper
- Embroidery supplies
- Sewing machine
- Scissors
- A jar lid or small plate
- Coordinating sewing thread


Step One: Embroider exterior piece of fabric and clip exterior, interior, and interfacing to 8.5 by 9-inches. Use a jar lid or small plate to create the curved bottom edges of each piece of fabric, interior/lining, and interfacing. I used a jar lid and placed it as close to the bottom and side edge as I could. I traced the bottom curve along the corner of fabric, then clipped the excess fabric off.


Step Two: Place the zipper face down over the exterior piece of fabric, with the furthest edge of the zipper tape along the top edge of the fabric. I have the interfacing underneath this exterior piece of fabric.


Place one interior or lining piece of fabric face down over that and pin in place. Using a zipper foot on a sewing machine, stitch along this top edge. 


When you flip these pieces over to expose the unsewn edge of the zipper, it should look like this.


Step Three: Repeat the instructions from Step Two by placing the zipper face down with the unsewn edge along the top of the exterior piece and the lining face down over that. Again, the interfacing is underneath the exterior piece. You'll have the right sides of the interior/lining facing each other, as shown in the photo below. Pin in place and sew. 


When you turn the fabric out, it should look something like this, with the right sides of the interior/lining and exterior facing out on either side.


Step Four: Top stitch along each side of the zipper, as shown in the photo above.

Step Five: Unzip the zipper about halfway. Take the two exterior pieces and bring them right sides together and pin in place. Pin the interior/lining pieces together as well, marking a 2-inch space to leave unsewn on the interior/lining piece. Sew around these pieces using a 1/2-inch seam allowance. 


Step Six: Clip the four curves of the exterior and interior/lining, perpendicular to the seam you just created. Clip as closely to the seam as possible, without cutting the thread. This will allow the curve to lay flat once the bag is turned.


Step Seven: Turn the bag through the unsewn space in the lining and then top stitch this space shut. 


Step Eight: Enjoy a fun clutch bag/purse!


Hope you enjoy and have a very happy Tuesday!

Hi, I'm Kristen! I am a lover of all things stitchy and crafty. I have been sewing for as long as I can remember. My grandmother taught me how to sew Barbie clothes when I was young and I have been sewing ever since.

You can find me at Bobbypin Bandit, on Instagram, and my Etsy shop.

September 1, 2013

Patterns: Bunny Rabbit

cute rabbit patterns

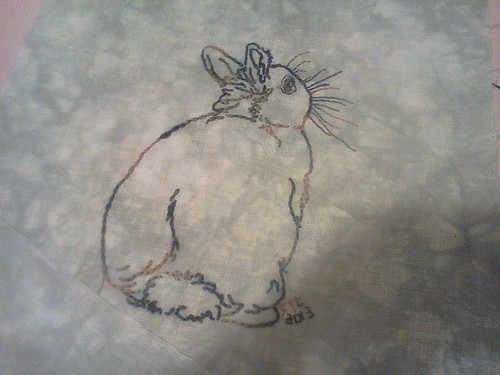
Stitched by Sandy Chidester, pattern by isewcute

If you fancy a dose of realism in your embroidery (and like rabbits!) check out Bunny Rabbit hand embroidery patterns by isewcute.

Hi, I'm Jo - I feature new embroidery patterns Sundays on Feeling Stitchy. I also post on our Twitter and Pinterest.

Is there a new pattern you'd like us feature? Email me!

August 28, 2013

Holiday stitches

OlĂ¡! I'm working on a new pattern that I've already talked about some weeks ago.

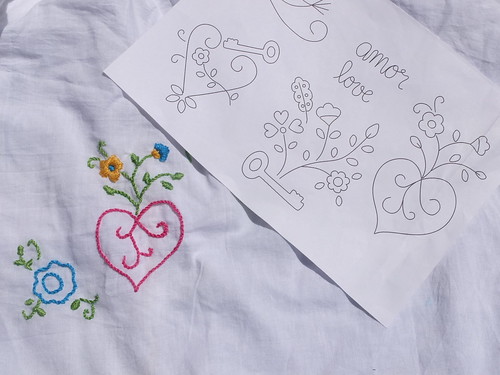
While enjoying some days off I've begun my stitching... Soon it will be finished and I'll show you the final result. My younger daughter is counting the days for me to finish it... She will be wearing the blouse...

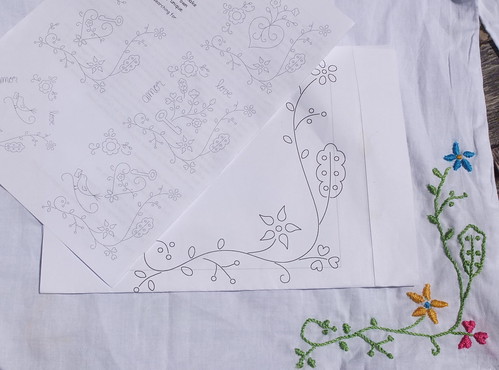
Fiancé Kerchiefs patterns

DSCF1355

During those nice days, every time I took the blouse in my hands I knew that someone would ask: "do you never rest???"

I thought that embroidering was one of the best ways to get rest, but it seems that not everyone thinks the same way!!!

August 25, 2013

Patterns: Bee Happy


How cheerful is this new embroidery pattern from Cherry & Cinnamon? I think you could not fail to 'bee happy' stitching this!

Hi, I'm Jo - I feature new embroidery patterns Sundays on Feeling Stitchy. I also post on our Twitter and Pinterest.

Is there a new pattern you'd like us feature? Email me!

August 22, 2013

Embroidery and Portuguese art

OlĂ¡! This morning I waited almost two hours to visit the exhibition of Joana Vasconcelos, one of the most creative contemporaneous Portuguese artists. And I have to say that every detail was worth the wait.

Her exhibitions have the particularity of interacting with the spaces in a very special way. Last year she was the first woman and young artist to see her creations exhibited in Versailles (Paris) and that exhibition ended being the most visited in the last 50 years in Paris. Follow this link and you'll find incredibly beautiful images of how her work fits each place in such a marvelous scenario as Versailles.

But today I visited her work in Portugal! In a Royal Palace - PalĂ¡cio Nacional da Ajuda, where we could confront the "Royal Life" of some of Portuguese last kings and queens with the irreverence and creativity of a contemporaneous artist - it's an incredible experience so different from an exhibition in a gallery...

One of the other characteristics of her work is the special way how she mixes different Portuguese materials and techniques. Each detail of these pieces are full of meaning to the Portuguese people and make us very proud of our culture - what is not so common among us, I have to say...

One of the most popular works are those made of ceramics and crochet, two very traditional Portuguese crafts.  And also the traditional Portuguese hearts, from Minho region, present in our embroidery and jewelry, and reinvented by her using plastic cutlery.

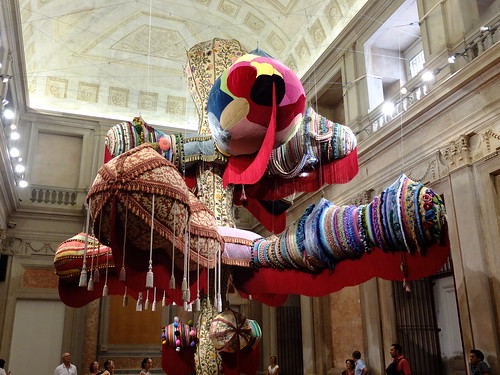
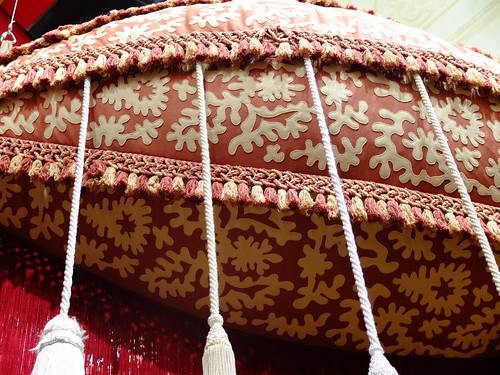
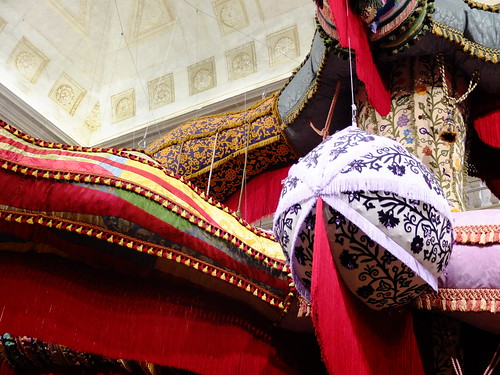
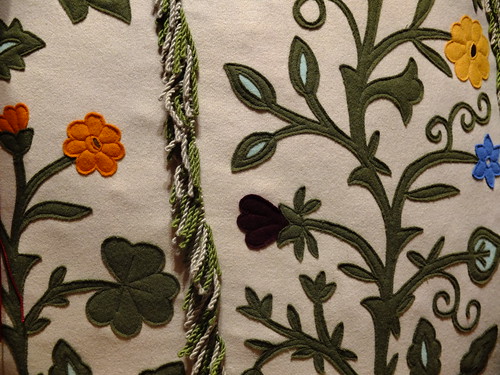
But today I bring you some photos of the "Royal Valkyrie". I've already talked about another Valkyrie, while presenting Nisa Embroiderers. Part of this sculpture was made by women from Nisa, using their talent in appliquĂ© embroidery - one of the traditional techniques from this region.

It's impossible to explain the impact of this sculpture and any photo will not be able to show it...  Here you'll find a video and some better photos, but still it is so different to be there...

Enjoy...


DSCF1200
Royal Valkyrie - general view
DSCF1178
Royal Valkyrie - Nisa appliqué embroidery
Royal Valkyrie- Joana Vasconcelos
Royal Valkyrie - three pieces of Nisa's embroidery
Royal Valkyrie - Joana Vasconcelos
Royal Valkyrie - detail of the work of women from Nisa.
I hope you've liked it!

August 18, 2013

Patterns: Mini Folk Letters

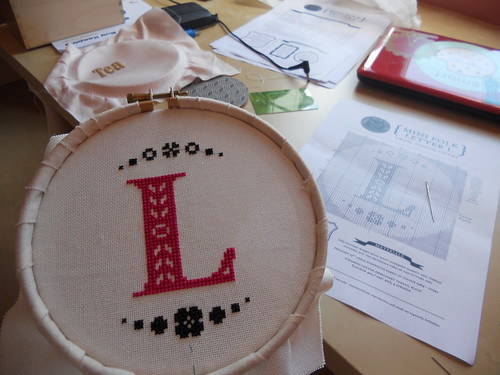
What Delilah Folk Letter

What Delilah Folk Letter stitched by Laura Mason

I've admired What Delilah Did's work forever (have you seen her new book? it's brilliant!), I particularly like her large letters, which look like they'd take ages to stitch. So good news for the short on time / less experienced cross stitcher, Sophie from What Delilah Did has now released a series of smaller letters, yay! I think these would make great quick(ish) personalised gifts, for you know, that holiday season beginning with C that's getting just that little bit closer ......

Hi, I'm Jo - I feature new embroidery patterns Sundays on Feeling Stitchy. I also post on our Twitter and Pinterest.

Is there a new pattern you'd like us feature? Email me!

August 14, 2013

Crazy Dog Lady

Crazy Dog Lady 8-5-2013

This super cute hoop hits a little too close to home. It's like ~glenda snapped a picture of my life and stitched it up.  Okay, not really, but it's pretty dang close! Love the lettering!

August 13, 2013

Tutorial Tuesday

Happy Tuesday, everyone! It's back-to-school time for some us, and I thought an embroidered pencil case would be just the thing to kick the new school year off right. If it isn't back-to-school time for you, perhaps you might need a new pencil case for sketching or drawing. Either way, today's tutorial features a pattern from Aneela Hoey's book, Little Stitches, that I think you'll enjoy.


To make this pencil case, you'll need:

- two pieces of exterior fabric in 6x10-inches
- two pieces of laminated cotton or oilcloth in 6x10-inches (I found it here)
- one 9-inch zipper
- embroidery supplies
- pins
- sewing machine 
- scissors
- iron and ironing board


Step One: Transfer your pattern to one piece of the exterior fabric and stitch. I thought the bugs and snail in a jar pattern from Little Stitches was adorable for back-to-school, but Jenny Hart's Sexy Librarians pattern over at Sublime Stitching would look awesome, as well.

Step Two: Place the zipper face down on the right side of the exterior piece, with the furthest zipper edge at the top of the exterior, as shown in the photo below. Place the laminated cotton right side down, over that and pin in place. Using a zipper foot on your sewing machine, stitch through the fabric and zipper tape.


Step Three: Unfold the fabric to expose the other side of the zipper tape, and place this face down on the right side of the other exterior fabric piece. The zipper pull will now be on the opposite side from the piece you just sewed. Place the second piece of laminated cotton right side down over this, pin in place, and sew using a zipper foot, as you did in step two.


When you unfold the fabric with the zipper at the center, it should look like this.


Step Four: Press the exterior fabric near the zipper to create a neat fold and crease. Do not press the laminated fabric, as it could melt. You want to make sure your fabric doesn't get caught in the zipper teeth. Top stitch on either side of the zipper about 1/4-inch away from the zipper to reinforce.


Step Five: Open your zipper to the halfway mark. This keeps the zipper handle out of the way while sewing, and allows you to turn the bag right-side out later. Open up the fabric so that the right sides of the exterior are face-to-face, same for the lining. Pin them in place, marking a 2-inch space in the lining that will remain unsewn. This will be used to turn the bag. Sew a 1/2-inch seam around the entire bag.


Step Six: Square off the corners of the bag by pressing the corner seams flat against one another to create a triangle. Mark 1-inch from the top point and sew a straight line across the bottom edge of this triangle. Clip the excess fabric and repeat for each corner of the lining and exterior.


Step Seven: Using the 2-inch opening in the lining, carefully pull the bag through so it is right side out. Top stitch this space shut, by hand or machine. 


Step Eight: Add your pens and pencils to the bag, and you are ready for a new year of writing, sketching,  and doodling.


Hope you enjoy and have a happy Tuesday!
Hi, I'm Kristen! I am a lover of all things stitchy and crafty. I have been sewing for as long as I can remember. My grandmother taught me how to sew Barbie clothes when I was young and I have been sewing ever since.

You can find me at Bobbypin Bandit, on Instagram, and my Etsy shop.

August 11, 2013

Patterns: Butterfly

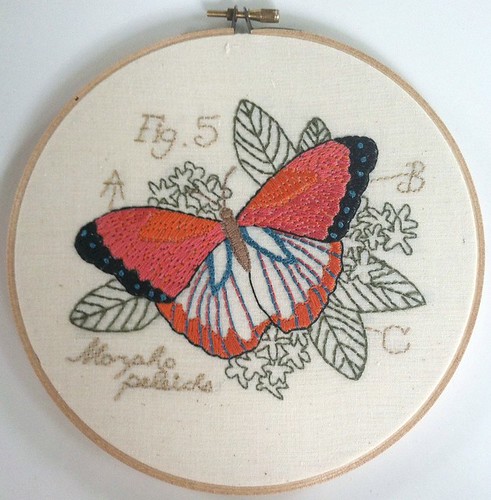
butterfly hoopart3

Stitched by aimee d

Aimee d has stitched this lovely pattern which is part of a set by Urban Threads called Miniature Menagerie. I love how it feels like an old scientific illustration. There's also a free quilt design to go with the set.

Hi, I'm Jo - I feature new embroidery patterns Sundays on Feeling Stitchy. I also post on our Twitter and Pinterest.

Is there a new pattern you'd like us feature? Email me!

August 7, 2013

Craftster is Turning 10!

Hello from Craftster land! So much has been happening on Craftster that it is hard to keep up! 

First, Craftster is turning 10! I can't believe that it has been that long! What better way to celebrate then to have a little crafty challenge. You can check out all the details on Craftster.org. There are some amazing prizes! Entries are due between August 7th and the 13th. 

If you are new to Craftster, we have some fun for you too! We have just started a Newbie Craftalong. You can go over, introduce yourself and join in the fun! Who knows, you might learn a new craft or meet your best friend. 

Now on to the Hoopla Along! The theme for June was summer. We had so many wonderful entries! 
Beautiful stitching from: Mandobug, kittykill, alwaysinmyroom, pottermouth, lindyV321, silentblair, deathbeforedishes, wreckstangle

July's theme was your favorite word, quote, saying. I didn't think the entries could get any better but they did!

Big thanks to: mandobug, amigurl55, bushbaby, alwaysinmyroom, pottermouth, lindyV321, silentblair, deathbeforedishes

The theme for August is 10. It could be 10 of anything! Colors, numbers, hoops, it is totally up to you! 

Whew! Are you tired now? I am! I'm ready for a cup of tea and some peaceful stitching time! Have a great week! 

August 5, 2013

Winner

We have a winner, guys! The random generator spoke and Stitched Gifts: 25 Sweet and Simple Embroidery Projects for Every Occasion by Jessica Marquez is going to:

Christine W 
I love the nursery alphabet! So cute, but not too cutesy - my favorite kind of baby decor! I would probably give it to my niece...she'll be one in November.

Christine is also going to receive a lovely embroidery kit from Jessica's shop. Thank you to everyone who left a comment, and thank you especially to Jessica Marquez for sharing her wonderful book and kit with us!

Have a great week guys!

Hi, I'm floresita, editor of Feeling Stitchy. I'm an avid stitcher, knitter, and crafter. You can see more of my stitching on Instagram and my blog. My vintage transfer collection is on Vintage Transfer Finds.

Feel free to email me with any ideas for the blog!

SITE DESIGN BY RYLEE BLAKE DESIGNS