

Hi guys! Are you ready for our first stitchalong ever? Now for those of you who don't know what to expect, don't worry! The truth is, I've never done a stitchalong, either, so I'm just making this up as I go along. :)
The basic idea is: we'll all create something based on that lovely vintage pattern above (generously scanned and added by Claudia) - get the pattern here. You can work the whole design, part of the design, or modify it in any way you wish! You'll have the entire month of February to stitch this in whatever way you like and add it to the Embroidery pool.
As we go along, I'll be here to answer questions, show you my progress bit by bit, and feature your awesome work as you add it to the pool. That sound fun? I hope so! :)
So, here we go, week 1 of our stitchalong!
Step 1: Transfer the pattern to your fabric.
Here's a very quick and easy way, if you have a computer screen:
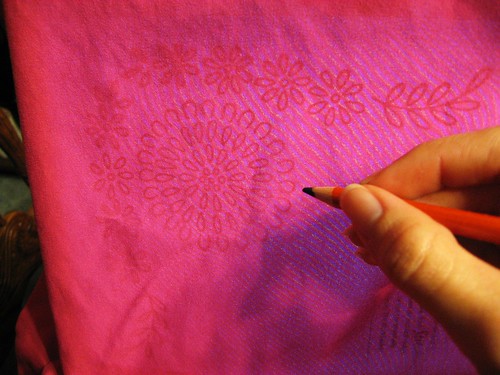
I slipped my fabric over my laptop screen and traced the pattern with a pencil.
Edit: Be sure to be very careful and press very lightly when tracing. If you think your screen might in any way be damaged by light pressure, don't do it! A printout is much cheaper than a new computer screen. :)
You can also use a transfer pencil (or transfer pen) - see my tutorial
Or, print the pattern, tape it to a bright window, hold your fabric up to trace over it.
Or, use transfer paper (or carbon paper).
Just a few ideas - be sure to share if you have any better ones!
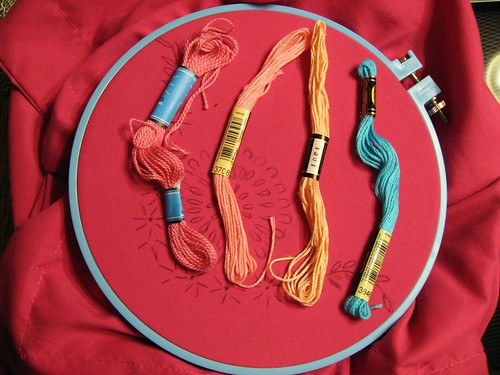
Step 2: Choose your colors
This step actually takes up A LOT of time for me. I also find myself plucking out stitches and re-stitching, so don't feel bummed if you end up doing the same.
I started off with 4 bright colors to complement the really bright fuschia fabric I'd be working on:
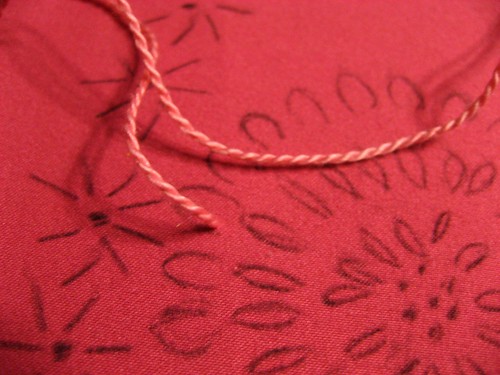
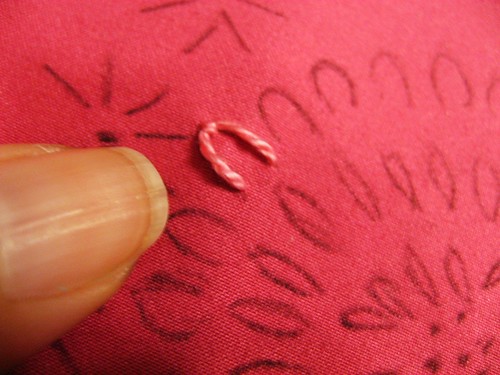
Step 3: Open Lazy Daisy stitches
I started off with the open-looking Lazy Daisy stitches along the outside of the large flower (they look sort of like little horseshoes:
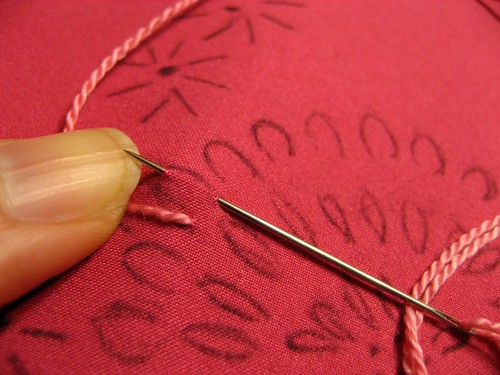
Need step-by-step directions for Lazy Daisy stitches? Here you go!
Stitch School: Lazy Daisy or detached chain stitch
Needle n' Thread: Lazy Daisy stitch (video)
Here's the finished outer row of open Lazy Daisy stitches:
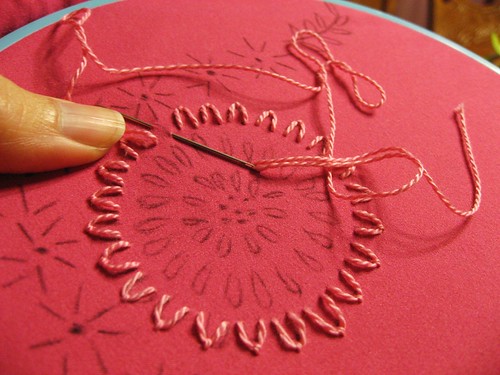
Step 4: More Lazy Daisy stitches
Next, I did the inner row of Lazy Daisy's which are your regular, closed variety:
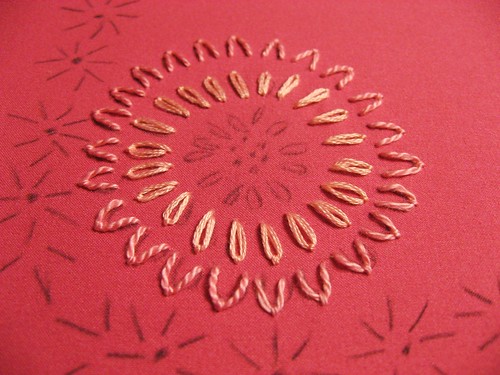
Last, I did the inside row:
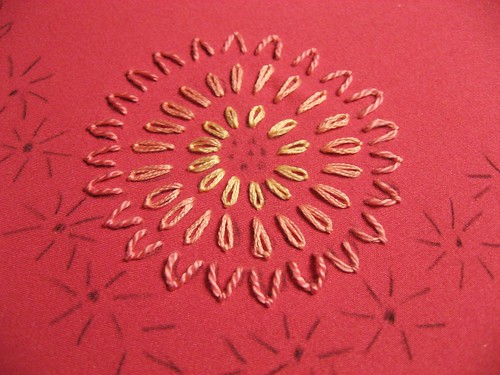
Whew! That was a lot of pictures and stitching!
How is your stitching going?
If you join us, be sure to add your pictures to the Embroidery pool and tag them: FebStitchalong so I can find them! Remember you can stitch this in any way you like - I'd love to see any creative ways you use this pattern! Let's see some stitching! :)


Love your fabric. I'm still a beginner at embroidery so I need to work on getting the proper tools (like a transfer pen -lol). In the meantime I've traced the design onto my fabric and am stitching away. Will add a photo when I've finished the outer ring of the flower. :) Can't wait to see what everyone is doing.
ReplyDeleteI bought a pad of tracing paper and I tape a piece to my computer, trace with pencil, then go over the pencil with my transfer marker (a godsend!) It allows me to turn anything in to an embroidery pattern, and the zoom function on my computer allows me to customize the size.
ReplyDeleteI have never done embroidery before but have been following your blog lately because I feel an urge to try it... this stitch along (and your great instructions!) might be a great way for me to start! I better get my supplies this weekend :)
ReplyDeleteI can not wait to get started.
ReplyDeleteOh gosh, I hope you'll do another vintage stitch-along in the future! I'd love to take part but I'm running a vintage knit-along myself, so I'm trying to keep my focus. But oh, the pretty stitching... ;D
ReplyDeletei'm in!!!!
ReplyDeleteLove it! And I love your idea of putting it up to the computer screen.
ReplyDeleteGreat tutorial. Thanks!
it's so pretty! I need to get in on this :)
ReplyDeleteOooh, looks like you have a super start!
ReplyDeleteI have the pattern but wont get to it until tomorrow. I'll be getting it started then anyway. Thanks for the inspiration.
ReplyDeleteI just want to share that I thought it was absolutely brilliant to transfer off your computer screen!! How simple, but clever....but don't try it if you have a large desktop screen! I just broke my back reaching AND the moire pattern drove me crazy.
ReplyDeleteNext time I'll try the laptop, because it really sounds brilliant, just didn't work so good for me tonight!
But now I'm ready to stitch, yippee!
I'm in awe of your two-step lazy daisy stitch... I have to go all the way in and come back out of my fabric.
ReplyDeleteI love to do this!
ReplyDeleteI will see if I can get the time - and wauuu - great colors and fabric -
ReplyDeleteThank you for the step by step - and link to the Stich scool - I needed that ;)
And hei - stop by if you need a calender
Have a great weekend
I've been following your blog for some time but now I have to step out of the shadows and say I would love to join the stitchalong. It's going to be fun.
ReplyDeleteI know a little embroidery and have been wanting to do a project for some time, so i think I'll join in if I can find some suitable colors in my old collection of floss (closest store with floss is a 30 min. drive and we're getting snow storms much too often!).
ReplyDeleteWhen I do hand applique I'm accustomed to cutting my background fabric into squares--Is that what you'd recommend for this embroidery? Maybe squares a few inches larger than the February design?
Thanks so much.
oh my goodness, please -- do NOT trace your fabric on your computer screen if you value it at all! You can scratch, dent, and carve a groove in your screen SO easily, even with a fingernail or a soft pencil. *cringe*
ReplyDeleteThis is such a great idea. Not too stressful and each person's creativity will shine through.
ReplyDeleteCarey
I couldn't resist and I just copied the pattern free hand with a water soluble marker on an old skirt. I have some trouble keeping the lazy daisies looking neat because they are rather big!
ReplyDeleteI second the comment about not tracing on your computer screen. That would only be acceptable on one of the older monitors with a glass screen. *cringes* at the very least have a scratch protector screen (I would also cover it in plastic wra), and use a water soluble marker so you don't need to apply any pressure.
ReplyDeleteHi Bean and anonymous, yes I agree if you trace over your computer screen do be VERY careful! I pressed very lightly and naturally my screen has a hard cover that wouldn't be damaged by light tracing. Use your best judgment and print the pattern if in any doubt. :)
ReplyDeleteGlad to hear so many of you are stitching along with us! :)
Looks great! I have a quick question -- how do you remove the pencil marks that are still visible once you're finished?
ReplyDeleteI love stitchalongs! Thanks so much for hosting this, I'll be linking.
ReplyDeleteNot sure what it is called or if it is available in other countries but in Australia we have something called freezer paper. if you cut an A4 piece of freezer paper and an A4 piece of thin cotton and iron the two together you can then feed the fabric through a straight feed (back to front rather than front to front. Do a test peice to make sure your printer ink washes out and ta da you have a transfer ready to stitch. I take no responisbility if this doesn't work with/kills your printer. It did work for my mum and I though and is a great time saver.
ReplyDeleteI used the method of taping the pattern and fabric to a bright window and then tracing. It worked great.
ReplyDeleteI'm joining in! I used a light box and traced with a very sharp pencil. I'm using three strands of floss and the pencil covers perfectly. I normally used a fine, water soluble marker and always have great success with them but had strange fabric this time that responded badly to the marker (I always test).
ReplyDeleteLight boxes are fairly inexpensive these days. I have an A4 size thin light box that was only £40 and I use it endlessly, so do my children so it's been well worth the investment. Mine was purchased on ebay UK. I'm sure there are also DIY light table tutorials online somewhere.
Rachel - If you press lightly, I've had good results removing pencil marks with an eraser. Just make sure it's clean and has no pencil smudges. Any light pencil marks that remain should wash off.
ReplyDeleteKathleen C - I think squares will work - then you can incorporate your design into a quilt or a pillow - be sure to leave extra space to give yourself plenty of room.
Hope all of that helps! :)
Ah ha! I found some needed help here. Never thought of using the computer screen to transfer a pattern. Brilliant.
ReplyDeleteI eye-balled the pattern and drew it onto my wool felt with pencil. It worked pretty well, but I may try tracing onto transfer/carbon paper next time. We'll see.
Thanks for sharing your good ideas.
Jody
If you have a lightbox for cardmaking and Paper crafts, that can be used to transfer the pattern to the cloth. Otherwise, what I do is print out the pattern, tape it to the window, and tape my fabric over it, then trace away...! Been doing it this way for years.
ReplyDelete