Showing posts with label amish stumpwork. Show all posts

December 5, 2016

MooshieStitch Monday: Plushwork Wreath

Plushwork Wreath tutorial by Michelle for Mooshiestitch Monday on Feeling Stitchy

Today I am going to show you how to stitch a plushwork wreath for the holidays!

For best results - I highly suggest tapestry wool.

This wreath is stitched with DMC Tapestry Wool (which DMC has so kindly provided).

Plushwork Wreath tutorial by Michelle for Mooshiestitch Monday on Feeling Stitchy
DMC Green 7344 and Red 7108

For my wreath template, I cut a circle about 2.5 inches wide in diameter out of cardboard.

To start, bring your wool up through the fabric (A) and back down (B)

Plushwork Wreath tutorial by Michelle for Mooshiestitch Monday on Feeling Stitchy

Continue with your surface satin stitch - bring your wool back up next to the previous stitch on the same side.

Plushwork Wreath tutorial by Michelle for Mooshiestitch Monday on Feeling Stitchy

Then down again across the template.

Plushwork Wreath tutorial by Michelle for Mooshiestitch Monday on Feeling Stitchy

Back up again next to that stitch on the same side and repeat until your template is covered.

Plushwork Wreath tutorial by Michelle for Mooshiestitch Monday on Feeling Stitchy

Plushwork Wreath tutorial by Michelle for Mooshiestitch Monday on Feeling Stitchy

Here is the first layer complete.

Plushwork Wreath tutorial by Michelle for Mooshiestitch Monday on Feeling Stitchy

I stitched 3 layers of wool around the circle template.

Now you are ready to cut through all the layers.

Plushwork Wreath tutorial by Michelle for Mooshiestitch Monday on Feeling Stitchy

Plushwork Wreath tutorial by Michelle for Mooshiestitch Monday on Feeling Stitchy

Remove the cardboard template.

Plushwork Wreath tutorial by Michelle for Mooshiestitch Monday on Feeling Stitchy

Here it as without any fluffing - notice you can see a gap in the wool.

Plushwork Wreath tutorial by Michelle for Mooshiestitch Monday on Feeling Stitchy

I tried fluffing the wool to remove the gap / indent in the middle of the wreath but it would not go away. Maybe my template was too wide? 

Plushwork Wreath tutorial by Michelle for Mooshiestitch Monday on Feeling Stitchy

Although I was not 100% satisfied with my first attempt, I trimmed the wool a little with my scissors, fluffed it as much as I could and added a red bow and french knots for decoration.

Plushwork Wreath tutorial by Michelle for Mooshiestitch Monday on Feeling Stitchy

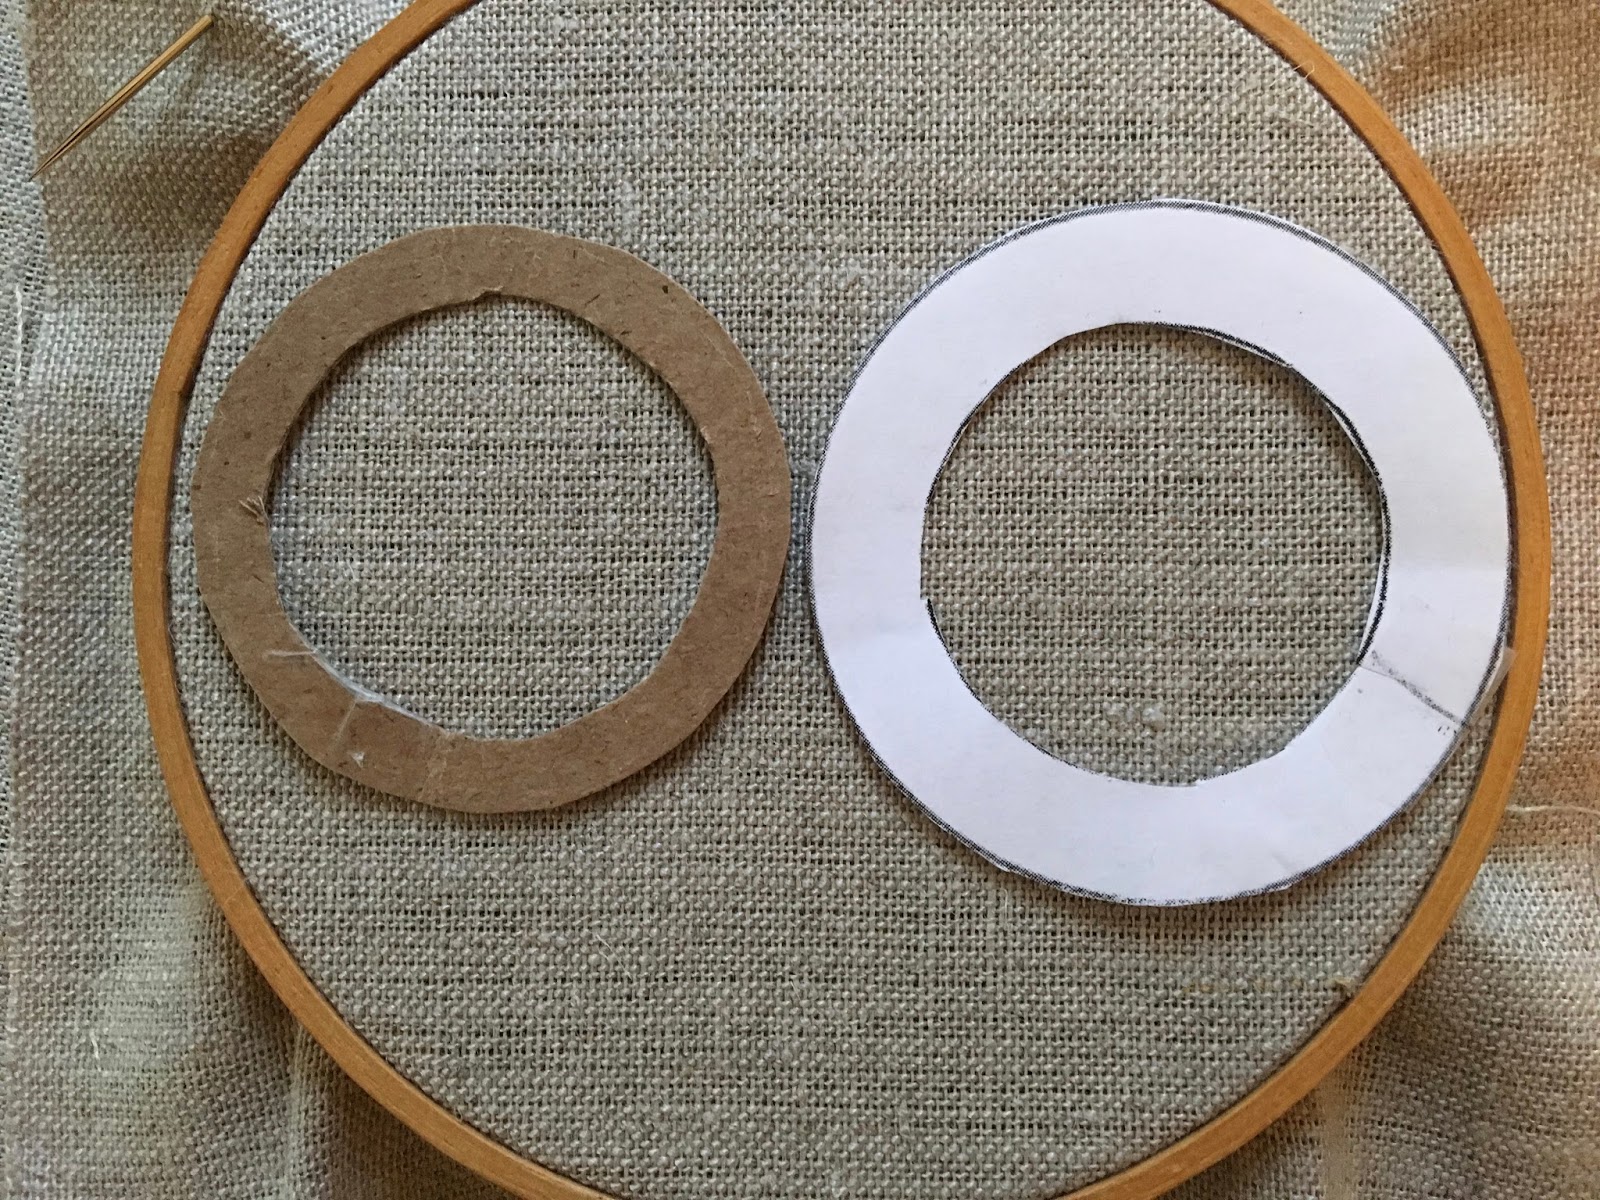
My second attempt, I cut a smaller, thinner circle template.

Below is the first circle in white paper on the right and the new template on the left. 

Plushwork Wreath tutorial by Michelle for Mooshiestitch Monday on Feeling Stitchy

Same process - I stitched three layers of wool.

Plushwork Wreath tutorial by Michelle for Mooshiestitch Monday on Feeling Stitchy

I cut the layers and removed the template. See how there is less of a gap this time??

Plushwork Wreath tutorial by Michelle for Mooshiestitch Monday on Feeling Stitchy

Here it is trimmed and fluffed. You can still see a line around the middle but it's less than the first wreath.

Plushwork Wreath tutorial by Michelle for Mooshiestitch Monday on Feeling Stitchy

Here is the wreath finished with the bow and french knots!

Plushwork Wreath tutorial by Michelle for Mooshiestitch Monday on Feeling Stitchy

Do you like the first or second wreath better? 

I hope you try this plushwork wreath sometime. If you do, leave a comment below and let us know!


October 31, 2016

MooshieStitch Monday: Plushwork (with pearl cotton)

Plushwork with pearl cotton, a tutorial by Michelle for Mooshiestitch Monday on Feeling Stitchy

My last few posts have shown the plushwork technique with tapestry wool and cotton floss. I wanted to keep experimenting with different flosses, so when a couple reader comments suggested pearl cotton, I decided to give it a try!

I chose an orange and green pearl cotton #5 and used the same template in my previous posts.


Plushwork with pearl cotton, a tutorial by Michelle for Mooshiestitch Monday on Feeling Stitchy


Layer 1: Orange

I have lots of spacing in between my stitches - but it is the first layer and I will be covering it up with more layers - so it doesn't need to be perfect!

Plushwork with pearl cotton, a tutorial by Michelle for Mooshiestitch Monday on Feeling Stitchy

Layer 2: Green

Plushwork with pearl cotton, a tutorial by Michelle for Mooshiestitch Monday on Feeling Stitchy

Layer 3: Orange

Plushwork with pearl cotton, a tutorial by Michelle for Mooshiestitch Monday on Feeling Stitchy

Layer 4: Green

Plushwork with pearl cotton, a tutorial by Michelle for Mooshiestitch Monday on Feeling Stitchy

Time to cut through the layers and remove the plastic template.

Plushwork with pearl cotton, a tutorial by Michelle for Mooshiestitch Monday on Feeling Stitchy

Plushwork with pearl cotton, a tutorial by Michelle for Mooshiestitch Monday on Feeling Stitchy

Here it is before "fluffing"..

Plushwork with pearl cotton, a tutorial by Michelle for Mooshiestitch Monday on Feeling Stitchy

... and after "fluffing".

Plushwork with pearl cotton, a tutorial by Michelle for Mooshiestitch Monday on Feeling Stitchy

I decided to trim the pearl cotton with my scissors to see if it would change the appearance.

Plushwork with pearl cotton, a tutorial by Michelle for Mooshiestitch Monday on Feeling Stitchy

Here it is after trimming with the scissors and fluffed.

Plushwork with pearl cotton, a tutorial by Michelle for Mooshiestitch Monday on Feeling Stitchy

Plushwork with pearl cotton, a tutorial by Michelle for Mooshiestitch Monday on Feeling Stitchy

I do like how the plushwork turned out with the pearl cotton, but I have decided the best results are when you use the tapestry wool.

Plushwork with pearl cotton, a tutorial by Michelle for Mooshiestitch Monday on Feeling Stitchy

Plushwork with pearl cotton, a tutorial by Michelle for Mooshiestitch Monday on Feeling Stitchy


P.S. I saw a reader comment on the previous post asking how the plushwork does not fall apart when you cut it. Here is a photo of the back.

Plushwork with pearl cotton, a tutorial by Michelle for Mooshiestitch Monday on Feeling Stitchy

It is actually the surface satin stitch - where you will bring the thread up from the back right next to the previous stitch on the same side - there are only long threads going across on the front side of your work. (This plushwork tutorial explains it also)

Compare the results from my other posts:


Happy Halloween!!

September 5, 2016

MooshieStitch Monday: Plushwork (with cotton floss)

Plushwork with cotton floss, a tutorial by Michelle for Mooshiestitch Monday on Feeling Stitchy

Last week, I posted about plushwork with tapestry wool.

I decided to try the same technique with six strand cotton embroidery floss and thought I would share a quick post about how it turned out!


Plushwork with cotton floss, a tutorial by Michelle for Mooshiestitch Monday on Feeling Stitchy

I used the same template and a variegated pink floss.

Plushwork with cotton floss, a tutorial by Michelle for Mooshiestitch Monday on Feeling Stitchy

Half way through my first layer of satin stitches - so far I like how it looks with the variegated pink.

Plushwork with cotton floss, a tutorial by Michelle for Mooshiestitch Monday on Feeling Stitchy

I completed 4 layers of floss on each petal.

Plushwork with cotton floss, a tutorial by Michelle for Mooshiestitch Monday on Feeling Stitchy

Once again - the fun part - cutting through the layers.

Plushwork with cotton floss, a tutorial by Michelle for Mooshiestitch Monday on Feeling Stitchy

Pull out the template...

Plushwork with cotton floss, a tutorial by Michelle for Mooshiestitch Monday on Feeling Stitchy

Here is what it looked like before I "fluffed" it ...

Plushwork with cotton floss, a tutorial by Michelle for Mooshiestitch Monday on Feeling Stitchy

Here is what it looks like after.

Plushwork with cotton floss, a tutorial by Michelle for Mooshiestitch Monday on Feeling Stitchy

I really like the end result with the embroidery floss! I also thought it was easier to stitch with the floss than wool, since wool is much more bulky, but I am also new to wool stitching.

A few more photos of different angles...

Plushwork with cotton floss, a tutorial by Michelle for Mooshiestitch Monday on Feeling Stitchy


Plushwork with cotton floss, a tutorial by Michelle for Mooshiestitch Monday on Feeling Stitchy

I see lots of possibilities of using this technique to add more dimension to my stitching too.

Plushwork with cotton floss, a tutorial by Michelle for Mooshiestitch Monday on Feeling Stitchy


What do you think? Which version do you like better - cotton floss or wool?

I have a few more ideas for plushwork, so you may be seeing some more posts about it in the future.....


August 29, 2016

Mooshiestitch Monday: Plushwork

Plushwork Embroidery by Michelle for Mooshiestitch Monday on Feeling Stitchy

Have you ever heard of plushwork embroidery? It is also called chenille work or Amish stumpwork. 

I had never heard of this technique before until I randomly came across a tutorial for it online - so I decided to try it out and share it with you!

First, you should really check out this awesome tutorial. It includes step by step instructions with excellent photos and a handy pdf template to print the design!

I printed the template, traced and cut out a flower using a cover of a plastic container (specifically from a yogurt container!).


Plushwork Embroidery by Michelle for Mooshiestitch Monday on Feeling Stitchy

My first try was with Appleton wool on linen fabric.

Plushwork Embroidery by Michelle for Mooshiestitch Monday on Feeling Stitchy

Plushwork Embroidery by Michelle for Mooshiestitch Monday on Feeling Stitchy

The technique is very easy to learn -  if you know satin stitch you can do this!

Plushwork Embroidery by Michelle for Mooshiestitch Monday on Feeling Stitchy

Done with the first layer.

Plushwork Embroidery by Michelle for Mooshiestitch Monday on Feeling Stitchy

I repeated two more layers of the same wool.

Plushwork Embroidery by Michelle for Mooshiestitch Monday on Feeling Stitchy

The next step is my favorite - cutting the layers!

Amish Stumpwork by Michelle for Mooshiestitch Monday on Feeling Stitchy

After I cut all the layers I removed the plastic template.

Plushwork Embroidery by Michelle for Mooshiestitch Monday on Feeling Stitchy

Here is the finished plushwork flower!

Plushwork Embroidery by Michelle for Mooshiestitch Monday on Feeling Stitchy

See how fluffy! It reminds me of turkey work.

Plushwork Embroidery by Michelle for Mooshiestitch Monday on Feeling Stitchy

I think it could have used a couple more layers of wool to make it fluffier, especially in the center of the flower, but it was good practice.

Next, I chose a bigger size flower, cut the template out of cardboard instead of plastic - it worked just as well - and I used DMC tapestry wool.

Plushwork Embroidery by Michelle for Mooshiestitch Monday on Feeling Stitchy

Here it is with one layer of light blue and adding my second layer of dark blue.

Plushwork Embroidery by Michelle for Mooshiestitch Monday on Feeling Stitchy

Added another layer of dark blue - for a total of three wool layers.

Plushwork Embroidery by Michelle for Mooshiestitch Monday on Feeling Stitchy

Cut through the layers and remove the template...

Chenille Work by Michelle for Mooshiestitch Monday on Feeling Stitchy

Chenille Work by Michelle for Mooshiestitch Monday on Feeling Stitchy

Notice the difference with the DMC tapestry wool? It is a thicker wool than the Appleton wool. 

Chenille Work by Michelle for Mooshiestitch Monday on Feeling Stitchy

I definitely like the end result with the thicker DMC wool. What do you think?

Chenille work by Michelle for Mooshiestitch Monday on Feeling Stitchy

Have you ever heard of plushwork? 

If you decide to give it a try, be sure to post your photos in the Feeling Stitchy Flickr Group or tag your photos on Instagram!


For more plushwork inspiration, check out this great Pinterest board.


SITE DESIGN BY RYLEE BLAKE DESIGNS