Showing posts with label summer. Show all posts

July 30, 2016

Floss Review & free pattern: DMC Coloris Floss


Hello all! Today, I have the lucky task of writing a floss review for DMC Coloris floss. Seriously, I was over the moon when the nice people at DMC Commonthread sent me this:

All the colors

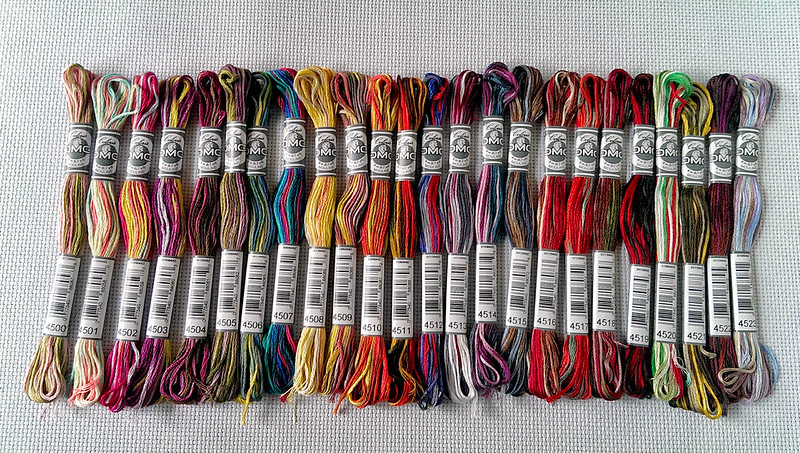
Yes, that's all 24 colors of new DMC Coloris floss. I think I took a million photos of them, then slowly moved on to crafting with them.

The floss is 6 strand embroidery floss, which is variegated in 4 shades of DMC colors. These colors are not always complementary, as in the traditional DMC variegated floss or Color Variations floss you may have used before - instead they are bright, contrasting colors that are very lively and fun.

In addition to numbers, each color has a name, which is an especially nice touch. Here is the full color card, from the DMC site:


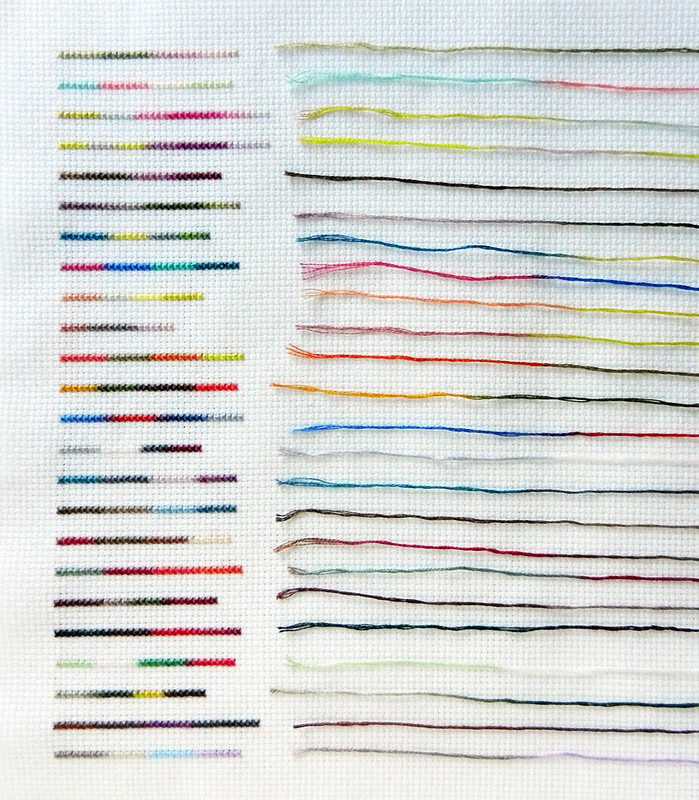
Below, I cross stitched one line of each floss color to give you an idea of how many stitches you can do before the color changes. Next to each line is the remaining 4 strands of each color :

strands of DMC Coloris floss

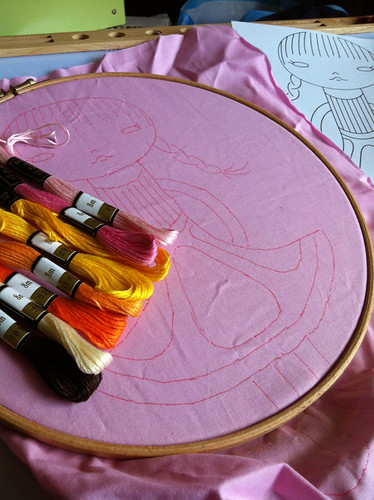
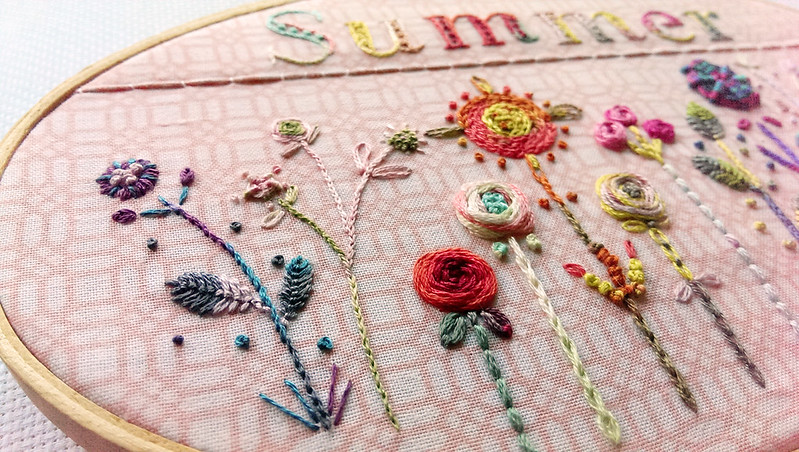
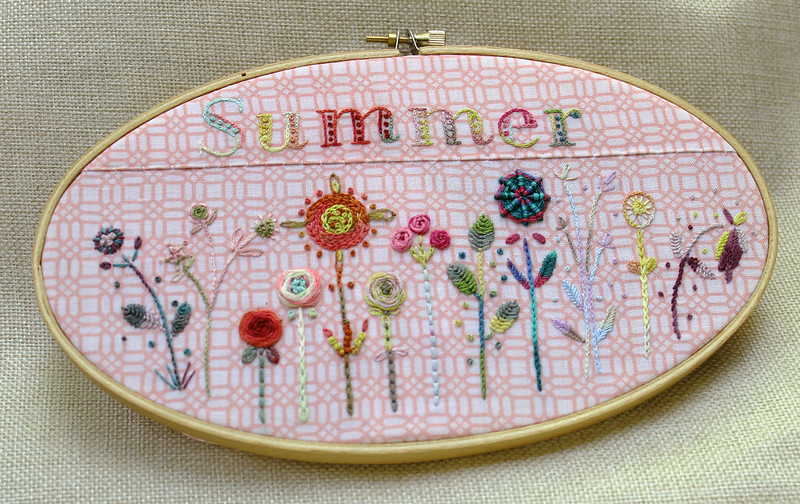
I chose 12 of my favorite Coloris shades and embroidered a small 5 x 9 in. hoop with a design I made up as I went along. I used 2-4 strands of floss, using as many stitches as I felt like experimenting with.

closeup on Summer hoop

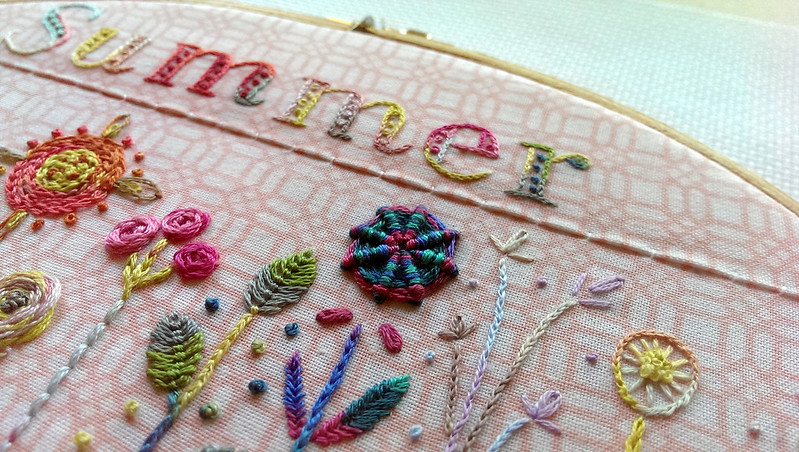
I stitched each flower with a different color, so I could see how each color changes...

closeup on Summer hoop

For the lettering, I traced a free font I found online and used 2 strands of floss to do a tiny split stitch.

I used a finer needle than I normally use, and that helped to keep my stitches tiny:

closeup on Summer hoop

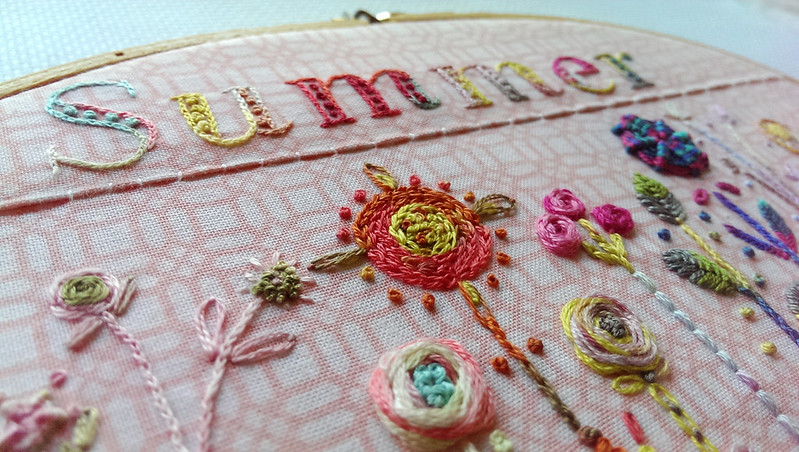
Here is the final design - it's a bit wonky, but lots of fun to stitch. Some colors show up better than others on the pink quilting fabric I chose, but it was mainly a learning exercise for me.

Stitched with DMC Coloris floss

Edit: I was asked which colors I used in my hoop, so I'll list them for you, from left to right.
Lettering: 4501, 4508, 4517, 4509, 4502, 4506
Flowers: 4514, 4500, 4517, 4501, 4510, 4509, 4502, 4506, 4507, 4523, 4508, 4503

Here's a free pattern I made, if you'd like to stitch along with me!

Free pattern


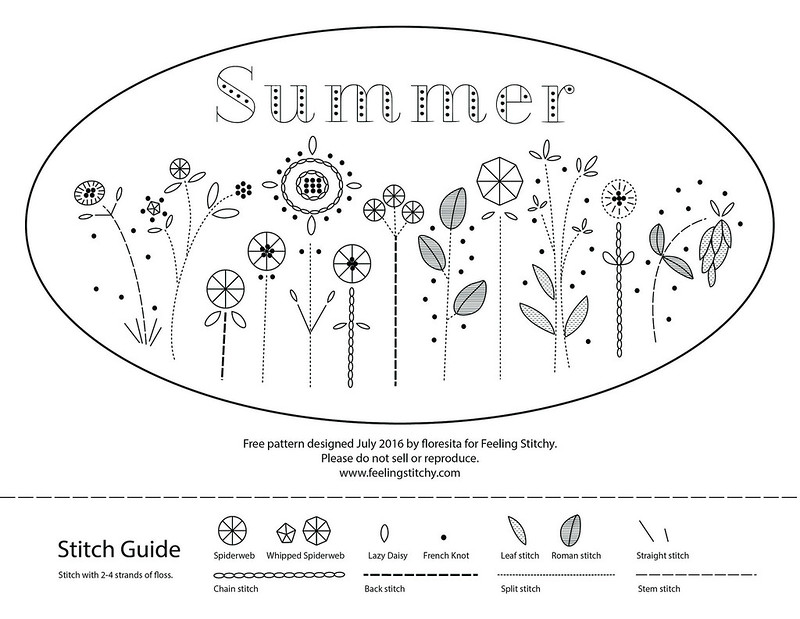
I tried to mark all the stitches I used, but feel free to do your own thing! If you print the design on 8 1/2 x 11 paper it "should" fit into a 5x9 in. hoop, but I'd test it out first to be sure.

I would definitely recommend giving DMC Coloris floss a try - it gives a lovely pop of color to even a basic project like mine. That's my two cents, and thanks again to DMC for sending this floss to me to try out!

What do YOU think of DMC Coloris floss? Have you seen it in your local stores? What kind of project would you stitch with it?

Hi, I'm floresita, editor of Feeling Stitchy. I'm an avid stitcher, knitter, and crafter. You can see more of my stitching on Instagram and my blog. My vintage transfer collection is on Vintage Transfer Finds.

Feel free to email me with any ideas for the blog!

June 6, 2015

Learn the Butterfly Chain Stitch


Happy Weekend, fellow stitchers!

It's the first weekend in June, which means summer is officially on the way. I bet many of you are preparing for long weeks ahead filled with travel, gardening projects or maybe figuring out how to entertain your kiddos when they finish up the school year! If that's the case, hopefully you have another week or two to relax and take some time out for yourself, which is why this is the perfect weekend to learn another stitch!

Today we're learning the Butterfly Chain Stitch, a very pretty border/band stitch that you can work on pretty much any fabric or canvas. Maybe it's just because it has the word butterfly in the name, but to me this stitch is perfect for summer. It's simple, but there is a special method to doing it correctly. In fact, I realized after I had taken all my photos that I had done the stitch incorrectly, so I had to go back and do it all again!

Setting up the stitch is simple. I'm working on pretty pale blue aida I found in my stash with stranded floss in a few different colors. To start, you'll make a series of three straight stitches evenly spaced across your fabric. These can be any size you want, and spaced any way you want.


Since I'm working on aida fabric, it's easy to put the exact same amount of space between your stitches, in my case 3. But if you're working on linen or cotton you can measure your spaces by making small notches on your finger to help with your spacing, like in the picture in the middle. Make as many sections as you like to fit your space. 

Now here's our trick. Sometimes a picture can do more for me than anything else, so I'll start there!


You'll work the decorative part of your band from right to left. Come up with your fabric to the far right of your last section of stitches. Place your floss over all three stitches. It helps to hold it tight out to the left, especially if you're working with a long piece of thread, so you can create a little loop for your needle. Slip your needle under the three stitches, then over the thread you're holding out to the side, and pull through. (If you're familiar with the twisted chain stitch, this is just like that!) Pull your stitch tight so that the thread pulls the three straight stitches together and pinches them in the middle.


Without piercing your fabric, repeat on all the other stacks. This part of the stitch is worked completely on top of the fabric. Here's another photo further down the row. You'll notice I change colors here, because this is the part I had to redo, after I had done all my other rows correctly :)


And there you have it- the Butterfly Chain Stitch! I love how creative you can be with this technique. I made a little sampler of different versions, most of which I just made up because I thought they would look neat!


I played with the spacing of my straight stitches on the top two rows, doing an even increase/decrease on both sides for the top one, then just showing different spacings on the second. To me, the more space you leave the more celebratory the band becomes. Our middle band is straight forward and by the book. Below that I really enjoyed playing with size. I did sets that were double the height with two evenly spaced decorative chain stitches on top. I think it looks like a little picket fence! The last one is my favorite. The center stitch of each section is slightly longer than the outer two, which makes our pinched sections look like little stars. This option would be lovely on a retro themed project or maybe even and art deco design.

I hope you enjoyed learning this new stitch with me! What ideas do you have for incorporating this into your every day stitching? Share them in the comments below or post projects in our Flickr pool for everyone to see. Happy Stitching!


Hi, I'm Whitney - I share a new embroidery stitch on the blog once a month, learning as I stitch along with the rest of the blog. Embroidery is my first and true crafty love, though I also enjoy painting, sewing and other crafts. My other loves include graphic design, craft beer and baking.

You can also find me on my blog Whitney Makes and on Tumblr.

May 21, 2015

Thimblenest Thursdays: Embroidered bookmark for summer reading


Summer reading lists are popping up everywhere as people anticipate the laid-back days that often come with warmer weather. As much as I enjoy technology, I'm still pretty old-school when it comes to books: there's just something about the weight of a book in your hand and the feel of paper on your fingers as you turn a page. I have a bad habit of dog-earing pages (even in library books--shhh!), so maybe a new bookmark will start me on a new path. So, regardless of whether your summer (or winter) reading is required or purely for leisure, join me in creating an embroidered bookmark!

MATERIALS

13" of 2" wide ribbon
6" x 6" square of fabric
2" x 2" square of lightweight iron-on interfacing
file with two flower designs and square template (1.8" x 1.8") or choose your own
Embroidery floss
Pinking shears
Water soluble fabric marker


Transfer and embroider the design on the 6" x 6" fabric square.


Iron the interfacing to the backside of the embroidered design.


If using the square template provided, cut out the inside of the square without cutting through any of the square's edges. Center the resulting square hole over your embroidered design and trace a square around it with the water soluble fabric marker.


Use pinking shears to cut out the design, following the square's outline.


Fold the ends of the ribbon under twice--1/4" each time and sew in place. The open weave of my ribbon made stitching a little tricky. If your ribbon won't fray you can cut an inverted triangle at each end instead of stitching. 


Position the embroidered square wherever you would like on the ribbon and hand- or machine-stitch in place using a scant 1/8" seam allowance.


Pop your finished bookmark in your latest read and head for the nearest beach, hammock, or hearth (for those in the Southern Hemisphere!).

What's on your to-read list for this summer/winter?

P.S. In two weeks I'll be back to kick off a stitch-along that will span June, July, and August; the end result will be a fun project to add to your autumn decor. See you then!

Hi, I'm Wendy - I've been embroidering since age 9 when my grandma gave me some blank tea towels and a set of Aunt Martha’s transfers. I blog at ThimbleNest.

You can also find me on Pinterest.

June 15, 2014

Patterns: Ice cream hats!

Ice Cream, You Scream... for Embroidery! Ice Cream, You Scream... for Embroidery!

Ice cream, you scream ..... for Embroidery! by Cate Anevski

Summer has hit us here in the UK, it could go away again any second mind you but even if it does I'll keep dreaming of it whilst stitching up these great ice cream patterns from Cate Anevski. 

Also worth a check out is some great extra stuff on Cate's blog at the moment, some cute printables and a romantic free embroidery pattern.

Hi, I'm Jo - I feature new embroidery patterns Sundays on Feeling Stitchy. I also post on our Twitter and Pinterest.

Is there a new pattern you'd like us feature? Email me!

June 2, 2013

Patterns: Wild Olive Summer Stitching Club


Wild Olive Summer Stitching Club sneak peak

This coming Monday (June 3rd), Wild Olive is launching her Summer Stitching Club. Each week between June and August club members will receive a mini embroidery pattern, small enough to fit on a paper pieced hexagon and the ideal size to take with you to the beach or the pool side. They'll also receive instructions on how to do the paper piecing, so by the end of the summer they'll have a lovely table mat or wall hanging. What a lovely way to remember the summer of 2013. You can sign up here, hurry, if you sign up before tomorrow you can join for an absolutely bargain rate!

Hi, I'm Jo - I feature new embroidery patterns Sundays on Feeling Stitchy. I also post on our Twitter and Pinterest.

Is there a new pattern you'd like us feature? Email me!

August 12, 2012

August Stitch Along!


We are very lucky to have the lovely and talented Cate Anevski design a pattern for us, for this month's Feeling Stitchy Stitch Along. Don't you think it's just perfect for stitching up in this hot weather, with a glass of ice cold something with a slice of lemon by your side? And in fact it doesn't have to be lemon, if that's not your thing, change the colour scheme and you've got a little lime slice or a little orange slice! You can download the pattern here (thank you Cate!).

I can't wait to see what everyone gets up to with this pattern! Don't forget to add pics of both your work in progress and your completed pieces to the Embroidery pool on Flickr and use the tag  AugustStitchalong2012 so that we can find you!

August Stitchalong - wip1

My start of Little Lemon Slice, I've picked some nice summery colours and I've blown the pattern up in Word, to make it slightly bigger, as I have plaaaaaaans.........

Hi, I'm Jo - I feature new embroidery patterns Sundays on Feeling Stitchy. I also post on our Twitter and Pinterest.

Is there a new pattern you'd like us feature? Email me!

August 10, 2011

Where's Summer?


I know so many people across the US and abroad are experiencing heatwaves. In my neck of the woods, we are cold! We haven't even had a summer yet. Instead of getting depressed over my lack of heat, I found this beautiful embroidery by Gracie's Garden and instantly felt the summer breeze sweeping across my face, I could smell the fresh grass and hear the birds singing. Thank you so much Gracie for bringing summer to me.

July 18, 2010

Patterns: Summer Girl


Sew Lovely have posted this beautiful free Summer Girl pattern over on Flickr.

I'm finding the height of summer a little quiet on the new pattern front (is everyone out there having too much fun!), so it was lovely having a new pattern to stitch from and with a summer theme to boot!

Hi, I'm Jo - I feature new embroidery patterns Sundays on Feeling Stitchy. I also post on our Twitter and Pinterest.

Is there a new pattern you'd like us feature? Email me!

May 30, 2010

Patterns: Summer Flowers

I love this new summery pattern called Summer Flowers from Carina of Polka & Bloom. I particularly like the colours she's used, as she says in her blog, they remind her of an ice lolly, perfect for a cooling spot of embroidery!

Hi, I'm Jo - I feature new embroidery patterns Sundays on Feeling Stitchy. I also post on our Twitter and Pinterest.

Is there a new pattern you'd like us feature? Email me!

SITE DESIGN BY RYLEE BLAKE DESIGNS