May 10, 2017
Wedding Wednesday: Married
Please go to http://www.feelingstitchy.com/2017/05/wedding-wednesday-married.html to view the original post in its entirety.
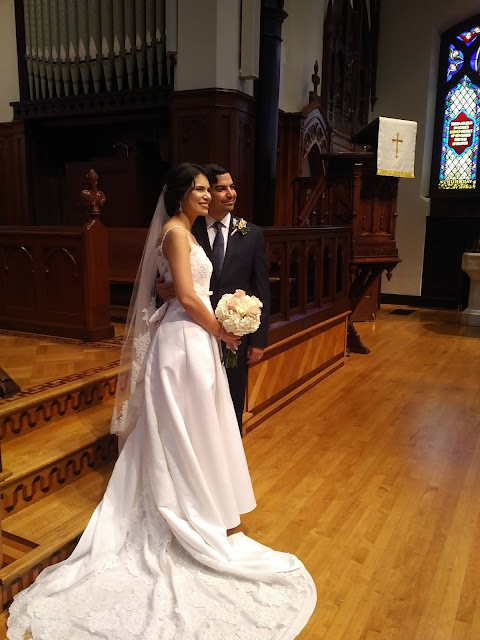
I don't usually post many personal details, but I thought this past Saturday might be a good exception - because on May 6, I married the man of my dreams.
Finding the perfect dress took a little trial and error - since the first one was altered too tightly to be wearable. I was able to get all my money back, and found this lovely vintage dress on Ebay for a pittance. It was perfect, and perfect for me. I loved the back and the embellishments and since it was an older dress, I liked the idea that I'd be wearing something unique.
Our ceremony was beautiful - surrounded by all the people I love (finally in one place!) in our church, which has so much meaning to us. I chose simple flowers because I didn't want to even try to compete with the natural beauty of the church.
Never in a million years did I think we could clean up so nicely. :) It still feels so surreal, like it all happened to somebody else.
I wore a lovely, lighter dress at our reception, which I also found on Ebay and paid less than I paid for my simple bouquet. I'm proud of that because we were on a tight budget, and were prioritizing saving money for our life together.
I wanted to be able to dance and move, and this dress was perfect for that. Although it was a bit snug after flautas and barbeque. :)
I suppose the most expensive purchase of my ensemble was the lovely ivory veil I wore - but I think it was well worth the price. I'd seen many expensive veils with unimpressive stitching, but the embellishment on this one was gorgeous. It was Bel Aire Bridal V7300 in ivory, if you're interested. :)
I'm still waiting on the professional photos - believe it or not these lovely photos were all snapped by my bridesmaid, niece, cousin, and wonderful sister-in-law.
I'll leave you with our first dance - I am so thankful - beyond happy, beyond lucky, and beyond blessed! Hope you enjoy these few photos and memories with me.
Hi, I'm floresita, editor of Feeling Stitchy. I'm an avid stitcher, knitter, and crafter. You can see more of my stitching on Instagram and my blog. My vintage transfer collection is on Vintage Transfer Finds.
Feel free to email me with any ideas for the blog!
March 1, 2017
Wedding Wednesday: Tutorial roundup
Well, my goal to give you a new free wedding-themed pattern each month was challenged by the actual wedding process. :)
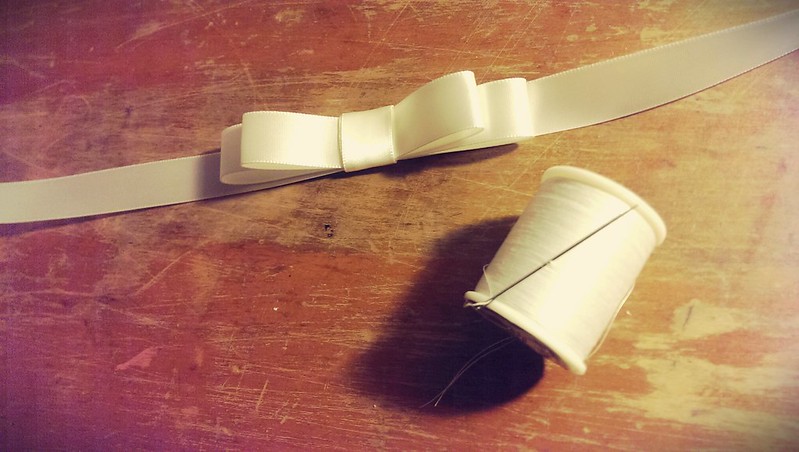
Up above is a small wedding project I fit in - a simple ribbon belt, made (with some alterations) from this Martha Stewart Weddings tutorial.
I made my belt smaller, using 5/8 inch ivory ribbon, so I also made my loops daintier and smaller. I may try another in a thicker ribbon, once I get my dress - which currently is - too small! Ack! I had it taken in and it was taken in too much. Breathing is important, so I'm hoping they can fix it on my next visit.
Adding Cap Sleeves to a Strapless Dress
My dress is strapless, which had me scouring tutorials for adding sleeves. We're getting married in a church, and I wanted to be as respectful as possible, plus, I think my bare shoulders are not the most attractive, let's face it.
If alterations can't fix the unsightly armpit fat-bulge caused by my too-tight bodice, this will be a helpful camouflage. :)
Here are two nice tutorials I found for adding simple cap sleeves:
That's all for now - how about you? Did you do any last-minute alterations to your wedding dresses? Are there any tutorials you can recommend, or something you'd like to see here? Just leave a comment below! :)
Hi, I'm floresita, editor of Feeling Stitchy. I'm an avid stitcher, knitter, and crafter. You can see more of my stitching on Instagram and my blog. My vintage transfer collection is on Vintage Transfer Finds.
Feel free to email me with any ideas for the blog!
February 8, 2017
Wedding Wednesday: Bride and Groom Hoops
Just a quick post to update you on the Bride and Groom hoops I shared with you as a free pattern!
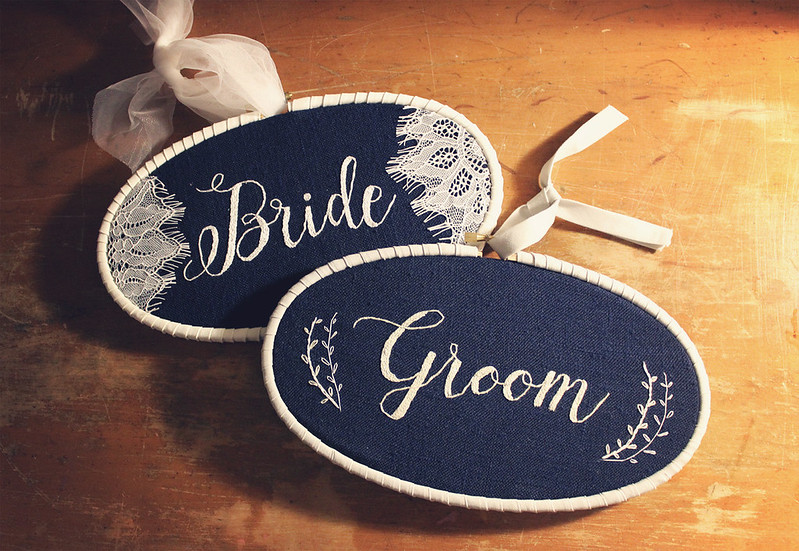
I just happened to be working on a veil project (more on that later, I hope) and had some scraps of pretty ivory Chantilly lace and tulle leftover, so I used them to embellish my Bride hoop. I also used ivory bias tape to wrap the hoop (I originally used light gray in my first post).
On to the Groom hoop - I wanted to embellish it, but not too much and not too flowery, so I stitched some very delicate branches on each side in DMC 822 and white sewing thread. I used the original light gray bias tape, and DMC 822 for the lettering.
The difference in color on the bias tape and stitching is very subtle, but I think it works well:
Here are the links to the free Bride and Groom patterns, by the way:
Would you like a pattern version of the very simple branches design I added to the Groom hoop? Leave a comment here, I'll be happy to draw it up later!
Hi, I'm floresita, editor of Feeling Stitchy. I'm an avid stitcher, knitter, and crafter. You can see more of my stitching on Instagram and my blog. My vintage transfer collection is on Vintage Transfer Finds.
Feel free to email me with any ideas for the blog!
January 28, 2017
Bride and Groom Hoop - free pattern!
So, I have a bit of exciting news for all of you - I'm getting married! And one thing I have noticed is there is a distinct lack of wedding embroidery patterns out there. I've seen all sorts of fun DIY projects on Pinterest, but very few that actually feature embroidery. Well, I'm gonna fix that!
Our wedding date is rather soon - May, but from now until then, my goal is to come up with one free project each month, to celebrate our wedding. Now I know that may be too ambitious, so I apologize in advance if I fall off the embroidery wagon, due to time constraints.
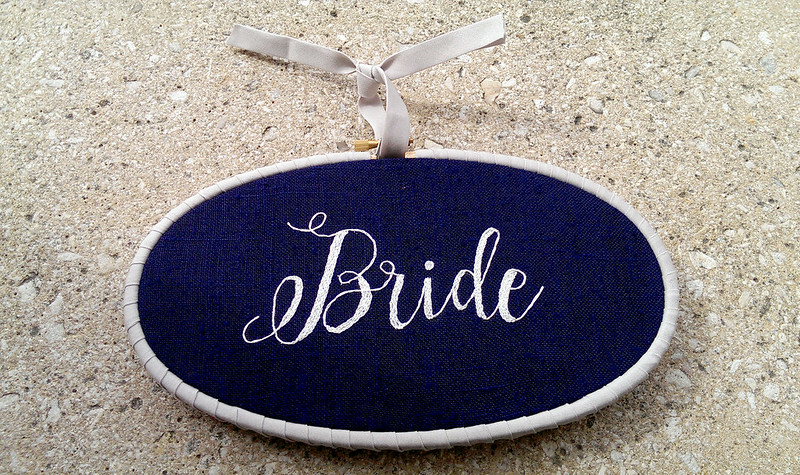
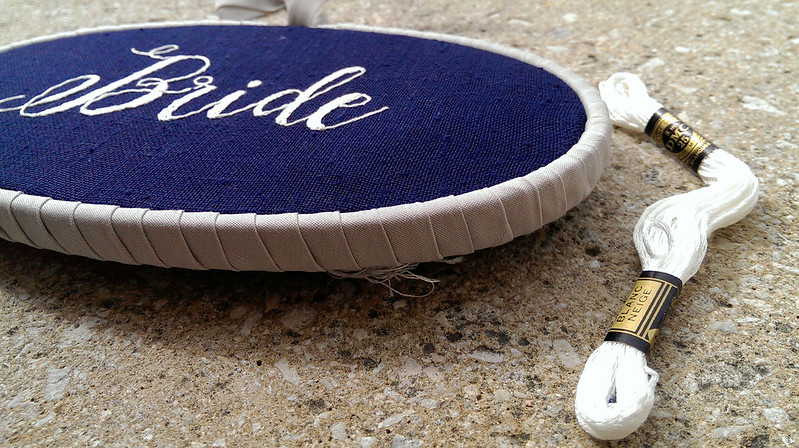
My first free pattern is a lovely Bride and Groom embroidery, to fit into a 5x9 oval embroidery hoop. I used the same stitching method on my lettering as I did with my free Vote pattern - this time I used 3 strands of split stitch for the thicker parts of the letter and 3 strands couched (how to do couching) for the thinner lines.
This is a quick, easy project that stitches up super fast, and a slightly more personalized alternative to the chalkboard signs I've seen all over the place.
I wrapped my Bride hoop in light grey bias tape to give it a more dressed up look:
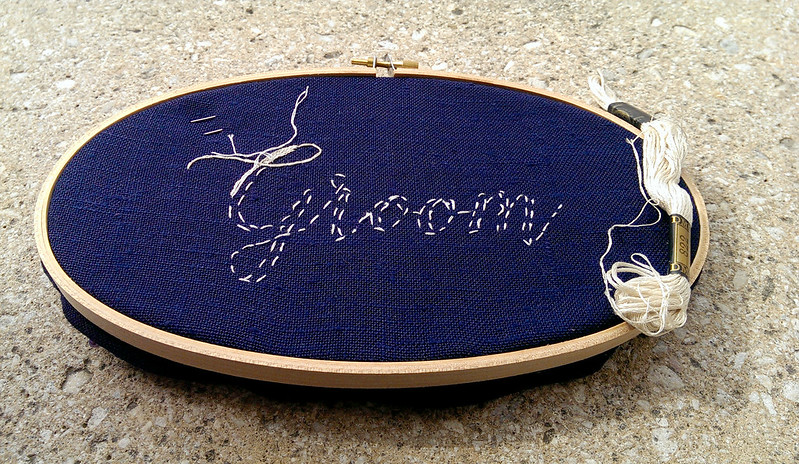
I used my wedding colors as inspiration for these hoops - Navy and Ivory. I used a nice Navy linen I also used in this wedding hoop, and DMC embroidery floss in Snow White for the Bride and 822 (an Ecru shade) for the Groom.
Here is the start of my Groom hoop - instead of transferring, I stitched over tracing paper, then used those lines to embroider my design.
It would also be lovely to use a white fabric for the bride, with gold or ivory thread, and a gray suiting fabric for the groom, with black or navy thread. The possibilities to customize this project are endless!
Have fun with it! And please if you stitch up a version of this project, tag us on Instagram - #feelingstitchyIG, comment here, or email us a photo we can share on our blog!
Hi, I'm floresita, editor of Feeling Stitchy. I'm an avid stitcher, knitter, and crafter. You can see more of my stitching on Instagram and my blog. My vintage transfer collection is on Vintage Transfer Finds.
Feel free to email me with any ideas for the blog!
February 16, 2015
Minted: Gorgeous Paper Invitations
I can definitely picture delicate knots and thin hash lines looking beautiful in white thread on these flowers:
And, how adorable would some thin black thread embellishment look here? :)
Embroidered embellishments aside, the Minted online editor is very easy to use, and you can mix and match fonts, font sizes, and nudge elements around.
Their bold, graphic designs give a custom-designed feel, and as a DIY-er I love being able to preview the finished design:
I'm a straight-up paper snob, so I'm thoroughly impressed by their explanation of paper weights and texture options. I also love all the different edge options and the simple square card options:
Minted also has some mouthwatering letterpress designs like this one - and again, being a paper snob, I am smitten by the lovely vintage look of them:
In short, I'm quite impressed by the gorgeous, graphic feel of Minted invites! And I was also impressed by the pages and pages of positive reviews they have on numerous sites, which was the main reason I chose to recommend them here.
Hi, I'm floresita, editor of Feeling Stitchy. I'm an avid stitcher, knitter, and crafter. You can see more of my stitching on Instagram and my blog. My vintage transfer collection is on Vintage Transfer Finds.
Feel free to email me with any ideas for the blog!
March 6, 2014
The embroidery that changed my life
*this post was meant to be published last week...
July 11, 2013
Cross stitch kit celebrating love
I confess I loved the final result and they were a success... These were the favors received by the ladies, I prepared something different to the gentlemen... But they were also asked to craft :)
At some point, during the reception, men and women were crafting and that was very funny!!
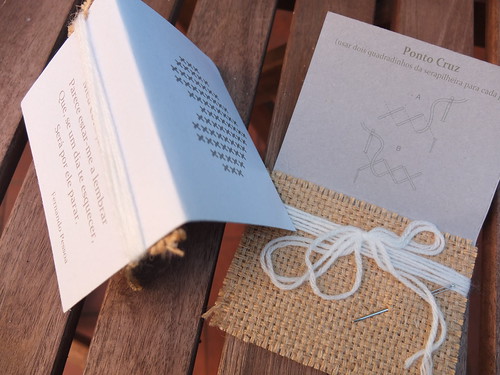 |
| Cross stitch kit, my photo |
 |
| Portuguese poem, my photo |
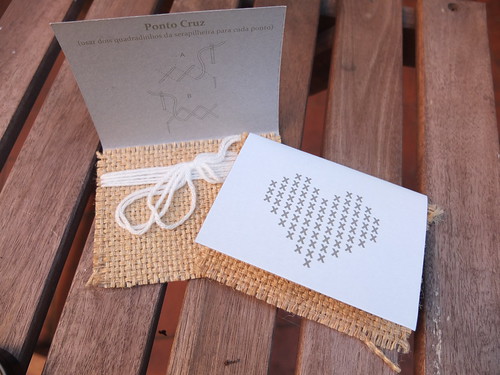 |
| Cross stitch kit celebrating love, my photo |
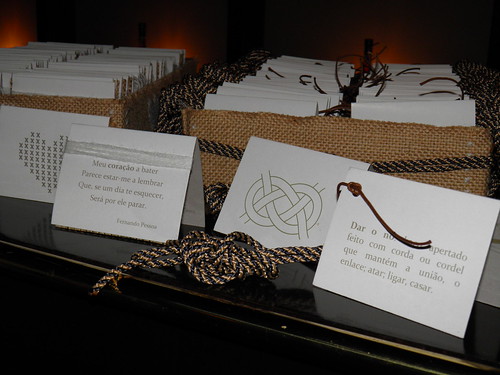 |
| Ladies and Gentlemen's favors, my photo |
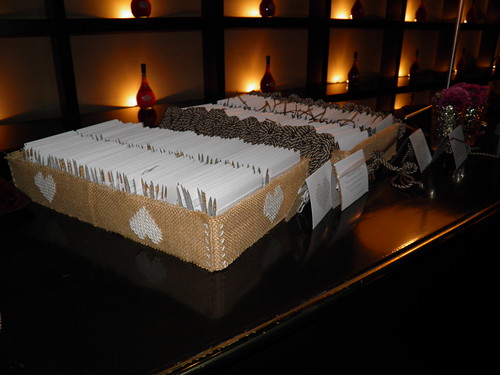 |
| The decoration at the reception, my photo |
 |
| Embroidered hearts during the reception, my photo |
May 4, 2013
Guest Post: A Stitched Wedding by Grace Myers Martin
Photography by Becca Dilley | www.beccadilley.com
When Andy and I got engaged, we were so excited to fill our wedding with our style and lots of personal touches. For him, this meant a fall date, great food and fun music. For me, this meant a vintage style and lots of hand-crafted elements.
Andy’s mom, a super talented crafter, knew just where I was coming from. We decided to knit shawls for the bridesmaids and hand stitch signs for the church and library reception. Certainly no small feat. Our excitement blinded us as to how large (and slightly crazy) an undertaking this was—and I’m so glad it did!
Andy’s mom, Mary Jo, stitched the larger signs for the church and reception. It was truly amazing to see her amazing crewelwork highlighting the two spaces. The signs are so detailed, personal and (as you can see) gorgeous. They added so much beauty to our day.
When I first saw all the embroidery she completed, I was so humbled. I could only think of all the hours she devoted to this project—and making my vision a reality.
I imagine all the time she spent stitching, all the while dreaming about the big day, reminiscing about Andy when he was a little kid and praying for our happy marriage. I think about how generous she is with her time, not just while we were planning the wedding, but every day. These stitches are proof to the joy and creativity she brings to everything she touches.
When I look at the photos of her embroidery now, I’m overwhelmed by my gratitude. I have not one, but two loving, supportive and joyful moms (and dads, too!), whom are my best friends. Working with them on different wedding projects was one of the best parts of the entire process, and something we’ll cherish forever.
We enlisted help from women throughout the families to help knit lace shawls for the bridesmaids—Andy's mom and aunt, my grandmother (my dad's mom), who coincidentally was the woman who taught me how to knit, and I knitted the six shawls. One of my favorite moments from the wedding was seeing all my bridesmaids together with their beautiful shawls knitted by women throughout different generations and branches of our families.
My first stitching project was an impromptu one that I took on after deciding to wear my grandmother’s wedding dress, which my mother also wore when she married my dad. I stitched our three names and wedding dates onto a blue ribbon, which the seamstress sewed into the bottom edge of the dress.
Even though this is a touch that no one could see, I loved that this small detail paid homage to my grandmother and mom—and their loving marriages—and made this heirloom dress that much more special.
I also began working on a larger project: a quote by Joseph Campbell that I found on pinterest (of course). I didn’t have a clear vision of how it would be used in the wedding, but I was so inspired and got stitching right away.
With a large scrap of Anna Maria Horner’s voile in a pretty light blue color, I used a chain stitch to create the letters, and added some subtle detail with backstitches. In the end, this sign decorated our head table. It’s one of my favorite embroidery accomplishments to date.
My other stitching projects were much more simple and smaller in scale. For the table numbers, I drew inspiration from BHLDN’s Hollyhock numbers and found the perfect silk dupioni fabric in a champagne color at a fabric store in St. Paul.
I stitched simple numbers surrounded with a floral and leaf motif, using the backstitch and lazy daisy stitch, then placed them into five-inch wooden hoops. I love how the table numbers, along with the beautiful flowers, soften the library space and add handmade charm.
About a month before the wedding, I finished all the table numbers and decided to keep stitching (I’m crazy, remember?) With the remaining silk, I created signs for our chair backs, echoing the floral motif from the table numbers and the light blue color from the Thomas Campbell quote. I also stitched a sweet phrase for the cake table with our family photos.
While our wedding would have been just as fun and special without all the stitching, I’m so glad that we took on this labor of love.
I can honestly say that it never stressed me out. Actually, it was the opposite: settling into the couch with our little puppy sitting on my feet, focusing on one stitch at a time helped me to relax and remember what was really important: marrying my best friend and the support of our amazing family.
With hand embroidery, there’s no choice but to embrace the slow pace and find beauty in your imperfections. It’s what I love about stitching any day, but especially in the months leading up to our wedding.
Thank you, Grace - for sharing your photos and stitching with us! For more on Grace, visit her blog.
All photos are credited to Becca Dilley, view more photos of the wedding on the photographer's blog.
Hi, I'm floresita, editor of Feeling Stitchy. I'm an avid stitcher, knitter, and crafter. You can see more of my stitching on Instagram and my blog. My vintage transfer collection is on Vintage Transfer Finds.
Feel free to email me with any ideas for the blog!


