Showing posts with label brooch. Show all posts

April 2, 2014

Blue Bird Brooch

Blue bird brooch
I have always suspected that Blue Birds were very distinguished. Klaudia Wisniewska proves my theory with her absolutely stunning Blue Bird Brooch.  I can't decide which I love more, his little tuft of hair or his smoking jacket. You can see other beautiful pieces from Klaudia on her Flickr feed. 

February 5, 2013

Tutorial Tuesday

Happy Tuesday, everyone!

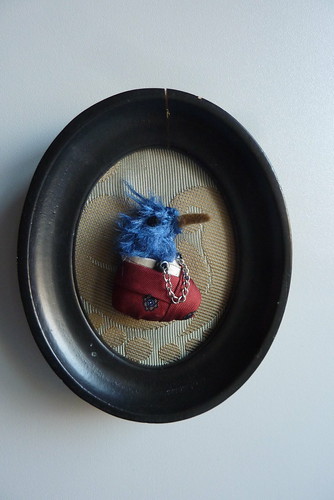
This week's tutorial is one of my favorite's so far! I found these awesome embroidery frame pins on etsy and knew they would be great to feature as a tutorial. I seem to be leaning toward smaller stitches, lately, but I just love the way these smaller designs are turning out, especially when they are wearable.


If you would like to make this embroidered pin/brooch, here is what you'll need:

-pin/brooch mounting (available here)
-embroidery floss (I used DMC No.8 floss)
-scissors
-small piece of felt
-embroidery pattern
-paper
-water soluble transfer pen or pencil
-muslin or cotton fabric


I took an embroidery design from Aimee Ray's Doodle Stitching book. She has a wonderful collection in this book and they come on a disc, which make it easy to adjust the size prior to printing. 


The pin mounting frame comes in three pieces, the front frame, the backing, and the pin back.


Let's get started!

Step One: Determine the sizing of your pattern according to the frame of the pin mounting. I traced the pin mounting using the inside line of the front frame as a guide, then sized the pattern accordingly. On my computer, scaling the image down to 13% was the perfect fit for this pin mounting, but you may have to play around with sizing to get the right one for you.


Step Two: Once the pattern was the size I needed, I transferred it to the fabric by taping it on the window and using the daylight as a backlight. 


Step Three: Place your fabric with the transferred pattern into a hoop and stitch. I apologize for not taking a picture at this stage, I was too excited to see the pin finished, that I moved to the next step sans photo.

Step Four: Once your stitches are complete, turn your design over and place the frame of the pin mounting over your stitches. Center the design and draw a circle about half an inch around the outside of the frame and cut along that line.


Step five: Using the front frame of the pin mounting piece again, trace the frame onto a piece of felt. This will go behind your stitches in the frame to give it stability and create a firm fit in the mounting.


Step Six: Take the pin backing, and align the felt and your stitched piece over it so that the stitches are centered.


Carefully, turn these three pieces over and using a sewing needle with coordinating thread, make a running stitch along the edge of the fabric with your stitches on it. Pull it snug in order to encase the felt and the pin backing behind your stitched piece of fabric. The tighter you pull this running stitch, the smoother your stitched piece will appear once it is in the frame. Knot the thread when you get it snug enough to your liking and everything is centered in the frame.


Step Seven: Once you have your stitched piece in a place that you like, fit it into the front frame piece. Clip any extra threads and such. Place the pin backing over the back, making sure to place the pin in the right place so it won't look crooked when you pin it to your blouse or jacket. Once it's all aligned, bend the prongs from the front frame over the back. This will cover your running stitch and make the pin clean and neat. I was able to use my fingers to bend the prongs, but you might want to use jewelry pliers. 


Step eight: Pin the embroidered piece to your blouse, or jacket, or hat, or wherever you like, and enjoy!


This is a great way to enjoy some of those smaller embroidery pieces. I hope you get to give this a try. 

Hope you have a happy Tuesday!

Hi, I'm Kristen! I am a lover of all things stitchy and crafty. I have been sewing for as long as I can remember. My grandmother taught me how to sew Barbie clothes when I was young and I have been sewing ever since.

You can find me at Bobbypin Bandit, on Instagram, and my Etsy shop.

May 8, 2012

Tutorial Tuesday


This week's tutorial was inspired by two things: 1) the FS April Monster Cupcake Stitchalong and 2) my best friend's recent decision to purchase a bakery. I love a good cupcake as much as anyone else. So, instead of wearing a heart on my sleeve, this is a cupcake to take its place.
It's a cupcake badge! It could also be considered a brooch, but I am sticking with it being a badge. Now, it isn't a monster cupcake like the stitchalong. It's a cupcake I free handed on a piece of scrap fabric. You could use any image you wanted and turn it into a badge. I think it would be fun for parties, or bridal and baby showers. I am going to use this one to celebrate my best friend's baking adventure.

To get started, you'll need the following:
-embroidered design of your choice 
-a 4-inch embroidery hoop
-two 6x6-inch pieces of scrap fabric (it can be larger than this, if you have it)
-scrap trim ( I used lace ribbon, but you can use pom fringe or any trim of your liking)
-pins
-one 6x6-inch piece of batting or a handful of poly-fil
-thread in different colors of your choice
-embroidery and sewing needles
-one safety pin
-scissors
-a sewing machine (this can be hand sewn, but if you want to use a machine, get it fired up!)

Step 1: Embroider your design of choice onto the fabric. I free handed my cupcake, but you can stitch anything you might want.
I let the hoop guide my design size. I followed the edge of the hoop to create the stitched border around the cupcake.
Step 2: Trim the fabric to 5x5 inches. Don't cut the fabric in a circle, leave it in a square for now.
Step 3: Place the fabric with your stitched design on top of the batting. I used a running stitch to attached the batting to the fabric by following the border I had stitched while the fabric was in the hoop.

NOTE: If you decide to use poly-fil, you will skip this step and continue on. 

Step 4: I used the base of the embroidery hoop as a measurement guide for the lace ribbon that I used as trim. I cut just a little extra overlap. 
Step 5: Arrange the trim on top of your design with the ends or outside edge facing inward. We are going to stitch the other piece of fabric on top of this, then turn it. Once we turn the badge, your trim will be right side out.
Step 6: Once you have your trim placed over your embroidered design, cover it with the blank piece of fabric and stitch around the edge in a circle. Make sure to leave a little space open to turn the badge. I was able to see through my fabric and used the stitched borders as a guideline.
Step 7: Now you can trim around the edge you just stitched and flip your badge. I left a little extra fabric on the opening I'll used to flip the badge so that I have enough to slip stitch it shut.
Step 8: Fold in the opening you used to flip the badge and slip stitch it shut. 

NOTE: If you decided to use poly-fill, this is when you would stuff the badge, and then slip stitch it shut.
Step 9: Your badge should look something like this now. Stitch the safety pin to the back and it's ready to wear.

I love the idea of this as a brooch or badge, but if you like, you could pin it to a tote or handbag. If you're feeling really adventurous, you can swap the safety pin out for a bobby pin or hair clip and wear it in your hair. 

I hope you enjoy making your own badge. I am off to see if I can trade this badge for some sweet treats from my best friend.
I hope you enjoy this badge. Please stay tuned in the coming weeks for more tutorials and, on occasion, a tutorial roundup with more fun and colorful projects for you to try.

Hi, I'm Kristen! I am a lover of all things stitchy and crafty. I have been sewing for as long as I can remember. My grandmother taught me how to sew Barbie clothes when I was young and I have been sewing ever since.

You can find me at Bobbypin Bandit, on Instagram, and my Etsy shop.

November 9, 2009

Good Enough to Eat


This pomegranate brooch looks good enough to eat. The garnets are beautiful seeds. Thank you  BrooklyneChaos.

May 19, 2009

little bird


stitched by BridgetFarmer

Sweetness from artist and printmaker, Bridget Farmer. Her bird etchings are gorgeous, too.

Hi, I'm floresita, editor of Feeling Stitchy. I'm an avid stitcher, knitter, and crafter. You can see more of my stitching on Instagram and my blog. My vintage transfer collection is on Vintage Transfer Finds.

Feel free to email me with any ideas for the blog!

May 12, 2009

Greta brooches


stitched by mary's granddaughter

I'm really loving these sweet and serious circus bears by Cindy. Like to see more? Visit her Etsy store.

Hi, I'm floresita, editor of Feeling Stitchy. I'm an avid stitcher, knitter, and crafter. You can see more of my stitching on Instagram and my blog. My vintage transfer collection is on Vintage Transfer Finds.

Feel free to email me with any ideas for the blog!

April 16, 2009

Key Brooches

key brooches
stitched by MaMagasin

Lovely, no?

Hi, I'm floresita, editor of Feeling Stitchy. I'm an avid stitcher, knitter, and crafter. You can see more of my stitching on Instagram and my blog. My vintage transfer collection is on Vintage Transfer Finds.

Feel free to email me with any ideas for the blog!

March 15, 2009

Trees

Tree Patterns
stitched by kayla coo

I am in awe of kayla coo's fiber arts. Each item she creates is so amazingly and intricately detailed.

Hi, I'm floresita, editor of Feeling Stitchy. I'm an avid stitcher, knitter, and crafter. You can see more of my stitching on Instagram and my blog. My vintage transfer collection is on Vintage Transfer Finds.

Feel free to email me with any ideas for the blog!

SITE DESIGN BY RYLEE BLAKE DESIGNS