Showing posts with label vintage embroidery patterns. Show all posts

May 25, 2014

Patterns: Beautiful vintage pattern embroidery photography

Untitled

Untitled by Bang Kao

There's some beautiful in progress style embroidery shots in the Embroidery pool on Flickr at the moment. It's hard to choose but I think this one by Bang Kao is my favourite. She doesn't list where the pattern is from, but I see she also has the photo in the New Embroidery with Vintage Patterns pool, so I'm guessing it's a vintage pattern, it looks like it. You could probably find something similar in the Hoop Love Vintage Transfer pool.

Hi, I'm Jo - I feature new embroidery patterns Sundays on Feeling Stitchy. I also post on our Twitter and Pinterest.

Is there a new pattern you'd like us feature? Email me!

January 9, 2014

Cesto da Roupa...

Olá! The first weeks of this year I'll be showing some more works from Portuguese embroiderers. I believe it is a great way of beginning the year... isn't it?

And let's begin with Isabel Jardim and her blog "cesto da roupa"... I would translate it as clothes basket... Because I believe she did not mean laundry basket... but maybe the real problem is with my English. :)

I got to know her work three years ago and I loved the originality and freshness of how she worked with fabrics... so different from what I usually see. But I only discovered embroidery on her work very recently...

Some years ago Isabel begun publishing beautiful painted  laundry bags and bed sheets but soon her charming bed covers became a success and I believe that was when she started showing her embroidery stitches... soon delicate stitches began embellishing many of Isabel's works. And she brought them from the bed to the table. Later, her doll lavender bags with cute embroidered faces were the confirmation that embroidery was there to stay. :)

Today I bring you some photos of more recent pieces of work with embroidered details that make them so special and unique... 


Photos from Cesto da Roupa
Photo from Cesto da Roupa

Isabel's bunting banners and this beautiful bag embroidered with little birds show her inspiration from vintage motifs...


Photos from Cesto da Roupa

 And this toilet bag surely shows Isabel's preference for floral patterns...


Photo from Cesto da Roupa

Lately, Isabel has been dedicating some of her stitches to our little friends... and she embroidered a beautiful collection of pillows for pets...

But I will leave the best for last... so don't forget to pass by next week. I'll show you my favorite works from "cesto da roupa" and you'll learn a little more about Isabel and her relation to embroidery.

September 17, 2013

Tutorial Tuesday

Happy Tuesday, everyone! I have a cute and easy tutorial for you today, featuring a vintage embroidery pattern available for free from French-Knots.com. I embroidered this ribbon frame pattern, and added my hand written initial, on the front of a small pouch. I will be doing some traveling in the near future and needed a jewelry pouch for toting around my rings and things.


To make your own jewelry pouch, you will need the following supplies:

- Two pieces of fabric 9-inches wide by 14-inches long (one for exterior & one for lining)
- One 35-inch piece of ribbon or string
- One medium-sized safety pin
- Embroidery supplies
- Sewing machine and coordinating thread
- scissors
- iron and ironing board


Step One: Transfer your embroidery pattern to your fabric and stitch it up. I used this ribbon and flower frame pattern, and hand wrote my initial into the center. If you don't want to add your own handwriting, there are various embroidery alphabets available, some great ones are available here, or you could use your favorite computer font.


Step Two: Place your exterior and lining pieces of fabric right sides together. Mark a 2-inch space that will remain open and unsewn along one of the longer sides. Using a 1/2-seam allowance, stitch around all four sides, leaving that 2-inch space open.


Step Three: Clip the corners and flip the fabric out through the 2-inch opening and press. You don't need to worry about stitching the space used to flip just yet. We'll stitch it shut in the following steps.


Step Four: With your lining piece facing up, fold over 1-inch of the short edges of fabric and press. Stitch each side along the bottom edge to create the space for the drawstring.


Step Five: Fold the fabric in half so that the lining is exposed and the exterior fabric is facing itself.


Stitch up both sides using a 1/4 seam allowance, stopping just at the perpendicular stitch, made to create the space for the drawstring. This stitch will close the opening we used to the flip the fabric in Step Three. Flip.


Step Six: Run a safety pin through one end of the ribbon or string. Use the safety pin to guide the ribbon, push the ribbon through both sides of the top edge. 


Step Seven: Knot the ends of the ribbon or string. I decided to trim mine a bit at this stage. 


Add your items and enjoy!


Hope you give this tutorial a try and take it on your next trip! 

Hi, I'm Kristen! I am a lover of all things stitchy and crafty. I have been sewing for as long as I can remember. My grandmother taught me how to sew Barbie clothes when I was young and I have been sewing ever since.

You can find me at Bobbypin Bandit, on Instagram, and my Etsy shop.

January 22, 2013

Tutorial Tuesday

Happy Tuesday, everyone! It seems Valentine's Day is everywhere I turn. In order to join in on the Valentine's Day prep, I searched for some vintage embroidery patterns perfect for the day o' love and found some fantastic ones at French-Knots

Once I had decided on which pattern to stitch, I thought it would be cute for a Valentine's Day coffee/tea cup cozy. I used the lazy daisy pattern of the heart with an arrow through it, which is available here. I scaled the pattern down to 35% and printed it to fit the center front of the cozy.


In order to make a Valentine's Day coffee cup cozy of your own or to gift, you'll need the following supplies:

-fabric for front and back of the cozy (approximately 10x5 inches of each)
-embroidery hoop
-embroidery pattern of choice
-embroidery floss (I used DMC floss No.8 in red 666 and Perle Iris No.8 in 5064)
-batting
-2-inches of elastic 
-one button
-sewing machine
-scissors
-iron

Step One: Transfer and stitch your pattern onto your fabric of choice. I scaled down my pattern of choice to 35%, before printing and transferring it to the fabric. 


Step Two: Once your stitching is complete, take the template and place it over your stitches, making sure the stitching is centered. Using the template, cut one of each of the front, back, and batting.


Step Three: Layer the pieces so they can be sewn together starting with the batting, then fabric back right side up, and fabric front with right side down. Take the elastic and form a loop. Place the loop side between the front and back pieces on one of the shorter sides. Pin the three pieces together. Stitch around the edges with a 1/4-inch seam. Make sure to leave a 2-inch space open so you can turn the cozy. 


Step Four: Clip the corners, turn the cozy, and press. 


Step Five: Stitch around the edge of the cozy to finish off the edges and close the space used to turn it right side out. 


Step Six: Place the button on the short edge of the cozy, opposite the side with the elastic, and stitch in place. 


Step Seven: Wrap the cozy around your next coffee or tea cup, and you have instant Valentine's Day flavor.


Hope you enjoy and give this tutorial a try! Have a great day!

Hi, I'm Kristen! I am a lover of all things stitchy and crafty. I have been sewing for as long as I can remember. My grandmother taught me how to sew Barbie clothes when I was young and I have been sewing ever since.

You can find me at Bobbypin Bandit, on Instagram, and my Etsy shop.

December 27, 2012

AMOR - My best wishes for 2013

Olá! I'm passing by only to wish a great 2013 and to offer you a late Christmas gift...

After reviewing the book "Traditional Embroidery of Portugal" I begun adapting and recovering some vintage patterns that came in the design sheets. To end 2012 I decided to share with you one of my favorite patterns, already embroidered in my cork fabric book cover...

This pattern belongs to Azores embroidery (that I will review soon), called the Long and Short stitches embroidery, usually embroidered with two shades of blue.

Amor motivo para bordar - "Amor" (love in Portuguese) embroidery pattern
Embroidery pattern adapted from "Traditional Embroidery of Portugal".

Pattern from Traditional Embroidery of Portugal
Design sheet from "Traditional Embroidery of Portugal"

Book cover and back cover
Book: Traditional Embroidery of Portugal

I believe that in 2013 "all we need is love"... And as the Portuguese word for LOVE is AMOR, this is my way of wishing you all the love in the world!

See you next year!

November 20, 2012

Tutorial Tuesday


Hello everyone! Happy Tuesday. I have a quick tutorial for you today. This can become a very nice little gift for the holidays or a contemporary take on creating a potential family heirloom hanky. I have been super inspired by vintage stitches lately and thought it would be fun to create something similar to those vintage handkerchiefs I love so much.


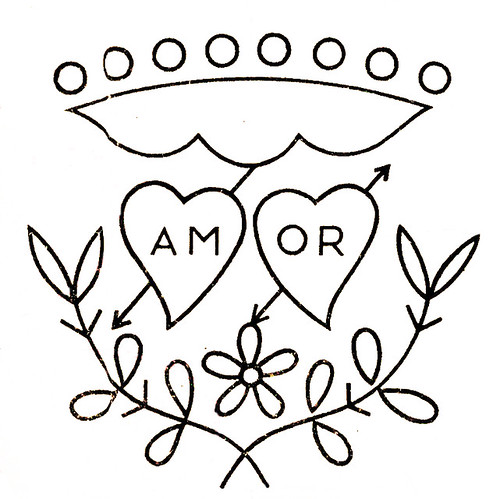
Thanks to Floresita, our editor and fellow blogger here at Feeling Stitchy, I found this darling bird embroidery pattern at her Vintage Transfer Finds blog, and it's free! She has some great vintage patterns in her archives at VTF, but I opted for this little bird in order to place it on the corner of a hanky. I found a package of 6 handkerchiefs at Target for $5, and I will be using one of those here.

To make this sweet little hanky you will need:

-A handkerchief
-Embroidery floss in colors of your choice
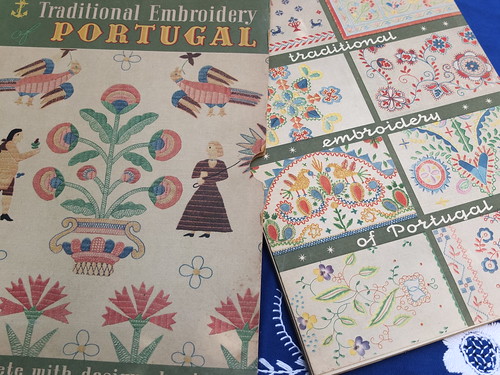
-Vintage pattern
-Pencil or water soluble transfer pen
-Embroidery hoop


Step 1: Begin by washing and pressing the handkerchief. This will take care of any shrinkage that may occur. 

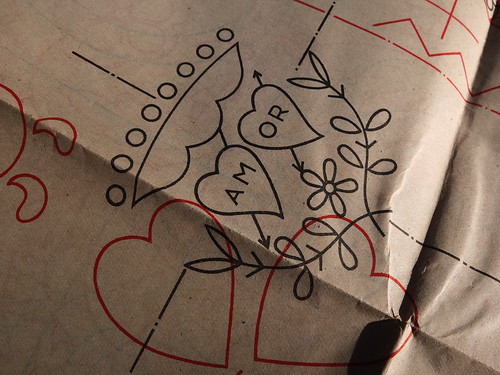
Step 2: Transfer your pattern to the handkerchief. The hanky is so thin, that it was very easy to see through to transfer the pattern. I used a pencil to transfer the pattern in order to keep the line thin, but it's just as easy to use a water soluble transfer pen.


Step 3: Separate the strands of floss in order to use thinner strands and create a more delicate look. I used 6 strand floss, and separated it into different strand widths throughout the pattern. For the bird, including the eye, beak and little claws, I used three strands of floss and a backstitch. The lazy daisy leaves and french knots are 4 strands of floss, and the branch is 6 strands of floss in a split stitch.

I find that it makes it easier for me to pull strands of floss apart if I pull them very slowly and I don't use a very long piece. I use the length from my finger tips to my elbow as the measurement for floss that I intend to separate.


Step 4: Stitch up the hanky. As you are stitching, make sure you tightly knot the ends of your floss and trim the excess as close to the knot as possible. I double knotted my stitches just to make sure they would not unravel during use or washing.


Step 5: This step is optional. My sister requested that I place a bow tie on the bird, so I did that, which means this hanky is being sent to her. 


Step 6: In order to ensure that your embroidered hanky can stand the test of time and become a vintage or heirloom hanky in the future, it's important to care for your stitches when washing. I usually wash hand embroidered items on the delicate or hand washing cycle in the washing machine. For smaller more dainty stitches, I recommend hand washing with a mild detergent, something akin to laundry detergent for babies. If you get makeup or lipstick on your hanky, I recommend spot cleaning and then washing the whole hanky by hand. It takes a little more time to care for stitches like this, but they will last.

Step 7: Enjoy your hanky! These would make a great gift to a family member or friend, as well. It's quick, and has a very nice handmade touch.


Hope you enjoy and have a great Tuesday!


Hi, I'm Kristen! I am a lover of all things stitchy and crafty. I have been sewing for as long as I can remember. My grandmother taught me how to sew Barbie clothes when I was young and I have been sewing ever since.

You can find me at Bobbypin Bandit, on Instagram, and my Etsy shop.

SITE DESIGN BY RYLEE BLAKE DESIGNS