Showing posts with label fill stitches. Show all posts

July 3, 2015

Friday Instagram Finds No. 11


On this Friday's edition of Friday Instagram Finds, we're going international (at least for me)! Today I'm featuring @olive7306 who, based on my intel from Google Translate, is from Korea. Olive creates hand embroidery, and also creates hardanger, which you'll see below. I'll use Google Translate to "write" this in Korean, too.

금요일 인스 타 그램이 금요일 에디션 발견, 우리는 (적어도 나를 위해) 국제거야! 오늘은 구글 번역에서 인텔 기반으로, @의 olive7306을 특징으로하고있어, 한국에서입니다. 올리브는 손 자수를 생성하고, 또한 당신이 아래에 볼 수 덴저를 만듭니다. 나는 구글이도 한국어로 "쓰기"로 번역 사용합니다.


This first hoop is uniquely beautiful in its simplicity. Equally appealing is the placement of the subject in the hoop. Placing it off center to the left creates visual interest. Olive's precise stitches are phenomenal!

첫 번째 후프 단순에서 유일하게 아름답다. 마찬가지로 매력적인 후프에서 피사체의 배치입니다. 왼쪽으로 중심을 그만 두는 것은 시각적 인 관심을 만듭니다. 올리브의 정확한 스티치 현상입니다!


Here is the promised hardanger! The first picture shows how Olive started out, and the second shows the work in progress. I've never tried hardanger, but seeing how beautiful it is makes me want to give it a try.

여기에 약속 덴저입니다!첫 번째 사진은 올리브가 시작하는 방법을 보여줍니다, 두 번째는 진행중인 작업을 보여줍니다. 나는 덴저을 시도,하지만 그것이 얼마나 아름다운 보는 것은 나에게 그것을 시도를 제공 할 수 없어요.


The bouquet of flowers below is so pretty! Again, Olive's stitches are so precise and beautiful, and her fill stitches are wonderful! 

꽃의 꽃다발 아래 너무 귀엽다! 다시 말하지만, 올리브의 바늘은 매우 정밀하고 아름다운, 그리고 그녀의 채우기 바늘은 훌륭합니다!


I had to include this piece because lavender is my favorite herb!

나는 라벤더는 내가 제일 좋아하는 허브이기 때문에이 부분을 포함했다!


I hope you've enjoyed this Korean edition of Friday Instagram Finds (FIF) on Feeling Stitchy, which is brought to you weekly, and you'll check out Olive7306's work on Instagram! And I hope Google Translate worked, and any Korean readers understand what I wrote. Please leave comments below to let me know what you thought.

While you're on Instagram, make sure you follow Feeling Stitchy! We're @feelingstitchyish. We'd love for you to stop by and say hello.

Hi, I'm Amy - I feature interesting embroidery and stitch-related photos I find on Instagram. I'm a hand embroiderer and maker.

You can find my embroidery and crafts on:
Instagram | Random Acts of Amy | Facebook

May 2, 2015

Learn the Couched Filling Stitch

I don't know about all of you, dear readers, but I am so relived that it's finally the weekend. It's been so busy in my little world that I was thrilled to find the time to sit down and teach myself a new stitch from my encyclopedia this month, and it turned out to be a fun one!

Today we're going to learn something called the Couched Filling Stitch, also known as Jacobean couching. It's simple but the result is really fun! I love fill stitches like this that are open and airy. They lend themselves to so many different uses. This one is also a great fill stitch because the whole fill is worked at once, meaning you see progress much faster! 

Let's dive in! I'm working in a plain weave fabric, with two different colors of stranded floss. This stitch would also be beautiful on aida or canvas where you can count out your spacing and be really precise. It's extremely important to use a frame or hoop to stretch your fabric though, as we'll be starting with some long stitches that we want to keep tight and even. I'd also recommend a ruler and a pencil or (preferably) a water soluble pen. 


The first thing you need to do with this stitch is lay out your foundation stitches. You can eye ball it if you wish or count your stitches on your aida, but I used a ruler to make tick marks every quarter of an inch across my hoop. I did the same thing from top to bottom, making a right angle with my hash marks. You can see the cross section in pencil in the photo below.

Now you can begin stitch. You're going to create long stitches all the way across your hoop. Start in one direction (I chose top to bottom) and make all of those stitches first.


In the first picture, you can see how I used the ruler to guide my stitches and kept them aligned with the hash marks and nice and straight. This isn't necessary, but it really helped. Once you have all your stitches from top to bottom, do the same thing from side to side on top. (This is where a water soluble pen and a super tight hoop come in handy! You can see a few pencil marks because my fabric came a little loose while I was stitching.)


Unlike some other couching stitches where you have to weave your foundation stitches together, this one doesn't need that. It's going to look loose and messy at this point, but once we add our final step it will all fall into place.

Now that our whole area is covered in this grid, we're going to add individual cross stitches at every intersection to anchor the threads. You can begin anywhere in the area that you like. Simply choose an intersection and come up with your needle in the bottom left corner and go back through your fabric in the top right corner. Come up again in the top left, finishing in the bottom right.


Repeat this step at every intersection! If you're filling in a shape you can use different colors on your cross stitch to add shading or use a different texture from your foundation grid.


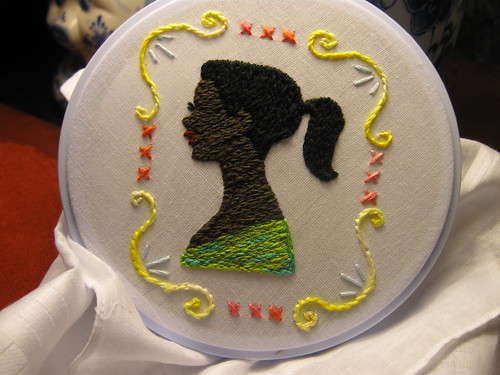
This would be a great fill stitch for any kind of silhouette project, and actually made me think of stars while I worked. It would be fun to use similar colored fabric and grid thread, and a metallic thread in certain spots to stitch the big dipper or other constellation. Of course, it also looks nice all on its own! 

I myself went a little rouge on my hoop. It's fun knowing how to complete all the traditional stitches, if only so I can break the rules when I use them later! 

I loved how geometric this was turning out, so I decided to leave a portion of my hoop open at the top with only vertical grid stitches, and to fill in only sections of my grid with cross stitches. Sometimes it's fun to use embroidery to simply create a texture, not stitch a particular object. Of course, you can see some spots where I missed the pencil marks completely, but those will erase right out! 


Well I hope you enjoyed learning the couched fill stitch, and if you already knew it I hope I inspired you to try it again in a fun new way! Be sure to upload your examples  of this stitch to the Flickr Pool for everyone to see and leave me a comment with any questions or suggestions. See you next time! 

Hi, I'm Whitney - I share a new embroidery stitch on the blog once a month, learning as I stitch along with the rest of the blog. Embroidery is my first and true crafty love, though I also enjoy painting, sewing and other crafts. My other loves include graphic design, craft beer and baking.

You can also find me on my blog Whitney Makes and on Tumblr.

March 9, 2014

Patterns: Moonlight Forest

Moonlight forest

Moonlight Forest by Aimee Ray

Aimee Ray has a new pattern out! Called Moonlight Forest, it is accompanied by a great little tutorial on how to fill stitch those foxes on her blog.

Hi, I'm Jo - I feature new embroidery patterns Sundays on Feeling Stitchy. I also post on our Twitter and Pinterest.

Is there a new pattern you'd like us feature? Email me!

February 18, 2011

Viva la Stitch

Viva la Stitch

There's not much I can add to this statement stitched by Kwgronau! Except maybe that I recently started a Flickr Group dedicated especially to Embroidery Stitches. It's called the Embroidery Stitch Gallery and you can check it out here. It focuses on stitches and techniques rather than finished pieces. Viva la Stitch would have been a great name for that group.

In the near future I intend to write a post (or maybe several) about fill stitching.  Not just about the 'traditional' fill stitches (like the satin stitch) but also semi-fill stitches (like the seed stitch) and creative use of filling your embroidered piece like the one I showcased last week.  So if you have a wonderful photo posted in the Embroidery Group please tag it with FillStitch so I will be able to find it easily. I may get in touch with you to ask you about your techniques. Thanks in advance! Viva la Fill Stitch!

November 29, 2010

Tiny portrait of a fox

winter fox  
I almost can't believe this is fox portrait measures only one inch! Amazing stuff. Bricolagelife has made more of these tiny woodland animal portraits, or embroidimals as she calls them, and she writes about them here.

November 21, 2010

Superbunny

Unfortunately I can't bring you your weekly dose of new embroidery pattern today, as I can't find any to blog about, so instead I thought I'd bring you . . . . . . Superbunny!

Superbunny by Dozydotes

Superbunny is an original design by Dozydotes, apparently she had trouble with this piece, posting a picture of the same piece a day earlier saying she wasn't happy with it. I think both photos look great, I love all that fill stitch and how dynamic Superbunny is as he reaches for the stars!


Hi, I'm Jo - I feature new embroidery patterns Sundays on Feeling Stitchy. I also post on our Twitter and Pinterest.

Is there a new pattern you'd like us feature? Email me!

October 24, 2010

Patterns: Mary Jane

it did not rain on Mary Jane


Oh I love anything with a fill stitch and anything with umbrellas and well this is so cute! The pattern is Mary Jane by Etsy seller LiliPopo (known as glassmountain on Flickr).

Hi, I'm Jo - I feature new embroidery patterns Sundays on Feeling Stitchy. I also post on our Twitter and Pinterest.

Is there a new pattern you'd like us feature? Email me!

July 9, 2010

Obey the Hypno Toad

 Finished Hypnotoad

Surely Pam Aghababian must have been under the influence of Hypno Toad when she decided to use only fill stitches on this embroidery. But the result is absolutely amazing. It's a striking image made with only a few colours and not that much (fill)stitch variety either. Don't look Hypno Toad into his eyes for too long though or you will be fill stitching your next project too! (not that there's something wrong with that...)

May 24, 2010

Fill Stitches


Just an amazing Frenched Bear by Bustle & Sew.

I love a coloured piece.

I've made a little gallery of lovely filled stitcheries recently added to the flickr group & I thought you might enjoy it.

My fillers of choice are chain stitch & french knots. I'm terrible at satin stitch & not much better at long & short. I think it's got something to do with my persistent refusal to use a hoop.

What's your filler of choice?

January 14, 2010

Red bellied woodpecker

red bellied woodpecker
Stitched by fionabearclaw

This girl knows how to stitch. Wow!

Hi, I'm floresita, editor of Feeling Stitchy. I'm an avid stitcher, knitter, and crafter. You can see more of my stitching on Instagram and my blog. My vintage transfer collection is on Vintage Transfer Finds.

Feel free to email me with any ideas for the blog!

September 18, 2009

Portrait of a Lady

Portrait of a Lady
Stitched by Amanda Panda Pants

Wow, just love this. Another thing you gotta love about Ms. Amanda Panda Pants is how she really rocks those fill-in stitches. And yep, that's from the new Sublime Stitching book, Embroidered Effects. Need to get your hands on one? I'll have to do a giveaway for that soon!

Hi, I'm floresita, editor of Feeling Stitchy. I'm an avid stitcher, knitter, and crafter. You can see more of my stitching on Instagram and my blog. My vintage transfer collection is on Vintage Transfer Finds.

Feel free to email me with any ideas for the blog!

August 14, 2009

Roaring 20's

Fill stitches!
Stitched by LittleBeeThatCould

Oh, goodness. Look at those fill-in stitches! Those colors. Those eyes. Amazingness! And yep, that'd be from another Sublime Stitching pattern, Roaring 20's.

Hi, I'm floresita, editor of Feeling Stitchy. I'm an avid stitcher, knitter, and crafter. You can see more of my stitching on Instagram and my blog. My vintage transfer collection is on Vintage Transfer Finds.

Feel free to email me with any ideas for the blog!

SITE DESIGN BY RYLEE BLAKE DESIGNS