Showing posts with label wool embroidery. Show all posts

January 8, 2018

MooshieStitch Monday: "Mountain Road" Vintage Embroidery Kit


Happy New Year Everyone! I am here today to share with you some photos of an embroidery kit I just finished!

A couple months ago, I decided to go on Ebay for embroidery stuff. I randomly searched for "vintage embroidery kits" just to see the results - and what do I find but this Sunset Designs Jiffy Stitchery "Mountain Road" embroidery kit (un-opened) from 1975!


The kit included instructions, wool yarn, needle, and fabric with the design printed on it.


The wool yarn was a 3-ply stranded Persian yarn. Most of the kit was stitched using 1-ply, with the exception of the French Knots, those are 2-plies of yarn.


Only three stitches were recommended: satin stitch, French knots, and Pueblo stitch.

I had never heard of the Pueblo stitch before, but from the stitch drawing included in the instructions, it looked similiar to the back stitch and split stitch combined?? I could be very wrong - and I didn't do much research on it either - so I just worked the split stitch wherever they said to use Pueblo stitch! :)


Here is a better view of the drawing included in the instructions - numbered with what color to use.


Here it is with all the greenery finished. I switched to an oval hoop because it was easier to use.


Making progress on the mountain...


Half way done with all those French knots!!


The finished product!


The fabric really puckers once I remove it from the hoop. I don't have a hoop that is the size or shape to keep the finished work in, so I am not sure what to do with it. Should I try to find a hoop to put it in or should I frame it??

Just for fun I took a photo of the of the finished piece next to the photo on the kit's cover to compare.


Up close!


The surprising thing about this kit was how fast I actually finished stitching it! In 2017, I barely embroidered. So when I got this kit, I used it as motivation to get stitching again and my goal was to finish by the new year. 

I really did enjoy the ease of it - no thinking about what stitches to use, the fabric and yarn were included, and having the kit tell me exactly what colors to stitch and where. (Can you tell I am new to the whole embroidery kit game?? ha ha Maybe I just need to get more kits to stitch....)


What's your favorite embroidery kit? Share in the comments, I would love to hear!


August 29, 2016

Mooshiestitch Monday: Plushwork

Plushwork Embroidery by Michelle for Mooshiestitch Monday on Feeling Stitchy

Have you ever heard of plushwork embroidery? It is also called chenille work or Amish stumpwork. 

I had never heard of this technique before until I randomly came across a tutorial for it online - so I decided to try it out and share it with you!

First, you should really check out this awesome tutorial. It includes step by step instructions with excellent photos and a handy pdf template to print the design!

I printed the template, traced and cut out a flower using a cover of a plastic container (specifically from a yogurt container!).


Plushwork Embroidery by Michelle for Mooshiestitch Monday on Feeling Stitchy

My first try was with Appleton wool on linen fabric.

Plushwork Embroidery by Michelle for Mooshiestitch Monday on Feeling Stitchy

Plushwork Embroidery by Michelle for Mooshiestitch Monday on Feeling Stitchy

The technique is very easy to learn -  if you know satin stitch you can do this!

Plushwork Embroidery by Michelle for Mooshiestitch Monday on Feeling Stitchy

Done with the first layer.

Plushwork Embroidery by Michelle for Mooshiestitch Monday on Feeling Stitchy

I repeated two more layers of the same wool.

Plushwork Embroidery by Michelle for Mooshiestitch Monday on Feeling Stitchy

The next step is my favorite - cutting the layers!

Amish Stumpwork by Michelle for Mooshiestitch Monday on Feeling Stitchy

After I cut all the layers I removed the plastic template.

Plushwork Embroidery by Michelle for Mooshiestitch Monday on Feeling Stitchy

Here is the finished plushwork flower!

Plushwork Embroidery by Michelle for Mooshiestitch Monday on Feeling Stitchy

See how fluffy! It reminds me of turkey work.

Plushwork Embroidery by Michelle for Mooshiestitch Monday on Feeling Stitchy

I think it could have used a couple more layers of wool to make it fluffier, especially in the center of the flower, but it was good practice.

Next, I chose a bigger size flower, cut the template out of cardboard instead of plastic - it worked just as well - and I used DMC tapestry wool.

Plushwork Embroidery by Michelle for Mooshiestitch Monday on Feeling Stitchy

Here it is with one layer of light blue and adding my second layer of dark blue.

Plushwork Embroidery by Michelle for Mooshiestitch Monday on Feeling Stitchy

Added another layer of dark blue - for a total of three wool layers.

Plushwork Embroidery by Michelle for Mooshiestitch Monday on Feeling Stitchy

Cut through the layers and remove the template...

Chenille Work by Michelle for Mooshiestitch Monday on Feeling Stitchy

Chenille Work by Michelle for Mooshiestitch Monday on Feeling Stitchy

Notice the difference with the DMC tapestry wool? It is a thicker wool than the Appleton wool. 

Chenille Work by Michelle for Mooshiestitch Monday on Feeling Stitchy

I definitely like the end result with the thicker DMC wool. What do you think?

Chenille work by Michelle for Mooshiestitch Monday on Feeling Stitchy

Have you ever heard of plushwork? 

If you decide to give it a try, be sure to post your photos in the Feeling Stitchy Flickr Group or tag your photos on Instagram!


For more plushwork inspiration, check out this great Pinterest board.


August 8, 2016

Book Review: Simply Stitched (and Giveaway!)

Hey everyone! Today we get to take a look at a wonderful embroidery book called Simply Stitched: Beautiful Embroidery Motifs and Projects with Wool and Cotton by Yumiko Higuchi.

Just so you know, the book link above is an Amazon Affiliate link - clicking through the link and buying is one way to support our volunteer reviews on Feeling Stitchy.

Don't miss the giveaway at the end of the post where you can win your own copy of the book!!

Simply Stitched, a book review by Michelle for Feeling Stitchy

The author, Yumiko Higuchi, is an amazing embroidery artist. You most likely have come across her work somewhere on the Internet - I know I have seen her embroidered pouches all over Pinterest! So I was very excited to have the opportunity to check out her latest book.

In Simply Stitched, you will find 20 modern and unique embroidery motifs to stitch (plus projects) using a combination of wool and cotton thread.

Simply Stitched, a book review by Michelle for Feeling Stitchy

There are projects for everyone - including a teapot cozy (above), pillow, zipper pouch, and a holiday stocking. There are even a few no-sew projects in the book - such as stitching the designs on a hat or sweater.

All projects include materials list with suggested thread colors, motif template with stitches, and clear, easy to understand instructions.

All stitches used are included in the Stitch Guide at the end of the book.

Simply Stitched, a book review by Michelle for Feeling Stitchy

The book has beautiful color photos of all the stitched designs and completed projects. How cute are those roosters??

Simply Stitched, a book review by Michelle for Feeling Stitchy

I love how all of the motifs could easily be stitched on ANYTHING or could be swapped to different projects in the book.

For example: The tote bag below is beautiful with the suggested flowers - but could also be stitched with either of the anemone or the rooster motifs in the photo above - and be just as cute!

Simply Stitched, a book review by Michelle for Feeling Stitchy

So I tested that theory when I decided on a project to complete from the book.

I wanted to make the needle case which has a thistle embroidery motif. But I really wanted to stitch the bumble bee motif from a different project.

So I made the needle case and embroidered the bumble bee instead...

Simply Stitched, a book review by Michelle for Feeling Stitchy

I think the end result turned out great! What do you think?

Simply Stitched, a book review by Michelle for Feeling Stitchy

I have never stitched with wool before either. This book is great for embroiderers who want to try out stitching with wool.

Here is the inside of the needle case. I used white cotton fabric with grey felt for the inside and black ribbon to tie it shut.

Simply Stitched, a book review by Michelle for Feeling Stitchy

As I mentioned before, the project instructions were very easy to understand - I have very little sewing machine skills and was able to sew up this little case no problem!

Simply Stitched, a book review by Michelle for Feeling Stitchy

I love the use of wool and cotton together. The wool really adds texture and dimension.


If you want to see more of Yumiko Higuchi's work, check out her website: www.yumikohiguchi.com or follow her on Instagram: @yumikohiguchi 


Giveaway Time!!!

To win a free copy of Simply Stitched, please leave a comment on this post by 9 PM US CST, August 12, 2016 and please tell us: Do you ever stitch with wool? What is your favorite thread/floss to stitch with?

** This giveaway is open to the US and Canada only **


P.S. My favorite floss to stitch with is good old DMC cotton 6 strand floss - although, I may start to stitch with wool more often now!! :)

August 16, 2012

Embroidered bookmarks

OlĂ¡! This week I'll bring you a project you can make with your children... Or students... When we try embroidering with kids the major difficulty is finding a simple and attractive project... On Father's day I held an event to which I gave the name "For dad, made with the heart". The idea was to gather children and make a special gift in 1 hour. Concluding an embroidery project within an hour is an ambitious aim and for some of the kids these were their first stitches... But this project was well-approved!

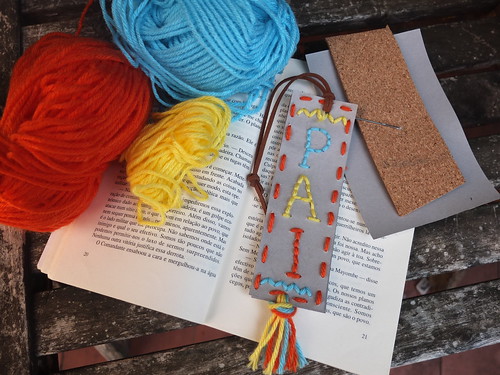
What will you need? Cardstock, yarn, a needle, suede cord (or any other tie that is easier for you), a pattern and something to perforate the cardstock. Try to be ingenious and use what you have on hand... I used the cards that are included in my lacing card embroidery kits, a common pin and a cork pad - or you can opt for a foam pad... But I always prefer Portuguese stuff :). Never forget that everything that pricks can be very dangerous in children's hands, never leave children alone at this stage...

DSCF4105
Yarn, cork, needle and a card.
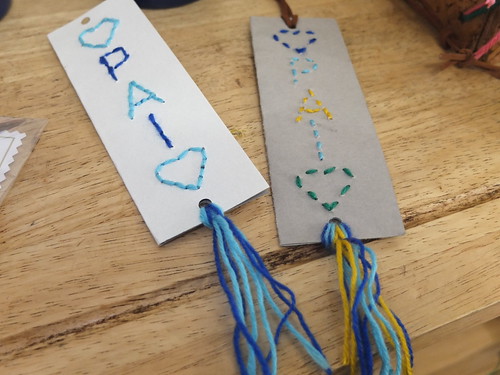
First you must fold the cardstock in half vertically. Choose if you'll want to decorate one side of the bookmark or both sides. I had prepared some patterns that they could choose, using the word "PAI", which means "DAD". I would have preferred to have them design their own pattern but they were too many and there was not enough time. But if you have time, have them draw directly on cardboard, instead of having a pattern on a common sheet of paper, as I did.

DSCF4108
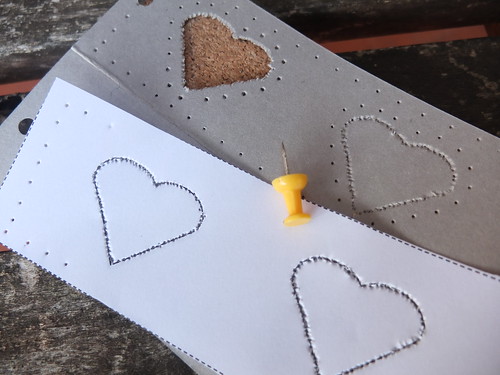
Use a sheet of paper with a pattern and make the hole punching using the pin and the pad.
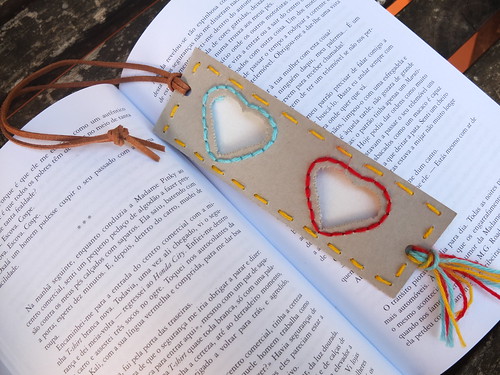
Place the card on the cork pad and the pattern on the card and make small punctures through the pattern with the pin, following the lines of the drawing. Space the holes approximately one centimetre apart. Your bookmark is ready to be embroidered... Choose a simple stitch like running stitch or backstitch.

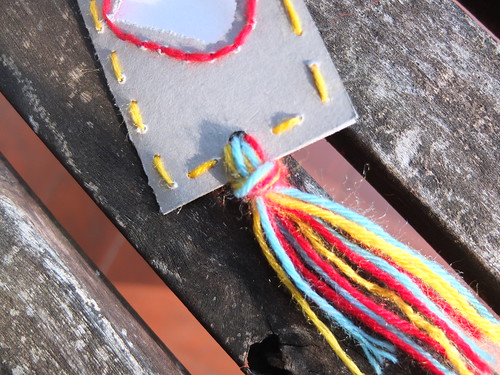
After stitching, join the two parts by folding them in half - punch holes at the top and bottom with a hole punch. At the bottom, use yarn to join the two parts and at the top, the suede cord.

DSCF4113
Use yarn to gather the two parts of the card.
DSCF4116
Easy and beautiful finishing..
And the bookmark is done! I said it was easy... Any child over 5 years old will be able to do it (don't forget to be careful with the pins - there are safer ways of doing this...)

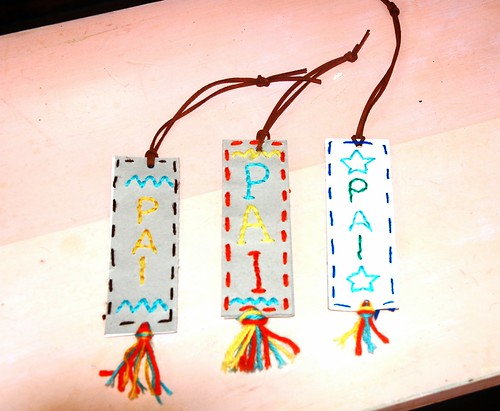
Book markers
Three bookmarks, three happy dads!
DSCF4161
More happy dads :)
DSCF4118
More ideas... 

I hope you enjoy it! Good stitches!
SITE DESIGN BY RYLEE BLAKE DESIGNS