June 29, 2014

Patterns: Las Flores de Frida

FridaKahlo-EmbroideryPattern

Las Flores de Frida by Carina from Polka & Bloom

Carina from Polka & Bloom has branched out to doing people! Embroidery patterns of faces (particularly realistic looking faces) are often tricky but Carina's done a great job here. You can learn more about how she created the pattern, which is fascinating, here. And you can find the pattern itself here.


Hi, I'm Jo - I feature new embroidery patterns Sundays on Feeling Stitchy. I also post on our Twitter and Pinterest.

Is there a new pattern you'd like us feature? Email me!

June 28, 2014

Review: Stitch it with Wool Craftsy Class


When I was contacted by author Kristin Nicholas to review her upcoming Craftsy class, Stitch it with Wool: Crewel Embroidery, I was excited about my first experience with Crewel embroidery. I really enjoyed this experience and recommend this class for crewel beginners - Kristin is a great teacher with a Matisse-like colorful style and her thorough lessons give you all the tools you need to get started! I'll walk you through the class, the materials I used, and the small project I stitched for this review.


The class includes an 8 page PDF with a list of supplies and 2 large designs for the pillows above, with a clear breakdown of color, and which stitch goes where.

Here's a brief overview of the class, which is divided into 7 lessons: Lesson 1 goes into all the particulars of threads, needles, hoops, fabric, and transferring your design. You'll also learn great tips if you have never embroidered, like how to start and end your thread! Lesson 2 covers basic stitches - if you have embroidered for any length of time, you probably already know these - but I would still give them a watch because Kristin gives some great tips and examples. Lessons 3 and 4 are where the good stuff starts for an intermediate stitcher - introducing stitches that build on the basics. Lesson 5 and 6 introduced me to lots of unfamiliar stitches that were not yet in my repertoire - and stitches that lend themselves particularly well to crewel threads. Finally, in Lesson 7, Kristin tells you all about untangling and managing wool skeins, finishing techniques, and a really interesting topic - knowing when to stop. :)

Kristin is a fabulous and thorough teacher - she explains every stitch carefully, taking the time to explain mistakes that you may make, and how to avoid and correct them. Kristin is calming and personable, and I really like that her emphasis is more on creativity and not on perfection, which makes this class a great springboard to create your own projects. I also like that she shows you finished examples of every stitch, so that you can better visualize how each stitch can contribute to an overall design. Her own work features imaginative lines, textures and vivid combinations of color with a lively, painterly style.

You may be asking, do I really need to buy a bunch of crewel wool?

Crewel wool

I was going to experiment with my regular embroidery floss or finer weight yarns until I saw Kristin's online store, and was hooked by her beautiful crewel wool. I bought the Some of Each set (above). Kristin was also sweet enough to add a large square of linen, in the color of my choice - I chose a neutral gray, to make the bright colors of the wool pop.

After taking the Appletons crewel wool for a test drive, I cannot say enough, yes, if you have never stitched with crewel wool, you should certainly try it.

my first stitches with crewel wool

Stitching with wool is SO distinct from stitching with embroidery cotton floss - the wool fiber is very thin, spongy, and springy. It has a marvelous matte texture that piles up nicely as you stitch. If you take this class, I definitely recommend purchasing a few crewel wool skeins. Another important note is that if you stitch with wool, you should definitely use linen fabric (something I learned the hard way, a few months ago). :)

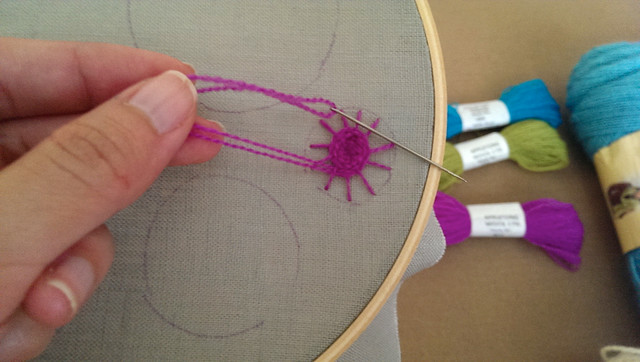
Here is my small project:

Spiderweb stitches

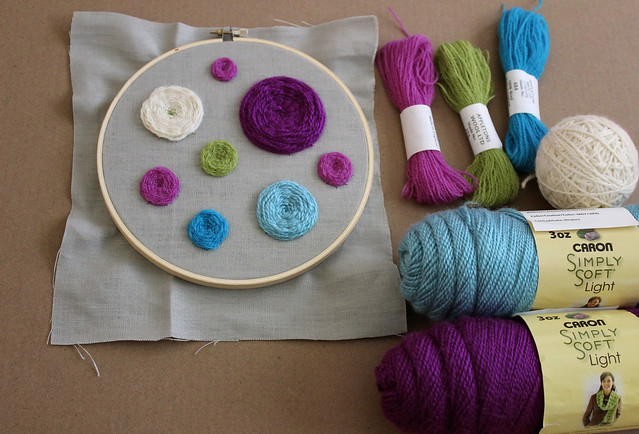
I decided to practice the Spiderweb stitch for this review, tracing random circles to create this design. I used 3 bright colors of Appleton crewel wool, along with 2 light yarns and one thicker white wool yarn from my stash. I have to say, the Spiderweb stitch is addictive and meditative, and I can't wait to try even more stitches from this class.

So, to sum up, Stitch it with Wool: Crewel Embroidery is a great class for beginners to learn crewel embroidery, and it's also perfect for a complete beginner who has never embroidered before. There is plenty of detail, instruction, and inspiration to get you started - whether or not you chose to stitch the pillow designs as they are, or create your own designs. Thank you Kristin, for allowing me to review your class and share it with our readers!

And, thanks to Kristin, for a limited time, we have one more thing to share with our Feeling Stitchy readers - a 50% discount on the Stitch it With Wool class: Get the discount. Hurry up, because that discount expires soon! Edit 7/5/2014 - Sorry guys, the discount has expired, but I still totally recommend the class!

Have any of you experimented with crewel embroidery or stitched with crewel wool? Let me know what you thought of it in the comments!

Hi, I'm floresita, editor of Feeling Stitchy. I'm an avid stitcher, knitter, and crafter. You can see more of my stitching on Instagram and my blog. My vintage transfer collection is on Vintage Transfer Finds.

Feel free to email me with any ideas for the blog!

June 22, 2014

Patterns: Solar System

Solar System Cross Stitch

Solar system cross stitch by Rebecca Greco

This amazing piece by Rebecca from Hugs Are Fun was done as a swap piece over on the & Stitches blog. Luckily we don't have to be too jealous of the lucky recipient, as Rebecca also has the pattern over in her shop! You can find it here.

Hi, I'm Jo - I feature new embroidery patterns Sundays on Feeling Stitchy. I also post on our Twitter and Pinterest.

Is there a new pattern you'd like us feature? Email me!

June 17, 2014

Tutorial Tuesday

Happy Tuesday, everyone!

Today's tutorial comes to you out of somewhat of a necessity in my world. I sew and stitch quite a bit and realized that I needed a thread catcher for the floss tails, threads, and fabric pieces that I snip off of my projects as I am working on them. I know I am not the only one who needs a quick place to toss the excess threads and floss while I am sewing and stitching. I am hoping you can make use of this project in your workspace as you stitch up your WIP, as well!


To make this thread catcher basket out of fabric, you'll need:
- Fabric for exterior (11 inches tall by 14.5 inches wide)
- Fabric for lining (11 inches tall by 14.5 inches wide)
- medium weight interfacing (11 inches tall by 14.5 inches wide)
- sewing machine and supplies
- scissors
- embroidery hoop, floss, and needles

I used the spool image from the Sewing Collage pattern available at Urban Threads.


Step One: Transfer the embroidery pattern to one of the front exterior panels of fabric, keeping it 2-inches from the top edge. Stitch. I used a 3-ply backstitch for this spool pattern.


Step Two: Place the exterior fabrics right sides together, with a piece of interfacing on the wrong side of each exterior piece. You should have a fabric sandwich with interfacing, exterior piece right side up, exterior piece right side down, then a piece of interfacing on top of that. 


Step Three: Sew around the three sides of the exterior and interfacing using a 1/2-inch seam allowance, leaving the top open. 


Step Four: To create a flat bottom for our fabric basket, take one bottom corner and fold it so the seams are laying flat against each other. 


Mark 2.5-inches from the center of the seam, where there is a V. Stitch straight across using the 2.5-inch mark as a guide. 


Clip the excess fabric away. Repeat for other side.


Step Five: Take the interior or lining pieces of fabric and place them right sides together. Stitch along the three edges with a 1/2-inch seam allowance, leaving a 2-inch space open along the center of the bottom edge. 


Step Six: Square off the bottom of the lining as we did for the exterior in Step Four. Mark 2.5-inches from the center of the seam, where there is a V. Stitch straight across using the 2.5-inch mark as a guide. Clip the excess fabric away. Repeat for other side 


Step Seven: Turn the exterior ride sides out. Place this inside of the lining, right sides together. Stitch along the top edge with a 1/2-inch seam allowance. 


Step Eight: Flip the fabric basket right side out, by pulling through the opening in the bottom seam of the lining. 


Step Nine: It is optional for you to press this top edge. Top stitch along the top at the 1/4 inch and 1/2 inch marks. 


Step Ten: Stitch the space used to flip the fabric basket shut. 


Step Eleven: Place close to your sewing machine or work area and toss your clipped threads, floss pieces, and fabric scraps into the basket. 


I hope you enjoy this thread catcher fabric basket and take the time to make one for yourself. It really does help around the work room. 

Hope you have a great Tuesday!

Hi, I'm Kristen! I am a lover of all things stitchy and crafty. I have been sewing for as long as I can remember. My grandmother taught me how to sew Barbie clothes when I was young and I have been sewing ever since.

You can find me at Bobbypin Bandit, on Instagram, and my Etsy shop.

June 15, 2014

Patterns: Ice cream hats!

Ice Cream, You Scream... for Embroidery! Ice Cream, You Scream... for Embroidery!

Ice cream, you scream ..... for Embroidery! by Cate Anevski

Summer has hit us here in the UK, it could go away again any second mind you but even if it does I'll keep dreaming of it whilst stitching up these great ice cream patterns from Cate Anevski. 

Also worth a check out is some great extra stuff on Cate's blog at the moment, some cute printables and a romantic free embroidery pattern.

Hi, I'm Jo - I feature new embroidery patterns Sundays on Feeling Stitchy. I also post on our Twitter and Pinterest.

Is there a new pattern you'd like us feature? Email me!

June 3, 2014

Tutorial Tuesday

Happy Tuesday, everyone!

With summer on its way and so many great summertime tutorials floating around, I thought it would be good to share all these fresh and fun projects with you today!

Welcome the summer blooms with a "Bring on the Sunshine"embroidery pattern and tutorial for 3-D flowers from Crafts Unleashed.

Update summer flip flops using a whipped running stitch with Julie K's tutorial


Brighten up your bathroom with DesignLoveFest's embroidered shower curtain tutorial.


Bev over at Flamingo Toes has a super cute tutorial for an embroidered map of the USA with a chevron print. Would make for a great 4th of July display!


Hope you are able to check some of these out and give them a try!

Have a great Tuesday!

Hi, I'm Kristen! I am a lover of all things stitchy and crafty. I have been sewing for as long as I can remember. My grandmother taught me how to sew Barbie clothes when I was young and I have been sewing ever since.

You can find me at Bobbypin Bandit, on Instagram, and my Etsy shop.

May 25, 2014

Patterns: Beautiful vintage pattern embroidery photography

Untitled

Untitled by Bang Kao

There's some beautiful in progress style embroidery shots in the Embroidery pool on Flickr at the moment. It's hard to choose but I think this one by Bang Kao is my favourite. She doesn't list where the pattern is from, but I see she also has the photo in the New Embroidery with Vintage Patterns pool, so I'm guessing it's a vintage pattern, it looks like it. You could probably find something similar in the Hoop Love Vintage Transfer pool.

Hi, I'm Jo - I feature new embroidery patterns Sundays on Feeling Stitchy. I also post on our Twitter and Pinterest.

Is there a new pattern you'd like us feature? Email me!

May 20, 2014

Tutorial Tuesday

Happy Tuesday, everyone!

I have a super fun tutorial for you today. Embroidery on paper! This is more of a how-to and this technique can be used to turn almost any pattern for stitches into a pattern for embroidery of paper.


To embroider on paper you will need:

- Paper (I used notebook paper, but card stock works well, too)
- Foam core (I used a scrap piece from a different project)
- tape
- Chenille needle
- 6-strand embroidery floss in 3-ply
- Sharpie or marker of choice
- Star pattern


Step One: Print out the star pattern, or your pattern of choice. Use your marker to create dots evenly spaced apart on the lines of the pattern. The dots will be the places where the needle and floss will pass through the paper. (I used the stars available as auto shapes in a word document, and couldn't remove that shadow, so I apologize if it makes the photos appear blurry. The dark thick line is the one we're working with).


Step Two: Place the paper with the pattern on top of the notebook paper and tape it where you want to transfer the pattern. Place the foam core underneath the notebook paper. 


Step Three: Using a chenille needle, or thick needle with a sharp point, punch a hole through each dot along the pattern line. You may want to use thimbles for this, depending on the thickness of the paper.


Step Four: Carefully remove the tape and pattern from the paper, and move the foam core. Your pattern should look something like this.


The notebook paper should look like this.


Step Five: Thread a needle with 3-ply floss, and you can begin backstitching the pattern. Be careful not to pull the floss too much or it could rip the paper. Move slowly and flip the paper back and forth in order to make sure you are stitching along the correct place in the pattern. 


Step Six: Send this as a note, or use it as a very sophisticated doodle! Use this technique on card stock for birthday or special occasion cards. 


Hope you enjoy and give this a try!

Hope you have a great Tuesday!

Hi, I'm Kristen! I am a lover of all things stitchy and crafty. I have been sewing for as long as I can remember. My grandmother taught me how to sew Barbie clothes when I was young and I have been sewing ever since.

You can find me at Bobbypin Bandit, on Instagram, and my Etsy shop.

May 13, 2014

Craftster Sew Lovely Old Hollywood Glamour Challenge

You guys know I LOVE Sew Lovely Embroidery. Those ladies rock my socks! Now they can rock yours with this awesome challenge. It is time to glam it up!  Head over to Craftster and participate in the Sew Lovely Old Hollywood Glamour Challenge. Save the pattern on the site and stitch it up. Go tradition glam or maybe you are feeling a little zombie glam coming on...it is totally up to you! Just grab a hoop, some rhinestones and get to stitching! 

The Details: 

What: Sew Lovely Old Hollywood Glamour Challenge. You MUST use the Marilyn pattern on the Craftster website.. NO EXCEPTIONS! You can alter it any way you wish. 

When: You have until  May 27th to stitch. Entries on due May 28th-June 3rd. Voting will happen from June 4th-10th. Winner announced June 11th. You must sign up for a Craftster account, but it is easy to do and any moderator can help you with uploading your pictures if you need it. 

Now for the good stuff.....

The Prize!  You win all the goodies in the picture below. How awesome is that? 


You can read more about the challenge HERE.

May 7, 2014

Cats and Crafts Experiment

Hi all! To all of you visiting from other places for the Cats and Crafts Experiment - I'm floresita, and welcome to Feeling Stitchy! Penguin & Fish kindly provided an adorable pattern, with no instructions except: be creative.

This idea was so much fun that all of our bloggers took part, and I am proud to present to you Gabi's version:


Gabi says about her piece:
Only 100% Portuguese materials... Cork fabric and cotton perle 8 made in Portugal! And the fastest ever stitching mood!

Next up is Kristen's project!


From Kristen:
I think the new, "Here Kitty Kitty," fabric line from Penguin & Fish is adorable. I particularly enjoy the geometric cat head print (to quilters it would be the fabric with the 9-patch cat heads on it). The embroidery patterns that come with the purchase of a fat quarter bundle are darling - they really coordinate well together for a variety of projects. 


I didn't have the fabric, because it isn't out yet, so I improvised and used what I had to create a "Crafty Cat" Mug Rug. I transferred my embroidery pattern using a light box (I used to find a sunny window and tape patterns and fabric to it in order to transfer, but my sister gave me a light box for my birthday, so that has become my method of choice). 


I decided to use yellows and oranges in this project because the cat reminded me of the family cat we had when I was really young. We called him Butterscotch, and he was an orangey-yellow. I made a small 9-patch piece with 3-inch squares and attached it to the embroidered cat panel. I used 3-ply floss and a backstitch for the majority of the embroidery, with french knots on the cat's quilt. 

Next up is Jo's project:


From Jo:
I enlarged both patterns slightly and printed out multiple copies, so that I could cut out the shape of the cats and use it as a template to cut the cats out of felt. I then appliquĂ©d the felt shapes onto the fabric before transferring the rest of the pattern using a light box. For Knitty Kitty I used tapestry wool as the wool, couching it with a single strand of matching embroidery floss. The knitting needles on Knitty Kitty, each have a bead end. 


For Crafty Cat, I used small scraps and 0.5cm seam allowance to create a quilt top roughly the same shape as the pattern. In this case I appliquéd this onto the fabric before appliquéing the cat. The cotton reel thread was six strands of embroidery floss, couched with a single strand of embroidery floss in the same colour. For both cats and the quilt I stitched around the appliqués, for the cats I used the pattern as a guide to embroider the fur and outline and for the quilt I stitched around and between the different fabric squares.

The bags are lined patchwork (on both sides) drawstring bags and are big enough to hold an embroidery hoop and a few bits and bobs or a few balls of wool.


Next, here is Pam's adorable version - I really love the knit like texture on her knitted square:


 And last up, here is yours truly, floresita, with what I stitched up:

Cats and Crafts Embroidery Experiment

For my versions, I went hunting in my mom's fabric stash and found this nice teal chambray-ish fabric. For Knitty Kitty, I used light pink yarn in a sport weight and knit up a tiny garter stitch square on size 4 needles, casting on a teeny 5 stitches. I used the same yarn to create the ball of yarn shape, adding layer over layer until it popped out into a ball-like texture. I filled the kitty with a combination of embroidery floss and white sport weight yarn - I liked the chunky texture that it gave the fill stitches. The knitting needles are couched pink metallic floss.

For Crafty Cat, I used my zero quilting knowledge to create a teeny crooked quilt top consisting of the gingham square and 4 polka dot squares. I couched white yarn in between to look like piping, and filled in the corners with satin stitched embroidery floss in pinks. I wanted Crafty Cat to be all black yarn, but I filled in embroidery floss here and there in dark gray and olive green to add a bit of texture. Overall, it was super fun, a super quick stitch, and a great excuse to get creative!

Thank you, Penguin & Fish for sharing your cute pattern with us and including us in your tour!

Hi, I'm floresita, editor of Feeling Stitchy. I'm an avid stitcher, knitter, and crafter. You can see more of my stitching on Instagram and my blog. My vintage transfer collection is on Vintage Transfer Finds.

Feel free to email me with any ideas for the blog!

SITE DESIGN BY RYLEE BLAKE DESIGNS