Showing posts with label Urban Threads. Show all posts

June 17, 2014

Tutorial Tuesday

Happy Tuesday, everyone!

Today's tutorial comes to you out of somewhat of a necessity in my world. I sew and stitch quite a bit and realized that I needed a thread catcher for the floss tails, threads, and fabric pieces that I snip off of my projects as I am working on them. I know I am not the only one who needs a quick place to toss the excess threads and floss while I am sewing and stitching. I am hoping you can make use of this project in your workspace as you stitch up your WIP, as well!


To make this thread catcher basket out of fabric, you'll need:
- Fabric for exterior (11 inches tall by 14.5 inches wide)
- Fabric for lining (11 inches tall by 14.5 inches wide)
- medium weight interfacing (11 inches tall by 14.5 inches wide)
- sewing machine and supplies
- scissors
- embroidery hoop, floss, and needles

I used the spool image from the Sewing Collage pattern available at Urban Threads.


Step One: Transfer the embroidery pattern to one of the front exterior panels of fabric, keeping it 2-inches from the top edge. Stitch. I used a 3-ply backstitch for this spool pattern.


Step Two: Place the exterior fabrics right sides together, with a piece of interfacing on the wrong side of each exterior piece. You should have a fabric sandwich with interfacing, exterior piece right side up, exterior piece right side down, then a piece of interfacing on top of that. 


Step Three: Sew around the three sides of the exterior and interfacing using a 1/2-inch seam allowance, leaving the top open. 


Step Four: To create a flat bottom for our fabric basket, take one bottom corner and fold it so the seams are laying flat against each other. 


Mark 2.5-inches from the center of the seam, where there is a V. Stitch straight across using the 2.5-inch mark as a guide. 


Clip the excess fabric away. Repeat for other side.


Step Five: Take the interior or lining pieces of fabric and place them right sides together. Stitch along the three edges with a 1/2-inch seam allowance, leaving a 2-inch space open along the center of the bottom edge. 


Step Six: Square off the bottom of the lining as we did for the exterior in Step Four. Mark 2.5-inches from the center of the seam, where there is a V. Stitch straight across using the 2.5-inch mark as a guide. Clip the excess fabric away. Repeat for other side 


Step Seven: Turn the exterior ride sides out. Place this inside of the lining, right sides together. Stitch along the top edge with a 1/2-inch seam allowance. 


Step Eight: Flip the fabric basket right side out, by pulling through the opening in the bottom seam of the lining. 


Step Nine: It is optional for you to press this top edge. Top stitch along the top at the 1/4 inch and 1/2 inch marks. 


Step Ten: Stitch the space used to flip the fabric basket shut. 


Step Eleven: Place close to your sewing machine or work area and toss your clipped threads, floss pieces, and fabric scraps into the basket. 


I hope you enjoy this thread catcher fabric basket and take the time to make one for yourself. It really does help around the work room. 

Hope you have a great Tuesday!

Hi, I'm Kristen! I am a lover of all things stitchy and crafty. I have been sewing for as long as I can remember. My grandmother taught me how to sew Barbie clothes when I was young and I have been sewing ever since.

You can find me at Bobbypin Bandit, on Instagram, and my Etsy shop.

March 25, 2014

Tutorial Tuesday

Happy Tuesday, everyone!

Today's tutorial was an idea I had when I walked into my sister's office without knocking, and began talking to her before I realized she was on an important phone call. I had to do that apologetic move and bow out until she was finished. I thought a stitched double-sided doorknob hanger would be good, that way my sis could use it to let me know when it was alright for me to barge in, or flip the hanger over if I need to zip my lip. This is a good doorknob hanger for offices and workspaces, but I also thought it might be good to change out the telephone image and use something appropriate for a nursery when the baby is sleeping. Either way, this doorknob hanger can help alert visitors as they approach your door.


To make this doorknob hanger you will need:

-muslin in a 18x18 inch piece (there will be scraps)
-11 inch piece of ribbon
-poly-fil or fiberfill
-embroidery supplies (hoop, floss, scissors, needles)
-sewing machine and coordinating thread
-scissors
-pins
-Telephone embroidery pattern (available at Urban Threads)

I created a pattern of sorts using a free vintage pattern from French-knots.com and incorporated text using a stock font in a Word document. You can access the vintage floral pattern here, but I have also made the floral pattern with text available for you here.


Step 1: Transfer the patterns to fabric. Make sure to place the the patterns far enough away from each other so you can cut 6.5x6.5-inch squares out of fabric with the embroidery at the center. Stitch.

Step 2: Once embroidered, cut two 6.5x6.5-inch squares with the embroidery at the center of each square.


Step 3: Place one square with the right side, face up, and lay the ribbon on top of it with the curved part inward and the edges aligned along the top edge of fabric. The outer edges of the ribbon need to be at least 1-inch away from the side edges of the fabric. Lay the second embroidered square right side down on top of this. Pin in place.


Step 4: Stitch around the exterior of the square with a 1/2-inch seam allowance, leaving one small space at the bottom of the square open, for flipping. I used red so you could see where I sewed this up.


Step 5: Clip the corners and flip, pushing the corners out.


Step 6: Take poly-fil or fiberfill, and stuff the doorknob hanger to your liking. Be careful not to overstuff the hanger, because it can bust out the stitches.


Step 7: Using a ladder stitch, close the space used to flip and stuff the doorknob hanger.


Step 8: Hang on your office or work room door and hope I don't barge in while you are on the phone!


Hope you enjoy this week's tutorial and give it a try!

Hi, I'm Kristen! I am a lover of all things stitchy and crafty. I have been sewing for as long as I can remember. My grandmother taught me how to sew Barbie clothes when I was young and I have been sewing ever since.

You can find me at Bobbypin Bandit, on Instagram, and my Etsy shop.

August 11, 2013

Patterns: Butterfly

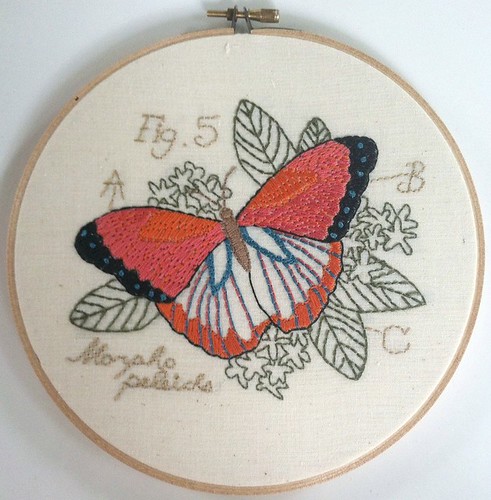
butterfly hoopart3

Stitched by aimee d

Aimee d has stitched this lovely pattern which is part of a set by Urban Threads called Miniature Menagerie. I love how it feels like an old scientific illustration. There's also a free quilt design to go with the set.

Hi, I'm Jo - I feature new embroidery patterns Sundays on Feeling Stitchy. I also post on our Twitter and Pinterest.

Is there a new pattern you'd like us feature? Email me!

January 8, 2013

Tutorial Tuesday

Happy Tuesday, everyone and Happy New Year!

I have a tutorial roundup to share with you today. Each tutorial has some great instructions for how to create a fun and functional item using embroidery.


If you want to add a little color to your table now that the holiday decorations are packed away, Anna Maria Horner has an excellent tutorial for a table scarf. This is a pdf file, so make sure you have Adobe reader in order to access it.


Kylie Hunt provided the Flower Press blog with an excellent tutorial for creating a floral brooch using vintage fabric as her pattern. Access the tutorial here. 


Urban Threads has a great tutorial for creating silhouettes using a satin stitch. Check out their tutorial here. 


Lilipopo has a darling embroidered glasses case tutorial over at her blog. It's a super cute case and quick to make.

Hope you get to try some of these out. Hope you have a happy Tuesday!

Hi, I'm Kristen! I am a lover of all things stitchy and crafty. I have been sewing for as long as I can remember. My grandmother taught me how to sew Barbie clothes when I was young and I have been sewing ever since.

You can find me at Bobbypin Bandit, on Instagram, and my Etsy shop.

September 11, 2012

Tutorial Tuesday

Happy Tuesday, everyone!

I have a tutorial roundup for you this week. Hopefully you'll get to give one, or all, of these a try, as they are super cute ideas!

If you would like to learn some stitches to include on the edges of a blanket or scarf, the Purl Bee has some great tutorials for a Chevron Blanket Stitch, Triple Blanket Stitch with a knot, and a Knotted Buttonhole stitch. Head over to the Purl Bee site to check some of these out.


If you are looking for a fun way to accessorize with embroidery for you or the little one in your life, this headband with french knots would look dazzling! The instructions for the headband can be found at Heidi & Finn. After the tutorial, there are various images of additional embroidery ideas for the headband.


Aside from having some adorable embroidery patterns for sale, Urban Threads offers some great tutorials on their site. This embroidered sock monkey is one of the cutest and easiest tutorials to follow. 

Hope you all have a fantastic Tuesday!

Hi, I'm Kristen! I am a lover of all things stitchy and crafty. I have been sewing for as long as I can remember. My grandmother taught me how to sew Barbie clothes when I was young and I have been sewing ever since.

You can find me at Bobbypin Bandit, on Instagram, and my Etsy shop.

July 8, 2012

Patterns: Mythical, Magical & Oh so Cuteness!


I love this cute trio, stitched up by 1.2.Stitcharoo, the captions she's added are fabulous and the crayon tinting is brilliant! You can find the patterns here on Urban Threads.

Hi, I'm Jo - I feature new embroidery patterns Sundays on Feeling Stitchy. I also post on our Twitter and Pinterest.

Is there a new pattern you'd like us feature? Email me!

November 13, 2011

Patterns: ~glenda's Christmas stitching

~glenda's Christmas decorations

Holiday Penguin - free pattern by Badbird
Singing girl with bird (I unfortunately can't find the link to this pattern)

~glenda has stitched up these beautiful ornaments up as part of the Bastrop (Texas) Wildfire relief effort, replacing Christmas decorations for those that lost their homes in the fire this summer. Click on the links above to take you to bigger versions of the embroideries or to go to the pattern source. Go here for a great photo tutorial on how ~glenda made the embroideries into ornaments.

Hi, I'm Jo - I feature new embroidery patterns Sundays on Feeling Stitchy. I also post on our Twitter and Pinterest.

Is there a new pattern you'd like us feature? Email me!

September 25, 2011

Patterns: Halloween

Halloween patterns


I think Halloween has to be one of the most fun celebrations to stitch for, so I couldn't just mention one Halloween pattern -

Badbird's Batty Framed was stitched beautifully by xperimental, the pattern is by Badbird and can be found here.

Halloween Cross Stitch Wall Hangings were stitched by Early Bird Special from patterns by My Paper Crane which can be found here. These wall hangings were stitched on plastic canvas with acrylic yarn and you can read more about them on the Early Bird Special blog here.

progress 9/24/11 was stitched by Kunderwood from a Lizzie Kate Halloween pattern and I've been following Kunderwood's progress shots eagerly on Flickr recently.

Also worthy of Halloween pattern mentions are Zombies and Monsters from Sublime Stitching and Urban Threads Halloween selection, both of which I've been using as I prepare for my own Halloween celebrations. I haven't stopped stitching yet however and plan to stitch something from this great new Halloween pattern set from Cate Anevski and hopefully of course Feeling Stitchy's very own Halloween pattern from Cathy Gaubert.

Spooky stitching everyone!

Hi, I'm Jo - I feature new embroidery patterns Sundays on Feeling Stitchy. I also post on our Twitter and Pinterest.

Is there a new pattern you'd like us feature? Email me!

August 7, 2011

Patterns: Needle Power

Needle Power 
 Needle Power stitched by xperimentl - pattern by Urban Threads

At the risk of repeating myself, as I blogged about another Urban Threads pattern last week, I just had to blog about this one, as xperimentl as produced such a unique twist to this, with the great choice of colours and oooh, that lovely appliqué! You can find the pattern, called Craft Revolution, here. How many different ways could you imagine doing this pattern?

July 31, 2011

Patterns: Steampunk Santa

Steampunk Santa WIP Side Beard View


Steampunk Santa WIP - stitched by sereniticat

It's never too early to get ready for Christmas it seems (I have to admit my to stitch list for Christmas is beginning to nag at me). Sereniticat has made an amazingly admirable start with the Steampunk Santa pattern from Urban Threads. I just adore the detailing on this, the little gold beads for buttons, the different textural stitches and of course the fluffy beard! I can't wait to see the finished piece!

Hi, I'm Jo - I feature new embroidery patterns Sundays on Feeling Stitchy. I also post on our Twitter and Pinterest.

Is there a new pattern you'd like us feature? Email me!

December 26, 2010

Pattern highlights of 2010

My favourite embroidery patterns of 2010


1. April Showers , 2. mermaid circle, 3. Kedra's Owl, 4. "From the Depths" FINISHED, 5. Little Tiger's Orangey Celebration embroidery, 6. Queen Bee

I've had a lot of fun highlighting the new (and sometimes vintage) patterns that are out there for Feeling Stitchy this year and the above six are just some of my favourites.

Here's to a stitchingly good 2011, I can't wait to see the new patterns that are going to emerge next year but until then I'm having a quiet Christmas at home. I am lucky enough to live in a very green part of London, so if I can I'll be dragging my family out for a walk, but if I can't I'll be staying in the warm and stitching a little bit more of this.

Christmas night embroidery

Work in Progress Christmas pattern by Bustle and Sew, also seen in picture Steampunk Santa - pattern by Urban Threads and map of USA - pattern by Flossbox


Hi, I'm Jo - I feature new embroidery patterns Sundays on Feeling Stitchy. I also post on our Twitter and Pinterest.

Is there a new pattern you'd like us feature? Email me!

SITE DESIGN BY RYLEE BLAKE DESIGNS