Showing posts with label gifts. Show all posts

July 26, 2010

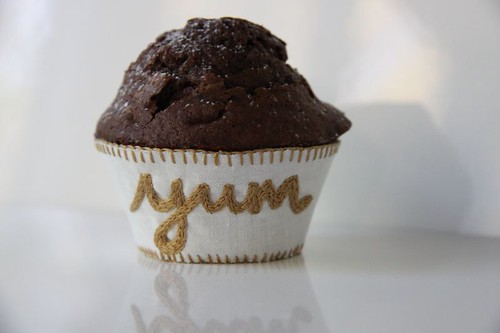
Embroidery ideas - - - cupcake cozy

Cupcake Cosy

I've had this idea kicking around in my head for a while. Cupcake wrappers & cozies are all over the internet but most of them are single use.

I love the idea that these are able to be used time & time again.

What to do...
-Trace around the template using your wash out or fade out marker.
-Draw your design onto the fabric. I just scribbled the "yum" & then went over it a few times to fatten it up. I used plastic backed curtain lining which worked well but you could always use regular cotton or linen & then vliesofix a couple of layers together before you do your blanket stitching.
- Stitch your design.
- Cut around the template shape.
- Blanket stitch around the edge.
-You just need to stitch a little hook & eye onto either side of the join once you're done with the stitching.

You can collect the pdf template & a nice cupcake recipe too - - - right here.

July 5, 2010

Embroidery Project - - - faux hand bound notebook cover

Spine

Page

Embroidery

This project is based on a simple Japanese bookbinding techinique which I learnt from Gemma Jones.

BT4 Notebook - Frankincense (for the senses)

I embroidered this vintage design some time ago & bound it using the Japanese binding method. I did feel a bit sorry that it's life span was going to be so short.

I've come up with a Japanese style embroidered cover which will have a much longer life expectancy & I thought that you clever stitchers might like to use the technique too. I think they make a fabulous gift idea.


Once you've completed the embroidery you'll need to assemble the cover. I put together a very simple fabric notebook cover tutorial last year which you might like to follow.

I look forward to seeing your covers popping up in the flickr group.

May 9, 2008

Embroidery- the Embellisher Queen

Hi Everyone! I hope you are looking forward to a new project! I have learned that sometimes I fail to make use of some valuable tools I have when I am looking for an embroidery project. As an embellisher, I constantly look for things to put my "signature" on. Lately, when I go to a fabric store, I have been looking at fabric as a canvas, rather than a painting. Instead of being satisfied that the fabric is doing all the work, I look to see what I can do to make it "mine".

I suppose because I am a painter on certain days, looking at things as "unfinished" seems to happen to me quite frequently. I like working on muslin and filling in all the wonderful colors, but sometimes I like to look at something that's already on its way and change it's course. I will show you some examples of what I mean, and then, give you the directions for the little 'checkbook holder', 'pocket folder', or 'clutch', whatever you decide to use it for.


Here is an example of a fabric that had cats printed all over it. I trimmed one of the cats and left enough border to stitch it to another piece of fabric. To make things easier, I ironed it on with Heat and Bond Lite first. (The light Heat and Bond lets you sew through it).


I blanket stitched around the outside of the cat, but, after looking at it, I probably could have just straight stitched and been just as happy. I thought of filling in the stripes, which is an option, but I left them open.


Here, I used the 'themed' fabric and just took it a step further with adding the word 'teacher' and a few flowers to pull the pieces together. Later, after looking at it, I added white centers to the flowers, but I will not post that picture to save space.


Here, again I used the 'themed' fabric and added the image, and after looking at it, tied it together with embellishing one of the 'cat' words on the already printed fabric.


This little trick draws the piece together and gives it that personal touch. Now, I will show you how this is all put together. (what to cut, directions)


Cut the following pieces: 2 pieces 7" x 3 3/4" that will be the cover. They look like that above. While you are cutting them, imagine them folded in half width-wise, so if you are placing a particular design that it goes where you want it. (not upside down) This piece above gets folded as the cover of the folder. Stitch these two pieces together and plan your embroidery embellishments and do them before anything else.


Here, I have embellished the 'plain' dragonflies. At this point I debated about beading, which would have been great on this design. I added the word 'dragonfly' and stitched the flowers in the dark area to tie it together. This is a good time to add your label if you have one, also.


Now, this is the tricky part. I did it wrong the first time, so my picture was wrong and I can't show it. Cut 2 pieces of fabric 7" x 6" that will be the inside pockets. Fold these lengthwise and iron, then lay them on the right side of the cover (the outside) the opposite (which would be crossway) direction of the division of the cover. In other words, the two lines would intersect. Make sure the fold of the pocket is facing the middle, and the side you want showing facing the cover.

Then, cut one piece of fabric (this will be your lining) 7" x 7 1/2". Lay this piece face down on top of the pockets. Pin all around, leaving a gap for turning. I like to leave the gap on the back side bottom. This will be handstitched after turning. After stitching and trimming, pull the entire thing through that opening and push corners out and iron flat. I hand stitched snap closures on mine, but this is optional.


I wanted to show this last kitty folder because I wasn't happy with it after I finished it. I don't think the newspaper fabric 'worked'. I would probably use a solid or vaguely printed fabric instead, next time and use the newspaper fabric for the folders.

I hope you enjoyed this tutorial, and idea post. Let me know if you use it, I would love to see what you do with it.


note: pattern pieces below are not actual size - they're a guide to show you what to cut...

May 2, 2008

Are we almost there???????

Wow. That's how I feel sometimes when I am trying to finish an embroidery project. I begin jumping up and down and get a little whiney inside like the little child in the back seat of the car crying out: "Are we almost there, yet?" Some projects take an awful long time, and give us some tremendous problems along the way, and maybe, it's the project we put away for months to take out again and determine to finish it.......

And, when you are finally done......who gets it? Don't you wish then, you could share it with more than one person? Well, you can. I am going to show you how.

First of all, you can use your own embroidery, but if you are interested in the design I am showing you, it will be on my blog for free use. I will try to put up the pattern today after I blog here. Here is the finished design.


Take the completed embroidery piece to a place that does color copies and have them reduce it to fit within 5.5"tall x 5" wide or slightly smaller. Fold a 11" x 8.5" sheet in half and see if you can line two designs to fit pasted next to each other. Then, have them run copies of your work on card stock paper. If you are able, you can run these color copies from your home printer, after scanning the work, or photographing the work and scanning the photograph.


When you cut the cards out, use a scissors with an design edge so you don't have to worry about perfection and it gives it that fabric look. You can purchase matching and fitting envelopes at the scrapbook stores or craft stores in the scrapbooking section.

I also made a nice booklet to hold the cards for gift giving, which I will show you how to make. First, I used heavier cloth, like duck, twill, or drapery weight. I even did the embroidery on duck cloth, but if you need to transfer by tracing, you probably will have to do muslin for the embroidery piece. If you already have the embroidery, pick something that will fit the space of this pattern and cut it down accordingly........the embroidery boundaries should measure approximately 4" x 5".


Your major book piece will be slightly larger than 8.5" x 11", I pinked the fabric all around. Attach your embroidery piece to this on the right right side, leaving room around the top and outer edge for machine stitching later. I attached my embroidery with a simple stitch, but you may want to machine stitch it on. I like the frayed edge, so I used fabric that I knew would fray nicely.


So, here I am applying the embroidery after attaching the piece to the front. Notice the placement on the side and top, leaving room for machine stitching later.


After you finish your embroidery, cut another piece of matching fabric to line the inside of the book, 11" x 6", and stitch them together all around the outside. Then, looking at drawn pattern, fold the bottom up making a hem at the top and stitch those sides closed. Then, sew two lines in the middle to hold a pen. Then stitch two pieces of twill tape or ribbon to tie the book closed. I used fray check on the twill tape open end.


Then add your pretty cards that you made earlier........


And there you have it! I hope I explained this well enough to follow, but I don't mind you emailing me if you have questions. I decided that after the embroidery cards were sent, this made a nice notebook for your purse with paper pads and pen. I wanted to purchase a nice matching pen before posting, but I forgot to go get one. Imagine the pen in the middle of the open book. It fits really nice. I know you can't see the pattern real well, but maybe you can print it out, and then you will see it better. Enjoy!

April 25, 2008

Refrigerator Art

Stop. Don't scroll down. Let me explain. You'll spoil the surprise if you peek......let me start this way:

In the United States, in Wisconsin, in some small city, on my street, in my home, there is a little known art gallery known as the "refrigerator door". It's the very first art gallery for my children's creations. I have five children, so not everyone's pictures got to be on the refrigerator at once, but it was surely an honor to have one's creations displayed for all to see who came to visit.

Now, my children's children have been proudly displaying their works of art. If you want to know what a big deal this is, know/remember what I am talking about, it's a little like when you open this page and see your creation on the page for all the visitors to see.....that "little person" in you lights up with glee.......


What I have for you today is how to transform those wonderful art pieces into embroidery. First, I made an inkjet transfer of the artwork and put it on muslin. Make sure that you make the transfer reversed if there is lettering, so that when you apply it, it is legible. Then, because I am not schooled in embroidery, I wanted to have the quilt batting to hide my embroidery trail, so I sewed on a border and tacked the quilt batting to it.


Then, I began a wonderful experience of embroidery. I cannot tell you the pleasure it gave me to trace those little crayon strokes of my granddaughter's. I was quite surprised.


The only two rules I gave myself were to try to mimic the colors as much as possible, and to embroider in the direction of the crayon stroke. I think this gave credibility to making the crayon drawing into the embroidery piece. I used a chain stitch most often because it filled in easily and I could blend other colors if I wanted to. Being an embellisher at heart, I really had to resist adding things like extra design, or beading.......I used self-control and stayed true to the drawing....lol. Now I will show you some detail of the work.


After much deliberation, I decided to make the piece a wall-hanging, though the possibilites included a tote panel, doll quilt or framed in picture style. I used DMC number 8 cotton perle embroidery thread. I like the ease of not having to separate strands, but the colors are much more limited. I am not a quilter, so I must admit I put this together without that knowledge, but I am fairly happy with it. I wished I was a quilter after I sewed it. However, I cannot wait to see Gabby's face when I give it to her for her birthday today. Truly, it would even be a great "Gramma" gift! Hope you enjoyed it!

SITE DESIGN BY RYLEE BLAKE DESIGNS