Showing posts with label woven trellis stitch. Show all posts

May 16, 2016

MooshieStitch Monday: Kamal Kadai Stitch Flower - Another Version

Kamal Kadai Stitch Flower, a tutorial by Michelle for Mooshiestitch Monday on Feeling Stitchy

Back in November when I stitched my first Kamal Kadai flower, I had also traced this pattern with the intention of stitching it right away. 

I kept procrastinating and the little traced flower sat there waiting to be stitched... until now!

Kamal Kadai Stitch Flower, a tutorial by Michelle for Mooshiestitch Monday on Feeling Stitchy

(Link to pattern if you are interested - there are a couple patterns posted there)

Kamal Kadai Stitch Flower, a tutorial by Michelle for Mooshiestitch Monday on Feeling Stitchy

For a more detailed tutorial on how to stitch - check out my previous post.

I followed the same technique to stitch this blue flower.

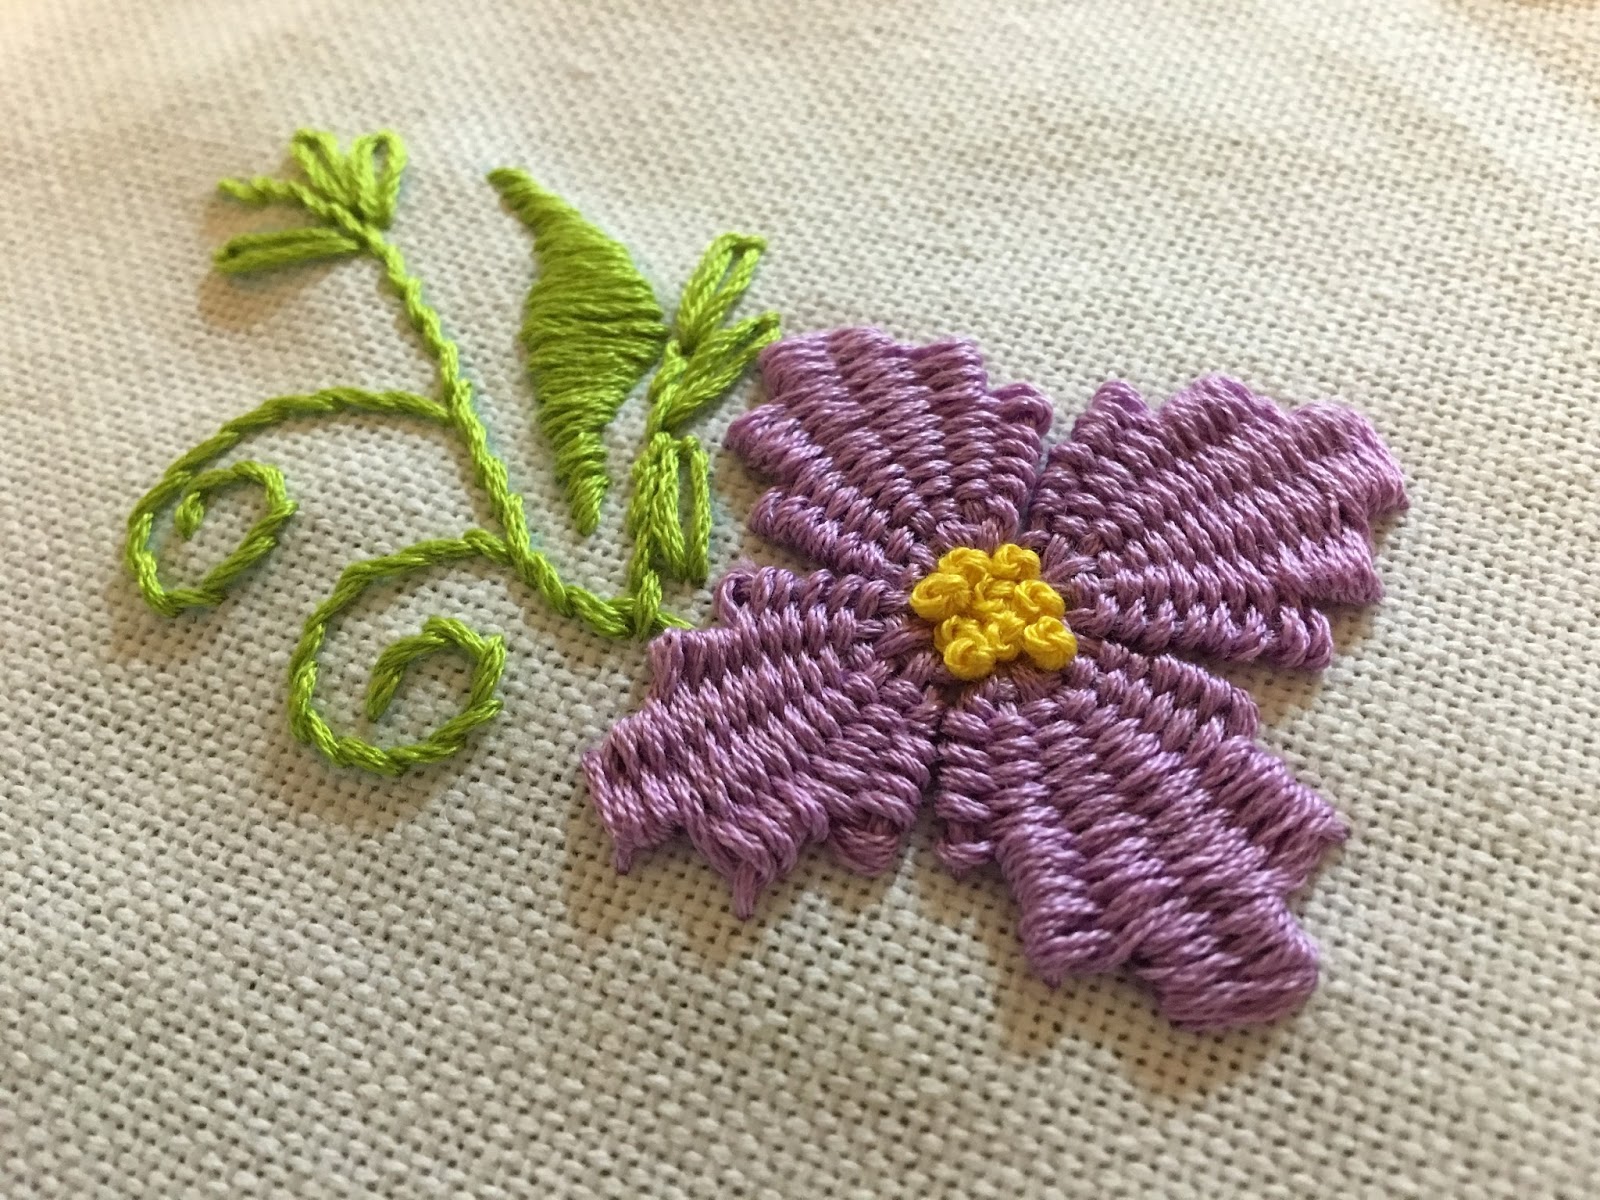
Now this pattern has an additional straight stitch on each petal - for a total of seven, instead of six.

Kamal Kadai Stitch Flower, a tutorial by Michelle for Mooshiestitch Monday on Feeling Stitchy

Honestly, after I finished this first petal, I think that middle straight stitch was supposed to be the same length as the two stitches directly on each side. I did not know how to weave all the way to the tip of that stitch.

But, I kind of like how it turned out, because it gives the petal more of a pointed look.

Kamal Kadai Stitch Flower, a tutorial by Michelle for Mooshiestitch Monday on Feeling Stitchy

Kamal Kadai Stitch Flower, a tutorial by Michelle for Mooshiestitch Monday on Feeling Stitchy

All done with the petals.

Kamal Kadai Stitch Flower, a tutorial by Michelle for Mooshiestitch Monday on Feeling Stitchy

 The stems/vines are stem stitch and the center of the flower are french knots.

Kamal Kadai Stitch Flower, a tutorial by Michelle for Mooshiestitch Monday on Feeling Stitchy

Since I could still see some of my pattern lines, it was a good thing I traced it with a water soluble pen!

Here is my finished flower all cleaned up with the pattern lines gone. 

Kamal Kadai Stitch Flower, a tutorial by Michelle for Mooshiestitch Monday on Feeling Stitchy

Kamal Kadai Stitch Flower, a tutorial by Michelle for Mooshiestitch Monday on Feeling Stitchy

Kamal Kadai Stitch Flower, a tutorial by Michelle for Mooshiestitch Monday on Feeling Stitchy


I thought I would share some links of other Kamal Kadai work I found while searching online:

  • These beautiful Kamal Kadai flowers (using two colors for the petals)
  • Here is another amazing Kamal Kadai stitch tutorial 


February 8, 2016

MooshieStitch Monday: Woven Picot Stitch

Woven Picot stitch, a tutorial by Michelle for Mooshiestitch Monday on Feeling Stitchy


Are you looking to add some dimension to your embroidery? Then let's learn the woven picot stitch!

I was first intimidated by this stitch. It looked like it had to be difficult. But you know what, it really isn't that hard! 

Better yet, if you already know the woven trellis stitch, the woven picot will be even easier since you follow the same weaving method.


Let's begin!


Take a pin and stick it in your fabric.

Come up from the back of the fabric on the left side of the pin with your needle and thread (how far away from the pin will depend on how wide you want your woven picot to be) and then wrap the thread around the back of the pin top.

(Please excuse the blue circle drawn on the fabric in the photos below. I know, it looks strange. It is my guide for building my flower with the woven picots - so hopefully it isn't too confusing and will make more sense later in the post.)

Woven Picot stitch, a tutorial by Michelle for Mooshiestitch Monday on Feeling Stitchy

Bring the needle down through the fabric on the right side of the pin about the same distance as the left side.

Woven Picot stitch, a tutorial by Michelle for Mooshiestitch Monday on Feeling Stitchy

Bring the needle up through the back of the fabric just to the left of the pin and wrap around the pin top again.

Woven Picot stitch, a tutorial by Michelle for Mooshiestitch Monday on Feeling Stitchy

Now you will begin weaving.

First row weave from the right to left: under / over / under.

Woven Picot stitch, a tutorial by Michelle for Mooshiestitch Monday on Feeling Stitchy

Next row weave from left to right doing the opposite: over / under / over.


Woven Picot stitch, a tutorial by Michelle for Mooshiestitch Monday on Feeling Stitchy

Continue this process until you reach the bottom.

Woven Picot stitch, a tutorial by Michelle for Mooshiestitch Monday on Feeling Stitchy

All done weaving.

Woven Picot stitch, a tutorial by Michelle for Mooshiestitch Monday on Feeling Stitchy

Pull out the pin and you are finished!

Here are a few pics of what it looks with pin removed and the woven picot lifted away from the fabric to give you an idea of the dimension.

Woven Picot stitch, a tutorial by Michelle for Mooshiestitch Monday on Feeling Stitchy

Pretty cool, huh?

I am using a #5 perle cotton thread. I hardly ever stitch with perle cotton but I read that the woven picot looks best when stitched with a thread that has a good twist to it (like a perle cotton).

Woven Picot stitch, a tutorial by Michelle for Mooshiestitch Monday on Feeling Stitchy

I continued to stitch more woven picots around my blue circle to create my flower petals.

Woven Picot stitch, a tutorial by Michelle for Mooshiestitch Monday on Feeling Stitchy

Woven Picot stitch, a tutorial by Michelle for Mooshiestitch Monday on Feeling Stitchy

Woven Picot stitch, a tutorial by Michelle for Mooshiestitch Monday on Feeling Stitchy

Woven Picot stitch, a tutorial by Michelle for Mooshiestitch Monday on Feeling Stitchy


Woven Picot stitch, a tutorial by Michelle for Mooshiestitch Monday on Feeling Stitchy

Then, I added french knots for the flower center with yellow DMC floss (all six strands).

Here are some more photos just to show the dimension of the stitch.

Woven Picot stitch, a tutorial by Michelle for Mooshiestitch Monday on Feeling Stitchy

Woven Picot stitch, a tutorial by Michelle for Mooshiestitch Monday on Feeling Stitchy

Woven Picot stitch, a tutorial by Michelle for Mooshiestitch Monday on Feeling Stitchy

Woven Picot stitch, a tutorial by Michelle for Mooshiestitch Monday on Feeling Stitchy


Have you ever tried the woven picot? Post your photos in the Flickr Embroidery Group!


P.S. I learned the woven picot from watching Mary Corbet's video tutorial. Check it out!


January 18, 2016

MooshieStitch Monday: Winter Woven Trees


Happy New Year!

Since some of you readers may be experiencing snow - here is a little "winter" themed project.

I have become slightly obsessed with the woven trellis stitch. I wanted to use it to stitch something other than a flower so I decided to try stitching little pine trees.

I practiced a few trees by drawing some triangles and followed the same steps as the woven trellis stitch.


needle woven trees


Once complete - turn the triangle around and it looks like a little pine tree ... right?


To make a little wintery tree scene, I roughly drew some trees on linen inside a little oval hoop - something different since I always use round hoops.


For the snow covered ground, I cut a piece of white felt and whip stitched it to the fabric.


Then added the tree trunks with straight stitches.


Now time to weave the trees!


woven trellis stitch

woven trellis stitch


needle weaving trees


I added some french knots and little eye stitches for snow flakes.


If I would have finished stitching this before the holidays, my plan was to decorate the trees by stitching little ornaments on them, or adding a star on top each tree. Maybe next year.....


P.S. To finish the back of the hoop - I followed this excellent tutorial.


See you next time!


November 9, 2015

MooshieStitch Monday: Kamal Kadai Work Flower

Kamal Kadai Work Flower, a tutorial by Michelle for Mooshiestitch Monday on Feeling Stitchy

I recently came across Kamal Kadai Work when searching for different types of needle weaving stitches. 

Kamal Kadai is an Indian embroidery style native to the state of Andhra Pradesh that primarily uses needle weaving to stitch beautiful flowers. There is definitely a specific style to the flower designs used in Kamal Kadai. The flower petals kind of look like they have "steps" or "levels" (for lack of better explanation).

After reviewing a couple blogs that had step by step tutorials (here and here),  I realized you basically follow the same process as the woven trellis stitch to stitch the flower petals.


Let's get started!

I traced the pattern (found here) with a water soluble pencil.

Kamal Kadai Work Flower, a tutorial by Michelle for Mooshiestitch Monday on Feeling Stitchy

From the base of the first petal, straight stitch to each outer point.

Kamal Kadai Work Flower, a tutorial by Michelle for Mooshiestitch Monday on Feeling Stitchy

As with the woven trellis stitch - you will want to switch to a blunt tapestry needle for the weaving.

Cut a piece of thread that is long enough to finish a whole petal. I used regular 6 strand DMC floss.

Come up through the fabric to the left of the first straight stitch. Weave your needle over that first stitch, then under the next stitch, over the following - repeating over and under until you get to the last stitch and pull the thread through.

Kamal Kadai Work Flower, a tutorial by Michelle for Mooshiestitch Monday on Feeling Stitchy

Next weave back the other way- always weaving over that first straight stitch - and pull the thread through.

Kamal Kadai Work Flower, a tutorial by Michelle for Mooshiestitch Monday on Feeling Stitchy

Repeat weaving back and forth - never pricking the fabric with your needle.

Kamal Kadai Work Flower, a tutorial by Michelle for Mooshiestitch Monday on Feeling Stitchy

Here is the first petal woven up to that first "level" of the petal.

Kamal Kadai Work Flower, a tutorial by Michelle for Mooshiestitch Monday on Feeling Stitchy

First petal complete.

Kamal Kadai Work Flower, a tutorial by Michelle for Mooshiestitch Monday on Feeling Stitchy

Repeat the process for each petal.

Kamal Kadai Work Flower, a tutorial by Michelle for Mooshiestitch Monday on Feeling Stitchy

Kamal Kadai Work Flower, a tutorial by Michelle for Mooshiestitch Monday on Feeling Stitchy

Kamal Kadai Work Flower, a tutorial by Michelle for Mooshiestitch Monday on Feeling Stitchy

To finish the flower, I filled the center with yellow french knots.

Stitches used for the stems and leaves: satin stitch, detached chain, and stem stitch.

Here is the final flower after rinsed and dried to remove the blue pen markings.

Kamal Kadai Work Flower, a tutorial by Michelle for Mooshiestitch Monday on Feeling Stitchy


Kamal Kadai Work Flower, a tutorial by Michelle for Mooshiestitch Monday on Feeling Stitchy

So, that is my interpretation of a Kamal Kadai flower, I hope I did it justice!

If anyone has additional information on the technique or has tried it before, please let me know. I would love to hear from you!


See you next time!


SITE DESIGN BY RYLEE BLAKE DESIGNS