Showing posts with label DMC. Show all posts

September 15, 2017

Freebie Friday - Free DMC patterns

Inside the Greenhouse free pattern by Baobap on DMC site
Inside the Greenhouse - free pattern by Baobap on DMC site

Hi all! In for a quick post to share some wonderful free patterns I found on the newly redesigned DMC site! The free patterns are a wonderful selection of many artists you may be familiar with on Etsy and Instagram (and possibly this blog)!

The free pattern pages do a great job of describing Level - from Beginner to Intermediate to Advanced and give you an estimate of the amount of time it may take you to stitch them:

free pattern on DMC site

(This part is most valuable to me, as I seek to work wonders with an hour here and there!) You can also buy complete kits with all the DMC threads you need to complete the design.

The downloadable PDFs are really detailed and list all the colors and stitches you'll need to complete the design:

free pattern on DMC site

I really fell in love with these free patterns by Baobap - Floral Bouquet and Desert Landscape.

Floral Bouquet free pattern by Baobap on DMC site

Desert Landscape free pattern by Baobap on DMC site

Lovely colors and they are just so gorgeously stitched! You can find more of Baobap on Instagram: @_.baobap._


Also love this Fractal pattern by Srta. Lylo, who is also on Instagram: @srtalylo

Fractal free pattern by Srta. Lylo on DMC site

Beautiful Floral Wreath pattern by Thread Honey @threadhoney on Instagram:
Floral Wreath free pattern by Thread Honey on DMC site

And these gorgeous foliage patterns by Sew and Saunders, @sewandsaunders on Instagram: Triple Fern, Rubber Plants, and Tropical Branch
Triple Fern free pattern by Sew and Saunders on DMC site

Rubber plants free pattern by Sew and Saunders on DMC site

Tropical Branch free pattern by Sew and Saunders on DMC site


I wanted to share a bit of inspiration and joy with you today, as so much of the world is filled with stress and fear and worry. Hope you enjoyed this bit of bright color to bring some hope and much-needed cheer to your day!

Hi, I'm floresita, editor of Feeling Stitchy. I'm an avid stitcher, knitter, and crafter. You can see more of my stitching on Instagram and my blog. My vintage transfer collection is on Vintage Transfer Finds.

Feel free to email me with any ideas for the blog!

December 5, 2016

MooshieStitch Monday: Plushwork Wreath

Plushwork Wreath tutorial by Michelle for Mooshiestitch Monday on Feeling Stitchy

Today I am going to show you how to stitch a plushwork wreath for the holidays!

For best results - I highly suggest tapestry wool.

This wreath is stitched with DMC Tapestry Wool (which DMC has so kindly provided).

Plushwork Wreath tutorial by Michelle for Mooshiestitch Monday on Feeling Stitchy
DMC Green 7344 and Red 7108

For my wreath template, I cut a circle about 2.5 inches wide in diameter out of cardboard.

To start, bring your wool up through the fabric (A) and back down (B)

Plushwork Wreath tutorial by Michelle for Mooshiestitch Monday on Feeling Stitchy

Continue with your surface satin stitch - bring your wool back up next to the previous stitch on the same side.

Plushwork Wreath tutorial by Michelle for Mooshiestitch Monday on Feeling Stitchy

Then down again across the template.

Plushwork Wreath tutorial by Michelle for Mooshiestitch Monday on Feeling Stitchy

Back up again next to that stitch on the same side and repeat until your template is covered.

Plushwork Wreath tutorial by Michelle for Mooshiestitch Monday on Feeling Stitchy

Plushwork Wreath tutorial by Michelle for Mooshiestitch Monday on Feeling Stitchy

Here is the first layer complete.

Plushwork Wreath tutorial by Michelle for Mooshiestitch Monday on Feeling Stitchy

I stitched 3 layers of wool around the circle template.

Now you are ready to cut through all the layers.

Plushwork Wreath tutorial by Michelle for Mooshiestitch Monday on Feeling Stitchy

Plushwork Wreath tutorial by Michelle for Mooshiestitch Monday on Feeling Stitchy

Remove the cardboard template.

Plushwork Wreath tutorial by Michelle for Mooshiestitch Monday on Feeling Stitchy

Here it as without any fluffing - notice you can see a gap in the wool.

Plushwork Wreath tutorial by Michelle for Mooshiestitch Monday on Feeling Stitchy

I tried fluffing the wool to remove the gap / indent in the middle of the wreath but it would not go away. Maybe my template was too wide? 

Plushwork Wreath tutorial by Michelle for Mooshiestitch Monday on Feeling Stitchy

Although I was not 100% satisfied with my first attempt, I trimmed the wool a little with my scissors, fluffed it as much as I could and added a red bow and french knots for decoration.

Plushwork Wreath tutorial by Michelle for Mooshiestitch Monday on Feeling Stitchy

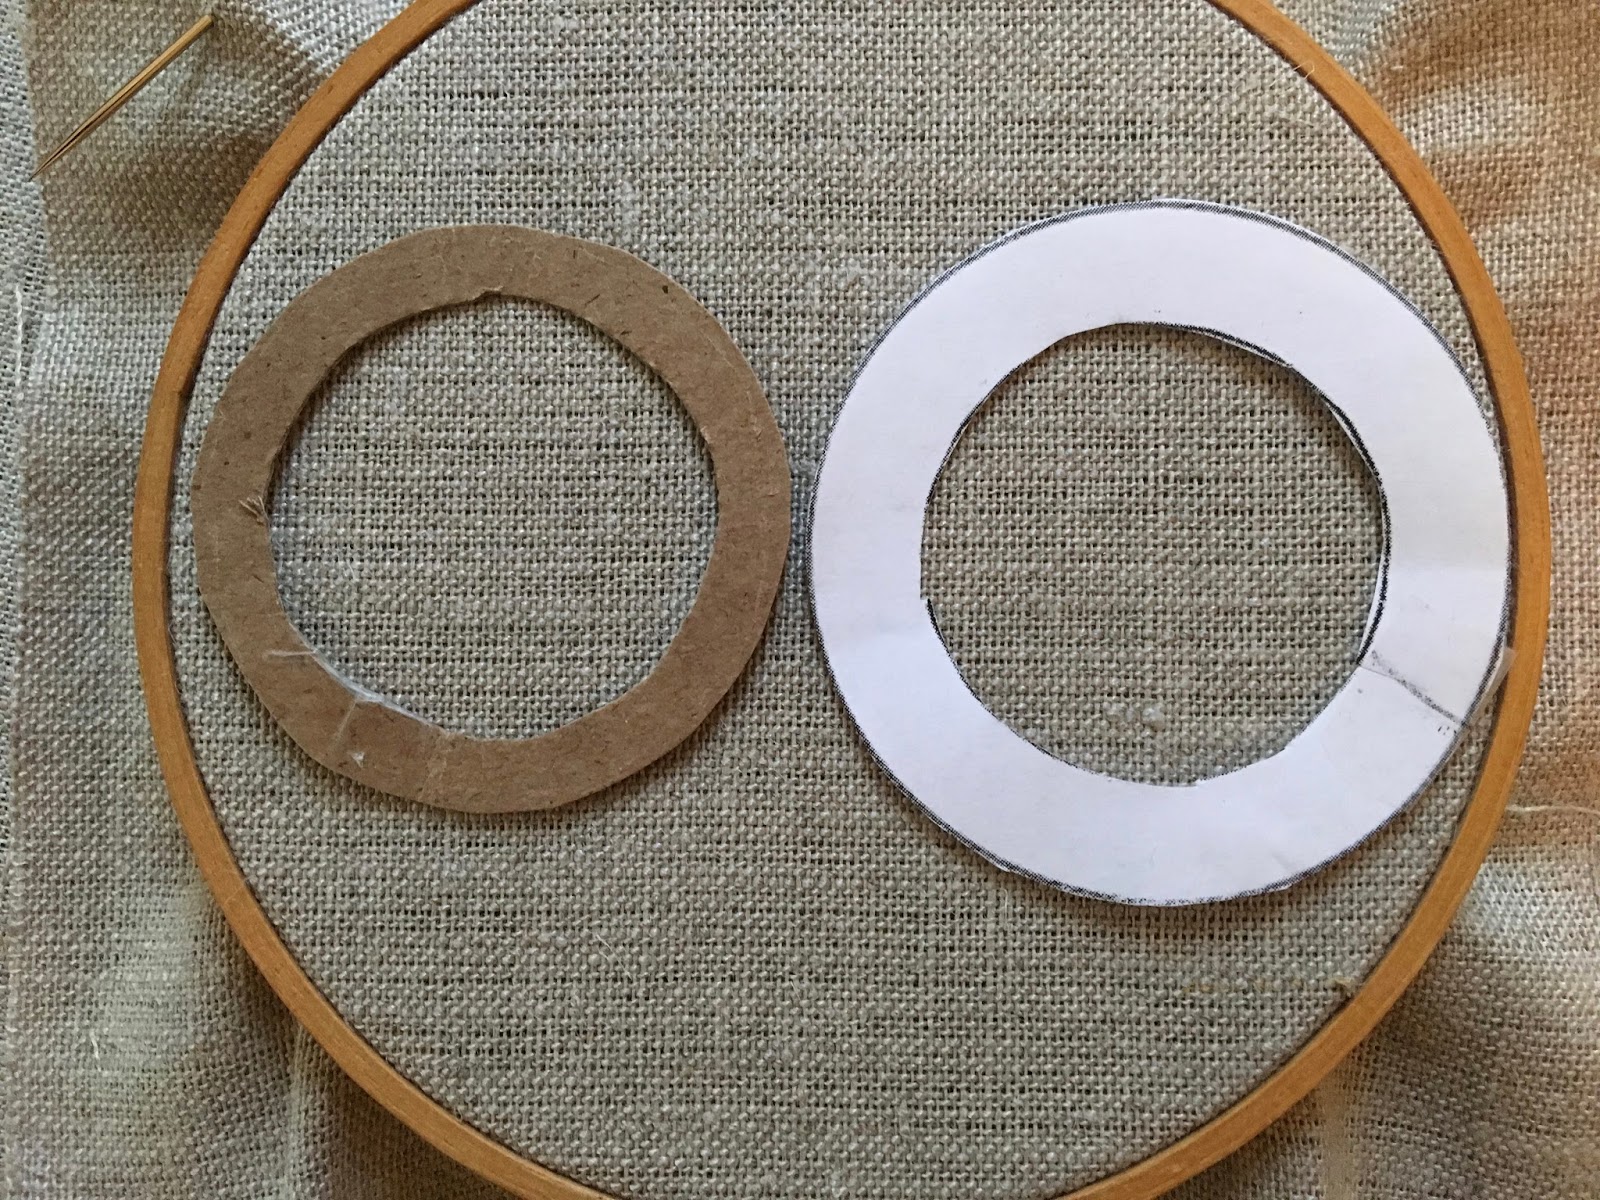
My second attempt, I cut a smaller, thinner circle template.

Below is the first circle in white paper on the right and the new template on the left. 

Plushwork Wreath tutorial by Michelle for Mooshiestitch Monday on Feeling Stitchy

Same process - I stitched three layers of wool.

Plushwork Wreath tutorial by Michelle for Mooshiestitch Monday on Feeling Stitchy

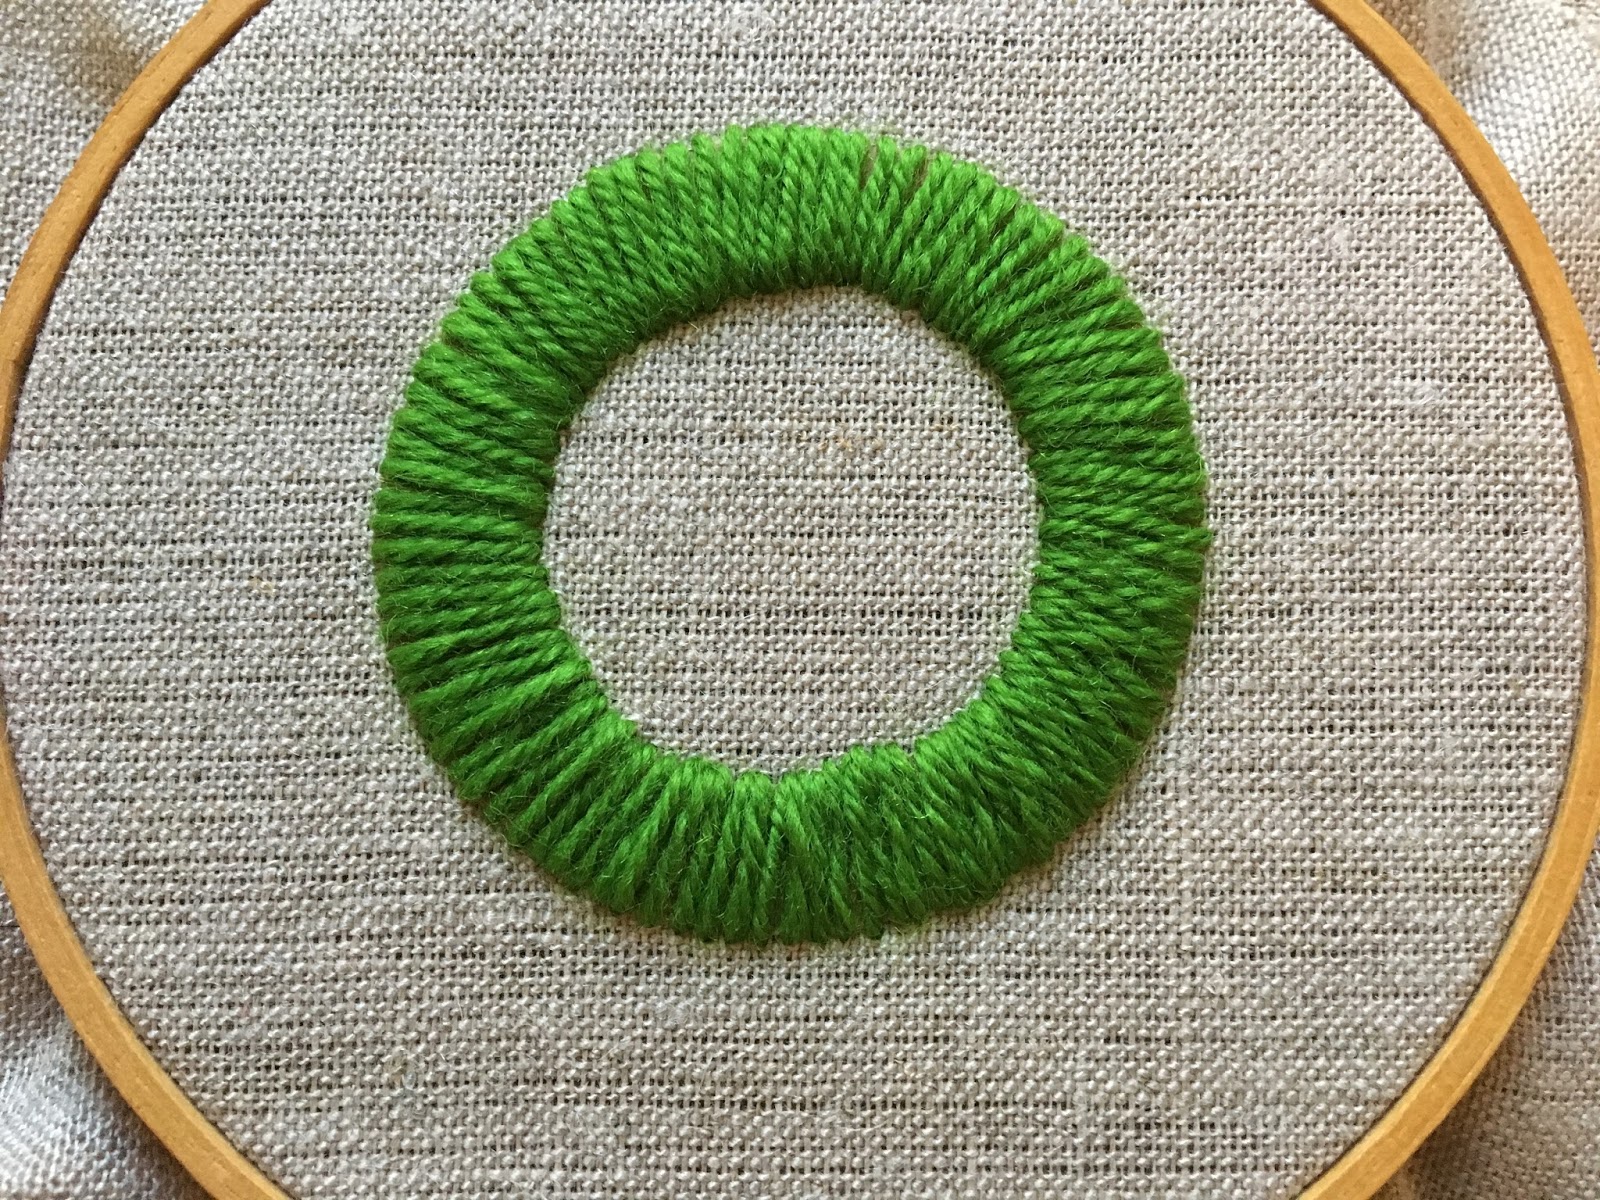
I cut the layers and removed the template. See how there is less of a gap this time??

Plushwork Wreath tutorial by Michelle for Mooshiestitch Monday on Feeling Stitchy

Here it is trimmed and fluffed. You can still see a line around the middle but it's less than the first wreath.

Plushwork Wreath tutorial by Michelle for Mooshiestitch Monday on Feeling Stitchy

Here is the wreath finished with the bow and french knots!

Plushwork Wreath tutorial by Michelle for Mooshiestitch Monday on Feeling Stitchy

Do you like the first or second wreath better? 

I hope you try this plushwork wreath sometime. If you do, leave a comment below and let us know!


November 28, 2016

MooshieStitch Monday: Puffy Couching (and Stitchable Cork!)


Have you ever heard of puffy couching? 

I was looking through one of my embroidery stitch books (The Embroiderer's Handbook by Margie Bauer) and saw it in the couching techniques section.

Essentially, a bundle of threads is puffed up between each couching stitch. 


To practice: I cut three 12 inch lengths of DMC floss and then pulled apart all 6 strands to create my bundle of threads below.


Smooth out the bundle of threads as best as you can. Fold the bundle in half and secure it to the fabric with a straight stitch.


Bring your first couching thread up and over the thread bundle.


Use your needle to lift and puff the thread bundle section.


Continue to couch down the thread bundle and lifting each section to desired puffiness.


To finish, bring your thread bundle through to the back of the fabric and secure. 


Here is the finished puffy couching.


DMC sent me a sample of their new stitchable cork fabric, so I decided to stitch a puffy couching project with it.

dmc stitchable cork fabric

To give it a little different look, instead of bringing my thread bundle through to the back of the fabric to finish each color,  I left a little tassel on the end.

couching

You can see my puffy couching has gaps in my thread bundle sections. I think it is because I didn't take as much time to smooth out my thread bundles, compared to above when practicing with the red thread.

So, it is important to get the bundles as smooth as possible. (But I still think they turned out ok!)


I liked stitching on the cork - it has a cool texture and it is similar to stitching on a thicker fabric.

I used the natural cork fabric for this project, but they also have a gold flecked cork.


Have you ever heard of puffy couching? It's definitely an easy stitch to give dimension to your embroidery. The tassels and puffy couching could be a good technique for stitching hair ... it reminds me of pony tails! :)


Thanks again to DMC for sending the stitchable cork!!

FYI - if you are interested in purchasing the book Michelle mentioned, here is an affiliate link to Amazon: The Embroiderer's Handbook. Clicking through this link to buy a book on Amazon is one way to support Feeling Stitchy and keep our all-volunteer work going. We use funds in our Amazon account to do new reviews and giveaways!

December 4, 2015

Friday Instagram Finds No. 32 with Random Acts of Amy


Hello Dear Readers! Well, I goofed today and didn't have a post scheduled to go out early this morning so readers around the world would see Friday Instagram Finds first thing. I also hadn't contacted anyone to let them know I'd be featuring their Instagram account. I didn't want anyone to feel shafted, so I thought I'd let you know what I've been up to lately.

I have been making, making, making for the two holiday markets I'm in this year. Last night was the first, Rockford Handmade Market at the Prairie Street Brewhouse. It was so much fun! I got to see so many old friends (I'm from Rockford, but now live two hours away), and meet so many new people.

A week from tomorrow, on Saturday, December 12th I'm in the first annual Sugarplum Market at North Main Studios. Between my full time day job at the Library, and this market coming up, I am going to be super busy stitching nights and this weekend away for the foreseeable future! Here are some of my pictures from Instagram.

@randomactsofamy

This is me at Rockford Handmade Market last night. Image by: @randomactsofamy


This is my Black Friday haul - 300 skeins of DMC floss! Image by @randomactsofamy

This is one of the larger ornaments (4") I made this year. Image by @randomactsofamy

Snowflake ornaments on navy linen fabric with vintage bugle bead accents. Image by @randomactsofamy

That's it for this week's edition of Friday Instagram Finds! Join in the conversation by commenting below. You can find Feeling Stitchy on Instagram at the handle @feelingstitchyish. You can find Amy @randomactsofamy on Instagram.

Want to be featured in Friday Instagram Find? Tag your best stitch-related photos with #feelingstitchyig!

Hi, I'm Amy - I feature interesting embroidery and stitch-related photos I find on Instagram. I'm a hand embroiderer and maker.

You can find my embroidery and crafts on:
Instagram | Random Acts of Amy | Facebook

SITE DESIGN BY RYLEE BLAKE DESIGNS