Showing posts with label backstitch. Show all posts

November 7, 2015

Learn the Eye Stitch

Thank you, readers, for joining me on yet another new stitching adventure! Today we'll be learning the Eye Stitch, only we'll be cheating, because technically this stitch is just made up of two stitches we already know - satin stitch and back stitch. So let's dive in!

Today I'm working on some linen fabric instead of my normal tightly woven cotton. I like linen for this stitch because of the big "hole" in the center of the design that forms as you go, but if you don't like that, you could stitch this on anything. To get a truly symmetrical design, use any even weave fabric and count the threads. As you will probably be able to see from my examples, I just eye balled it.

To begin, find the center of where you want your eye stitch to go. You're going to make a total of 16 satin stitches in various lengths from the center. To make mine a little more even looking, I first made a cross of stitches, and then went back around my circle adding in the others.

First a cross
Then long diagonal stitches in between

Then finally shorter diagonal stitches in between each of those

Make sure you always end (or begin) each stitch in the same spot, and you'll see how the threads surround the hole for a nice eye catching center. 

Once you have all 16 of your stitches in place, just make a box around them using the back stitch. I made my box touch each stitch of my original cross, which helped me keep everything even. 


And there you have it, an Eye Stitch! These look especially nice next to each other in little rows, either touching or spaced out evenly. I made my finished design into a mini ornament, which I hung from my bulletin board at work. 


You could whip up a bunch of these in various colors SO FAST. They would make great additions to the outside of your holiday gifts or as ornaments, or just as decorations year round. 

I hope you enjoyed learning the Eye Stitch with me today! Upload your own designs to the Feeling Stitchy flickr pool for everyone to see, and comment below if you have any questions for me, or suggestions on what to stitch next! 

Happy Stitching!


Hi, I'm Whitney - I share a new embroidery stitch on the blog once a month, learning as I stitch along with the rest of the blog. Embroidery is my first and true crafty love, though I also enjoy painting, sewing and other crafts. My other loves include graphic design, craft beer and baking.

You can also find me on my blog Whitney Makes and on Tumblr.

April 4, 2015

Learn the Back Stitched Chain Stitch

I’m so thrilled to be sharing my first post on Feeling Stitchy! I’ve been a reader of the blog for a long time and it’s very exciting to now be a part of it.

I spend a lot of time stitching, but there are so many stitches I've never mastered, or even tried. So I’m going to work my way through an encyclopedia of stitches, learning and teaching you as I go!

Starting, well, now, I’ll share a quick how-to for a new stitch on the first Saturday of every month! You’ll notice I may not always do things the traditional way, but I like putting my own spin on things and making the stitches work for me.

So, let’s jump right in, shall we?

For my first post I started with an easy one- The Back Stitched Chain Stitch!

This is essentially just a combination of those two stitches, so I’m guessing most experienced stitchers will be able to jump right in!


I’m using contrasting colors of thread (stranded cotton) so you can easily see the two different parts.  Start by making a chain stitch across your fabric. I actually work chain stitch a little differently than most (it’s backwards!), which I’ll explain below. If you like your way, just skip to the next section!


Begin with an anchor stitch. Come up with your thread at a point just below your anchor or previous stitch. Pass your needle and thread through the anchor stitch, pulling all the way through. Then insert your needle back into the same hole you started with. Repeat until you have a chain as long as you like!

When your chain stitch is in place we’ll go back and add the back stitch.

Begin by finding the end of your chain and come up with your needle just after the “hump” of our first chain stitch. Back stitch into the final stitch of the chain and pull all the way through. Come up again just over the chain stitch and back stitch into beginning of the previous stitch. Continue until you’ve backstitched through the whole thing.


And that’s it! You can experiment with different color combinations, types of thread and even weight.
In the picture above I used several different combinations and stitch sizes. From top to bottom: single strand perle cotton in fun, loose loops and another in small, tight stitches. The bottom three back to stranded floss, 2 strands of pink and one strand of blue. Then 4 strands of pink, 2 strands of blue and the bottom example is 4 strands of pink, 4 strands of blue.


You can see how different this stitch looks in all these different forms, and I hope you feel inspired to add this fun texture to some of your embroidery! It would definitely make a great thick outline stitch, as well as be an interesting fill texture and sampler accent as well.

I chose to use this stitch to lend some fun texture/color to a little hoop I made inspired by The Avett Brothers, who just wrapped up a three night concert stay in my hometown!

I went back to my stranded floss and used an almost ombre color scheme. The ampersand is all done in our back stitched chain stitch, and the chain stitch lent itself nicely to all the curves on the fancy font. I also did some double rows to make parts of it thicker, so you can see how this would look worked side by side.


Well, that’s it for this month. I hope you enjoyed learning with me! If you stitch something using the back stitched chain stitch, be sure to upload it to the Flickr pool so everyone can see! Be sure to leave me a note in the comments if you have any special stitch requests, or have any questions and I'll see you next time!

Hi, I'm Whitney - I share a new embroidery stitch on the blog once a month, learning as I stitch along with the rest of the blog. Embroidery is my first and true crafty love, though I also enjoy painting, sewing and other crafts. My other loves include graphic design, craft beer and baking.

You can also find me on my blog Whitney Makes and on Tumblr.

June 25, 2012

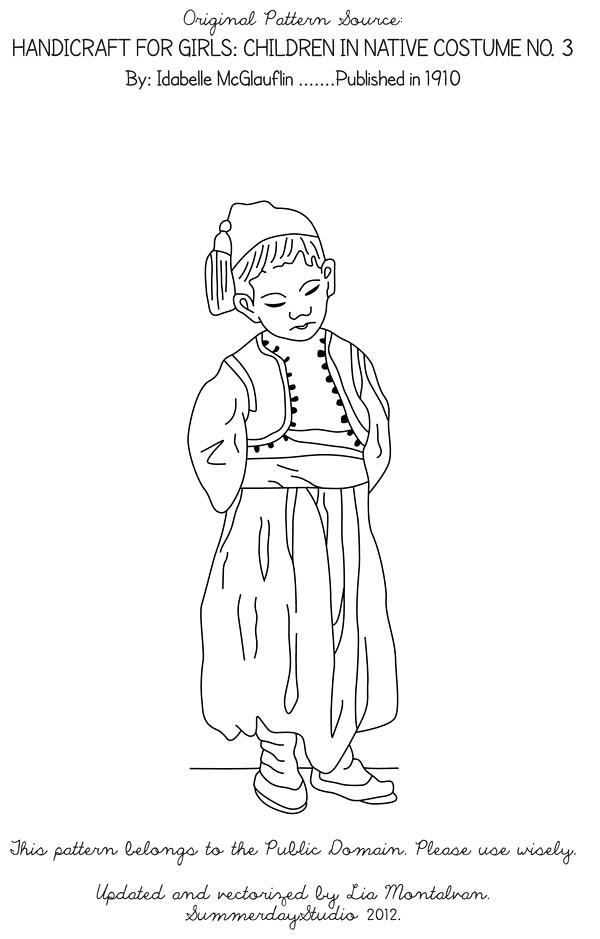
Handicraft for Girls: Doll Quilt Pt. 3

Hullo! Here's a little work in progress and pattern no. 3 for the doll quilt.

The instructions said to do it in running stitch, but I decided to do the face in hands in backstitches so it will stand out. I plan on doing this to the other patterns as well. The running stitch was done with 3 strands embroidery floss and the backstitch was done with 2 strands polyster sewing machine thread.


If you are just catching up on these posts now, this is Part 1 and Part 2. For now, I will leave you with Pattern no. 3. Happy Stitching everyone!


July 18, 2011

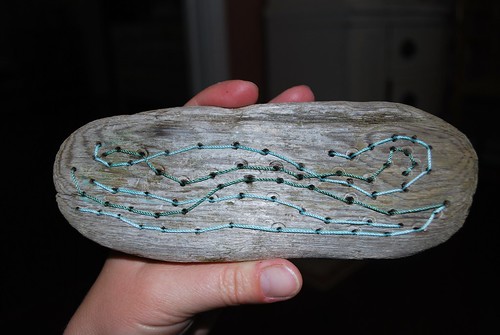
Driftwood Embroidery

Driftwood Embroidery, originally uploaded by shorby68.
Isn't this fun?

If I had ready access to some driftwood, I'd definitely give this sort of thing a go!
SITE DESIGN BY RYLEE BLAKE DESIGNS