Showing posts with label satin stitch. Show all posts

April 12, 2019

Project a Month: Wrap up - Lolli and Grace

Project a Month 3- Lolli and Grace
Well here we are at the end of stitching up this beautiful One Meaningful Word pattern by Lolli and Grace! And here I am again, into the next month, finishing up the previous month's pattern, ha ha. Looks like I might have to stitch something simpler and smaller this month to get caught up and back on a proper schedule. :)

I thoroughly enjoyed stitching this pattern - this has to be one of the most consistently joyful embroidery projects I've undertaken in some time.

Progress on One Meaningful Word pattern by Lolli and Grace

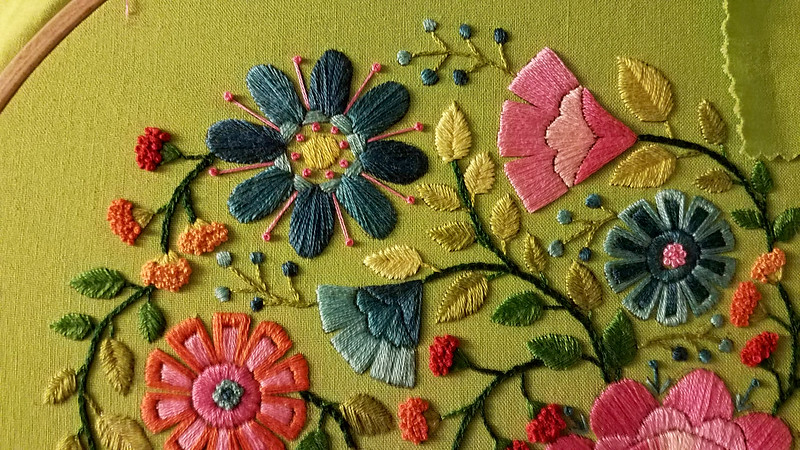
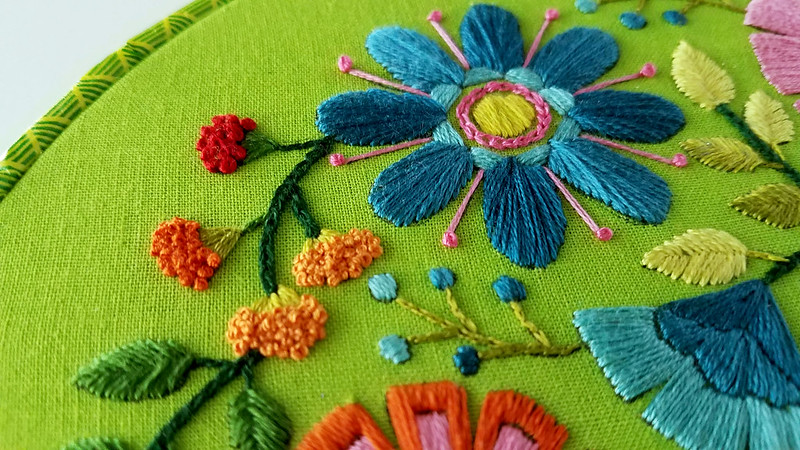
When I last left you, I had stitched up 3 flowers and was starting on the leaves and vines. I LOVE that blue flower, by the way. I could take and show you pictures of that blue flower all day...

Progress on One Meaningful Word pattern by Lolli and Grace

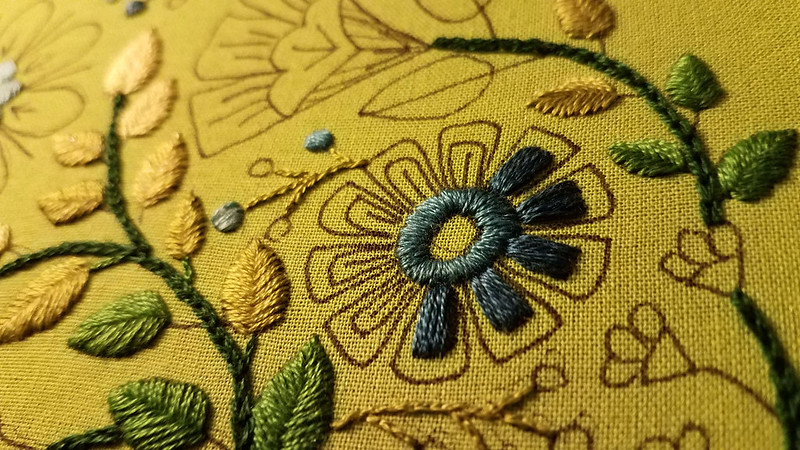
I mostly stuck to the Lolli and Grace pattern, but I did a fw things differently, I'll try to point them all out. Up above is one tiny difference - as I mentioned I used more of a fishbone stitch for my leaves as opposed to satin stitch. And on the leaf above, if you squint you'll see the tiniest sparkle- I blended 1 strand of Etoile floss with 1 strand of the yellow green the pattern called for. It was an interesting effect, but as you can see, so subtle it's hard to discern...

Next I tackled the largest pink flower - I was intimidated by the floss blending and wasn't sure if I'd like the finished product...

Progress on One Meaningful Word pattern by Lolli and Grace


But I really enjoyed this too! It's really bright and graphic and much lovelier than I expected.

Another thing I really enjoyed about this project is how I enjoyed the colors in every light...
Progress on One Meaningful Word pattern by Lolli and Grace

Do you know what I mean? Sometimes I choose colors for a project in broad daylight, and I only like my project in nice bright light, or vice versa, I choose my colors in the evening, and find I hate my project in bright light. Anne's colors were just consistently beautiful in every light, in my opinion!

You can see above that sometimes my fabric looks bright green, sometimes lime green or khakhi - and in every instance, the floss colors pop and work beautifully!

Progress on One Meaningful Word pattern by Lolli and Grace

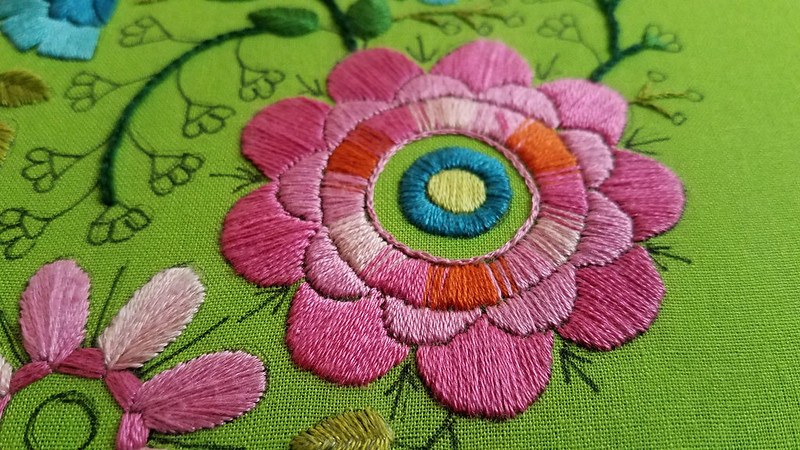
I did a real cruddy trace job and my trace lines were all over the place - so I stitched a thin split stitch on the inside of that big pink flower using 2 strands of thread, to cover my messy trace job.

Progress on One Meaningful Word pattern by Lolli and Grace

Here I am most of the way through, but at this point realizing I had LOTS of details to fill in. All the same, I loved looking at this project, no matter what stage it was in.

Progress on One Meaningful Word pattern by Lolli and Grace

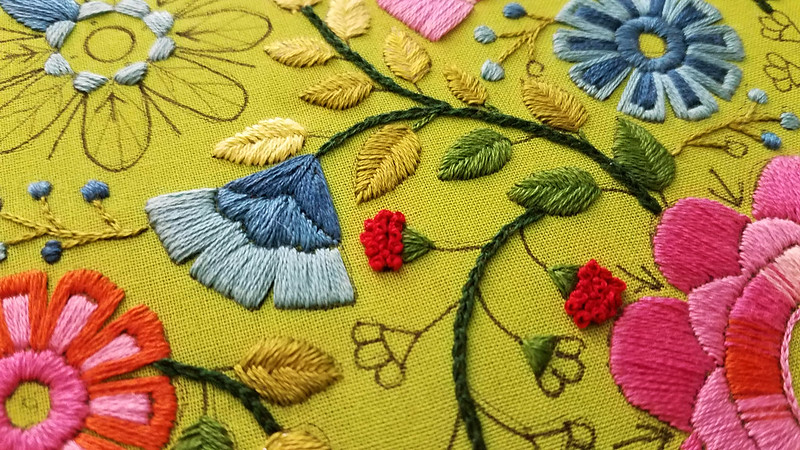
These little red flowers were supposed to be Lazy daisy stitches in the pattern, but I decided to do clusters of French knots instead...

Progress on One Meaningful Word pattern by Lolli and Grace

Progress on those tiny French knots was slow but so satisfying and restful...

French Knot Frustrations

I don't always enjoy French knots, however!

Progress on One Meaningful Word pattern by Lolli and Grace

I had a heck of a time feeling happy with the French knots in the centers of the large flowers - I just was never satisfied with my placement of them, the way I spaced them looked haphazard and messy to me...

Progress on One Meaningful Word pattern by Lolli and Grace

The French knots always looked ok to me in the beginning, when there was a good amount of space between them...

Progress on One Meaningful Word pattern by Lolli and Grace

But filling in the spaces made them look too cluttered and messy to me.

Progress on One Meaningful Word pattern by Lolli and Grace

More messy flower centers on those bottom 2 flowers - ok I realize I am nit-picking - but it's hard not to be obsessed with tiny details in such a lovely project.

Progress on One Meaningful Word pattern by Lolli and Grace

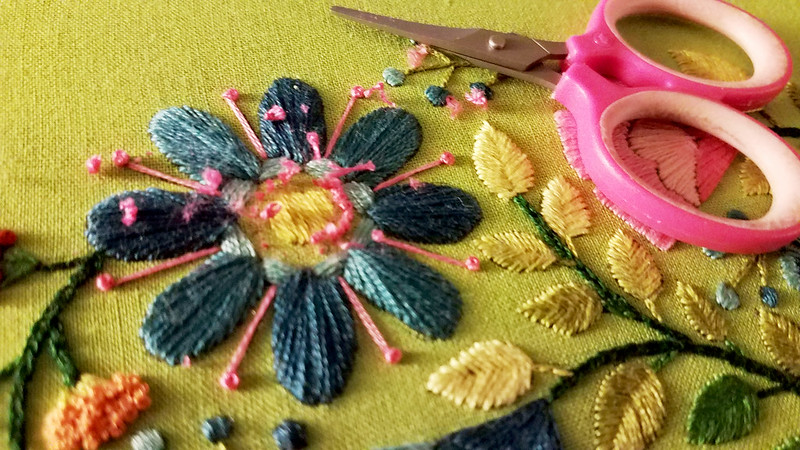
So I picked out all my French knots for the 5th time and tried again!

Progress on One Meaningful Word pattern by Lolli and Grace

I did a simple chain stitch in place of the French knot ring, and I instantly felt 100% happier with the look! This is an important lesson, I think - if you're not happy with a given stitch, don't be afraid to just try something different.

Choosing my One Meaningful Word

Choosing my one meaningful word for the year was hard for me - Anne offers plenty of options:

Progress on One Meaningful Word pattern by Lolli and Grace

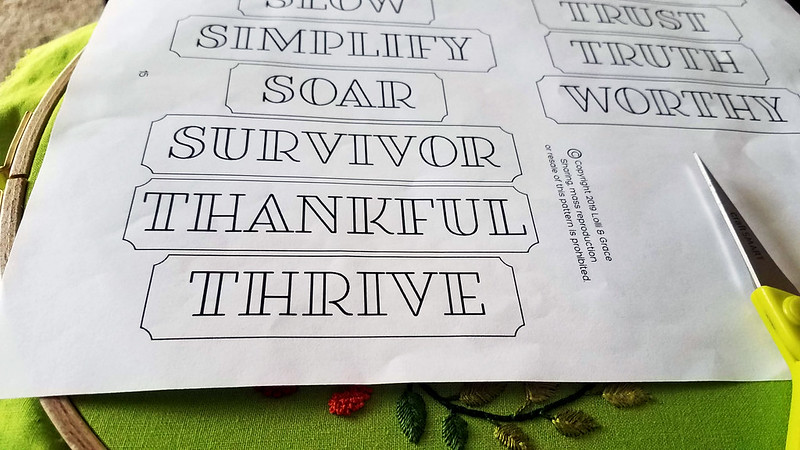
It was hard to choose the one word that spoke the most to me...

Progress on One Meaningful Word pattern by Lolli and Grace

Well, this one fits, but as a cancer survivor, I am hesitant to use that label because I don't want cancer to define me. It was something that happened to me,  but cancer is not me - there was so much more before and after cancer to define me.

So while I recognize the value of this term and all that it implies, I kept looking...

Progress on One Meaningful Word pattern by Lolli and Grace

This applied, too - after cancer treatment, I have experienced so many little moments of pure joy which are overwhelming. The smallest things that I never had the grace or ability to see as blessings or beautiful before, now move me. Life, and all its beauty, people in all their uniqueness and strength, overwhelm me with joy.

But still, I kept looking...

Progress on One Meaningful Word pattern by Lolli and Grace

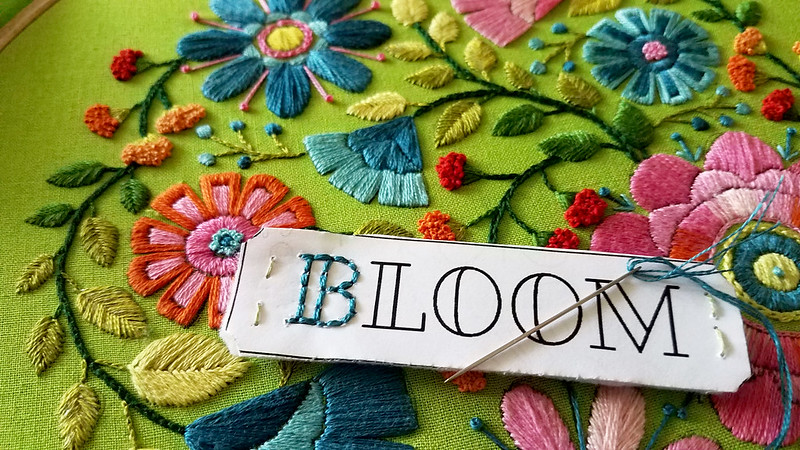
I settled on "Bloom" because I love this idea of not just surviving, but blooming - after all the pressure and worry and fear I've endured - to bloom more fully into a new creation, a new person I didn't have the ability to be before...

Finishing my Hoop

I purchased a smaller hoop to frame my finished embroidery...

Progress on One Meaningful Word pattern by Lolli and Grace

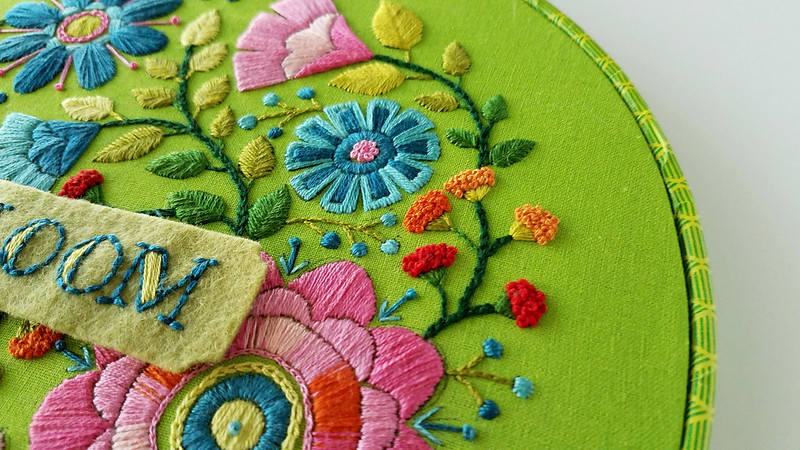
I was inspired by the bright lime green of my fabric, and the way it matched this green patterned masking tape that was on the table... what if..

Progress on One Meaningful Word pattern by Lolli and Grace

I wrapped my wooden hoop in the patterned masking tape - which fit nice and smoothly...

Progress on One Meaningful Word pattern by Lolli and Grace

I love the bright pop of color, and how well it coordinates with my fabric.

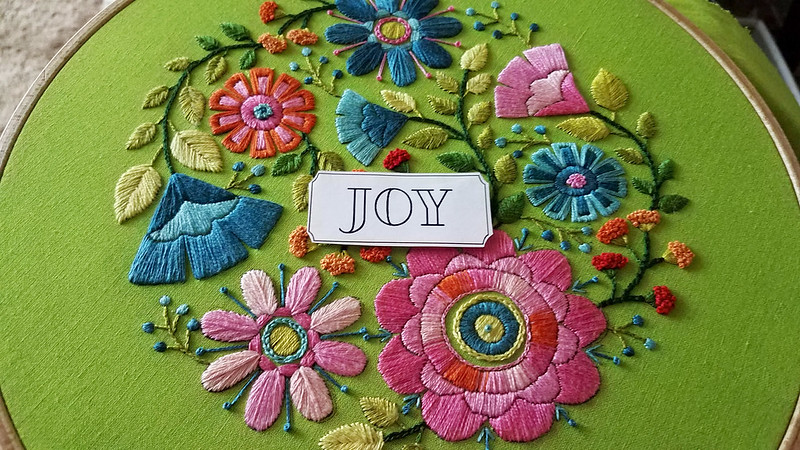
Here's my finished piece!

Progress on One Meaningful Word pattern by Lolli and Grace

I chose to leave off many of the lovely details on the larger flowers- because I loved the large, unbroken areas of satin stitch and was just so proud of my work, I wanted to leave them undisturbed and as simple as possible.

Progress on One Meaningful Word pattern by Lolli and Grace

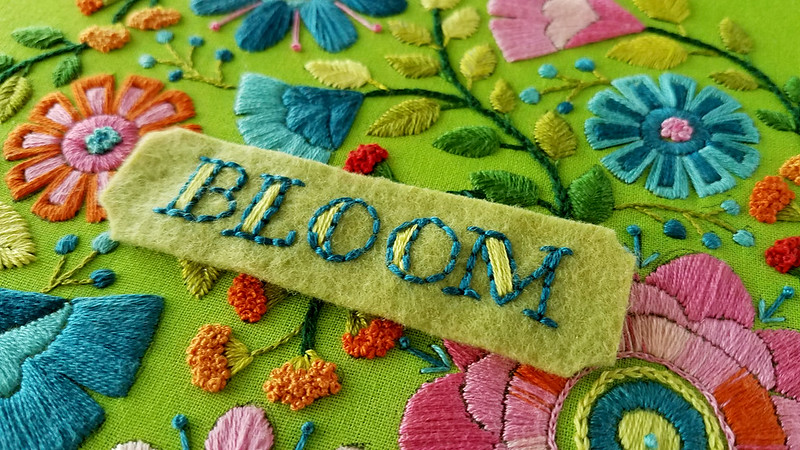
I decided to stitch my one word on a nice olive green felt I had leftover from last year's 12 Months of Christmas stitchalong. I used the suggested dark teal color and filled in the letters with the lightest yellow green in the pattern, I enjoyed the contrast.

Some last lovely details I enjoyed on my piece...
Progress on One Meaningful Word pattern by Lolli and Grace

Progress on One Meaningful Word pattern by Lolli and Grace

I haven't yet stitched the one word on - but I plan to either pin it or do a light basting stitch because I like the idea of swapping out words or displaying it without the word as I see fit...

One Meaningful Word pattern by Lolli and Grace

What a satisfying project this has been! Thanks to everyone who followed my progress, either here or on Instagram (@nyfloresita), and thanks especially to Anne of Lolli and Grace for designing this pattern and so graciously taking time to cheer me on!

First post: Project a Month - Lolli and Grace

Buy the pattern

You may purchase this pattern in the Lolli and Grace Etsy store, of course it has my very enthusiastic approval: One Meaningful Word pattern.

Hi, I'm floresita, editor of Feeling Stitchy. I'm an avid stitcher, knitter, and crafter. You can see more of my stitching on Instagram and my blog. My vintage transfer collection is on Vintage Transfer Finds.

Feel free to email me with any ideas for the blog!

November 4, 2017

Saturday Stitches - Namaste Embroidery

I am really loving the sped up stitch videos Jessica of Namaste Embroidery has been posting on Instagram! It is such a treat watching other people stitch, and I always feel like I learn something new from other stitcher's methods.


Be sure to follow Jessica on Instagram to see more stitch video goodness: https://www.instagram.com/namaste_embroidery/

Hi, I'm floresita, editor of Feeling Stitchy. I'm an avid stitcher, knitter, and crafter. You can see more of my stitching on Instagram and my blog. My vintage transfer collection is on Vintage Transfer Finds.

Feel free to email me with any ideas for the blog!

July 1, 2017

Review: Colour Confident Stitching by Karen Barbé

Colour Confident Stitching by Karen Barbe - a book review by floresita for Feeling Stitchy

It is a pleasure to review this fabulous new book, Colour Confident Stitching: How to Create Beautiful Colour Palettes by textile artist Karen Barbé. If you are at all curious about expanding your use of color and texture in your embroidery, this is the book for you!

Just so you know, the book link above is an Amazon Affiliate link - clicking through the link and buying is one way to support our volunteer reviews - we use funds in our Amazon account for new giveaways and reviews.

When I received this book from the publisher I was in the middle of planning some of my own projects, and I found reading this book and taking in the way Karen approaches color to be very inspiring. I had already started making little color cards of my own to keep track of my embroidery threads from project to project - Karen's approach of lining up colors as inspiration before you begin stitching is marvelous, too!

I find Karen's stitching within the book very inspiring - I am reminded of the loveliness of designers like Yumiko Higuchi, Irona Happa, and one of my favorite embroidery books ever, Handbook of Lettering for Stitchers by Elsie Svennas (read a wonderful overview of it on Pintangle).

Color Theory - The majority of the book is about color theory - and I love the way Karen writes about color. Her analysis of different color palettes, and how to develop them, is very inspiring. In particular, I love that she talks about how having a different color background can change the entire mood of the piece.

Color Palettes - I really enjoyed this section - there are 9 example color palettes drawn from a variety of different sources - fabric, collections, images, home, and places, just to name a few. They are all quite beautiful and could be a wonderful springboard for anyone who is intimidated by choosing a palette of colors for a new project.

Colour Confident Stitching by Karen Barbe - a book review by floresita for Feeling Stitchy

Patterns - there are 5 projects in this book, so it is light on patterns. But I will say the patterns are versatile and they inspire you to think deeply about color.

Here are the patterns included and the stitch you will learn / practice with it:
  • Sleeping Mask: Laid stitch, couched cross stitch, sewing, embroidery floss
  • Embellished Knitted Sleeves: Duplicate stitch, crewel or tapestry wool
  • Tea Towel with Woven Patches: Weave stitch, pearl cotton
  • Framed Embroidery: Chain stitch, satin stitch, embroidery floss
  • Cross Stitch Tea Party: Cross stitch on cardboard, embroidery floss

My favorite project was the framed embroidery, because it included 2 types of stitching I've been wanting to practice: densely packed chain stitches as outlines and geometric satin stitches.

Colour Confident Stitching by Karen Barbe - a book review by floresita for Feeling Stitchy

Following along with the pattern was tricky for me since the pattern is quite small and thus requires for absolute precision in drawing and stitching.

Colour Confident Stitching by Karen Barbe - a book review by floresita for Feeling Stitchy

Beginners, take note that you will feel less frustration if you enlarge the pattern on a copier and practice the intricate chain stitch. Tiny details are key in this project.

I broke up the large design into two parts, first a few chain-stitched motifs:

Colour Confident Stitching a book review by floresita for Feeling Stitchy

I would have loved to have a larger image of the stitching so I could decide how to tackle the project.

Second, I tried the satin-stitched circle, and practiced making woven patches:
Book review on Feeling Stitchy: Colour Confident Stitching by Karen Barbe

My satin stitching is very far from perfect - but this small project was a great way to practice it! I used 4 strands of floss for the woven patches. You can see more of my process photos on my Instagram (https://www.instagram.com/nyfloresita/)

One of my takeaways after reading through this book and trying out the projects is just how detailed, meditative, and slow Karen's creative process is - it makes sense that she is a textile artist, because you can see how she is willing to take a time-consuming task and make it into an art piece.

Crafters who would love to add new stitches to their repertoire, learn to think about color in a new way, and appreciate detailed patterns and projects will love this book.

I highly recommend this book for all levels of stitchers, with a caveat for beginners - the stitches and processes in this book are not simple, but if you approach your work slowly and meditatively, you will be rewarded for your time.

To see more of the inside of this glorious book - visit Karen's blog for some lovely images:
http://www.karenbarbe.com/blog/colour-confident-stitching-book-is-here/

I also highly recommend a visit to Karen's blog - I spent hours happily scrolling through her gorgeous posts: http://www.karenbarbe.com/blog/. You can also find Karen on Instagram (https://www.instagram.com/karenbarbe/

Hi, I'm floresita, editor of Feeling Stitchy. I'm an avid stitcher, knitter, and crafter. You can see more of my stitching on Instagram and my blog. My vintage transfer collection is on Vintage Transfer Finds.

Feel free to email me with any ideas for the blog!

April 19, 2017

Wonderful Wednesday #35: Garten Craft

Wonderful Wednesday 35 - Garten Craft, a Feeling Stitchy feature by floresita

I adore the colors and satin stitched textures in this beautiful Southwestern Embroidery by Garten Craft on Etsy. Visit her shop to see more of her lovely woven and embroidered work!

Hi, I'm floresita, editor of Feeling Stitchy. I'm an avid stitcher, knitter, and crafter. You can see more of my stitching on Instagram and my blog. My vintage transfer collection is on Vintage Transfer Finds.

Feel free to email me with any ideas for the blog!

June 6, 2016

MooshieStitch Monday: Padded Satin Stitch Flower


The padded satin stitch is an easy way to add a raised effect to your embroidery. There are different ways to add the "padding", but I decided to try it with felt first.

Here is how I created the flower:

I roughly drew simple flower petals on felt. I chose a felt that was the same color as my floss so it would be more forgiving in case I had any gaps in my satin stitch.


Cut out the flower petals and attach to your fabric. I stitched a small little straight stitch on each petal to keep them in place.


Satin stitch over each felt petal.


Cut felt leaves and attach onto the fabric.


Satin stitch each leaf.


Once complete, I added some yellow french knots in the flower center.


Up close you can see the puffy raised effect of the padded stitch.


Don't know the satin stitch? Check out this how-to.

This video tutorial is another method for the padded satin stitch.

And finally - I had to share this blog post of amazing felt padded embroidery I found on the Hanging by a Thread blog!!


November 7, 2015

Learn the Eye Stitch

Thank you, readers, for joining me on yet another new stitching adventure! Today we'll be learning the Eye Stitch, only we'll be cheating, because technically this stitch is just made up of two stitches we already know - satin stitch and back stitch. So let's dive in!

Today I'm working on some linen fabric instead of my normal tightly woven cotton. I like linen for this stitch because of the big "hole" in the center of the design that forms as you go, but if you don't like that, you could stitch this on anything. To get a truly symmetrical design, use any even weave fabric and count the threads. As you will probably be able to see from my examples, I just eye balled it.

To begin, find the center of where you want your eye stitch to go. You're going to make a total of 16 satin stitches in various lengths from the center. To make mine a little more even looking, I first made a cross of stitches, and then went back around my circle adding in the others.

First a cross
Then long diagonal stitches in between

Then finally shorter diagonal stitches in between each of those

Make sure you always end (or begin) each stitch in the same spot, and you'll see how the threads surround the hole for a nice eye catching center. 

Once you have all 16 of your stitches in place, just make a box around them using the back stitch. I made my box touch each stitch of my original cross, which helped me keep everything even. 


And there you have it, an Eye Stitch! These look especially nice next to each other in little rows, either touching or spaced out evenly. I made my finished design into a mini ornament, which I hung from my bulletin board at work. 


You could whip up a bunch of these in various colors SO FAST. They would make great additions to the outside of your holiday gifts or as ornaments, or just as decorations year round. 

I hope you enjoyed learning the Eye Stitch with me today! Upload your own designs to the Feeling Stitchy flickr pool for everyone to see, and comment below if you have any questions for me, or suggestions on what to stitch next! 

Happy Stitching!


Hi, I'm Whitney - I share a new embroidery stitch on the blog once a month, learning as I stitch along with the rest of the blog. Embroidery is my first and true crafty love, though I also enjoy painting, sewing and other crafts. My other loves include graphic design, craft beer and baking.

You can also find me on my blog Whitney Makes and on Tumblr.

June 21, 2015

Patterns: Helen M Stevens


Vivienne Wells from Vivebooks, very kindly sent me a copy of the Tawny Owl pattern by Helen M Stevens, to have a go at, the above photo is my attempt. The pattern recommends using Piper Silks or other silk embroidery floss, however I used DMC. I also used two strands of DMC and not the recommended one (if you were to use normal embroidery floss). I also did change the colours a bit, you can see the pattern more expertly embroidered here.

Helen M Stevens has designed a wide range of nature and animal patterns, each pattern pack has very comprehensive instructions, with diagrams that clearly show which colours to use and which direction you should stitch in. Helen's patterns are subtitled 'one simple stitch' and that is very true, as the owl above is just created with one simple stitch, the satin stitch, which makes seemingly complex designs, quite achievable.

Hi, I'm Jo - I feature new embroidery patterns Sundays on Feeling Stitchy. I also post on our Twitter and Pinterest.

Is there a new pattern you'd like us feature? Email me!

June 19, 2015

Friday Instagram Finds No. 9


On this week's edition of Friday Instagram Finds I'm introducing you to one of my first embroidery friends on Instagram, Kristen of @heypaul. She has done so much for bringing hand embroidery into the public eye through public events called Eat, Drink, Stitch @eatdrinkstitch, and the video tutorials of stitches she creates. She's a dog lover, and has the cutest Puggles (Pug and Beagle mix) named Briscoe and Lollipop!

@heypaul

This piece that Kristen did of chromosomes is awesome on so many levels! First and foremost, the chromosomes shown bring Fragile X Syndrome to light, which is a great way to start a conversation about this syndrome. Framing it in this big frame (and painting it pink!) beautifully showcases Kristen's amazing stitches! It looks to me like the chromosomes are made of expertly stitched satin stitches in a variety of great colors.


Not the same piece, and it looks like a smaller scale, but here's a closeup of chromosomes that Kristen's working on.


It was seeing what Kristen was making with stumpwork that got me interested in trying it. (In fact, 2015 is the Year of 3D Embroidery for me.) Take a look at all of these French knots! Built up like this, the French knots make this look like boucle.


This last picture is of Truman and Clinton Lakes in Missouri. I'm glad this picture is a closeup because we can see her teeny, tiny stitches.


Okay, so I bet you've figured out by now that I'm a pet lover, especially dogs. So I'll leave you with this adorable picture of Briscoe and Lollipop. I hope you have a fabulous weekend!


I hope you've enjoyed this edition of Friday Instagram Finds (FIF) on Feeling Stitchy, which is now brought to you weekly! Please leave comments below to let me know what you thought. If you'd like to be considered for FIF, or if you find a great embroiderer or stitch-related needle worker who you think I should feature, be sure to tag their pictures with #feelingstitchyig, and I'll take a look!

While you're on Instagram, make sure you follow Feeling Stitchy! We're @feelingstitchyish. We'd love for you to stop by and say hello.

Hi, I'm Amy - I feature interesting embroidery and stitch-related photos I find on Instagram. I'm a hand embroiderer and maker.

You can find my embroidery and crafts on:
Instagram | Random Acts of Amy | Facebook

SITE DESIGN BY RYLEE BLAKE DESIGNS