Showing posts with label valentine's day. Show all posts

February 13, 2017

MooshieStitch Monday: Valentine's Stitching Project Ideas


I love searching the Feeling Stitchy archives to find inspiration and project ideas.

Recently I searched the blog for Valentine's Day and found some really great tutorials I thought I would share!

But first - here are a few photos of the heart I stitched.


I traced a heart, worked the outline in stem stitch and added detached chain stitches around it for leaves.


Then added a red flower in the center and french knots around the leaves.


Now here are those tutorials I found...

Up first - this Valentine's Day treat bag with a cool negative space heart.

Tutorial Here


Make your self a Cupid's Arrow pin!

Tutorial Here


I love this silly skunk pattern  - stitch it up with your own personalized Valentine's Day message!

Find It Here


How about stitching a Valentine's Day coffee cup cozy?

Tutorial Here


Or try experimenting with wire! This "All you need is Love" project looks quick and easy - especially if you already know the couching stitch - and could be also be personalized with your own message.

Tutorial Here


Happy Valentine's Stitching!!


February 14, 2014

Happy V Day!

valentine
Photo by prosodialab

Isn't this work in progress by prosodialab adorably gorgeous? The finished work is even more gorgeous!

Hope you all have a wonderful V Day, surrounded by those you love, your hands occupied with the crafty projects you love. Enjoy!

Hi, I'm floresita, editor of Feeling Stitchy. I'm an avid stitcher, knitter, and crafter. You can see more of my stitching on Instagram and my blog. My vintage transfer collection is on Vintage Transfer Finds.

Feel free to email me with any ideas for the blog!

February 13, 2014

Challenged by embroidery with Portuguese soul - Margarida

Olá! As love is in the air, today I bring you very beautiful images that I was saving for a special occasion... And that day has come...

As you may know I write on a weekly basis showing "stitches with Portuguese soul". Usually discovering the history and tradition of embroidery in my country or showing the work of Portuguese embroiderers.

But this year I decided to try something different, too. Although embroidery is deeply rooted in our culture, it is not so present in recent craft trends... so I decided to challenge some of my favorite Portuguese crafters that usually don't use embroidery in their works, to change that at least for a day. And I'll be showing their embroidery stitches.


Pastel palette instead of traditional colors

And I definitely have to begin with Margarida. Some years ago, when I was starting my project, she was the first that gently decided to present it to the "blogosphere"... I can say that I debuted in her blog pano pra mangas...

Her blog is very popular among Portuguese crafters (but not only...) and as we would say in Portugal: she is a mulher dos sete ofícios - something like "jack of all trades". In her blog everything looks beautiful and charming... and her words are always kind and inspiring.

I'm very happy that Margarida accepted my challenge and what I like the most about her embroidery is that it says a lot about her... the colors, the motifs, inspiring words and everything planned to detail...

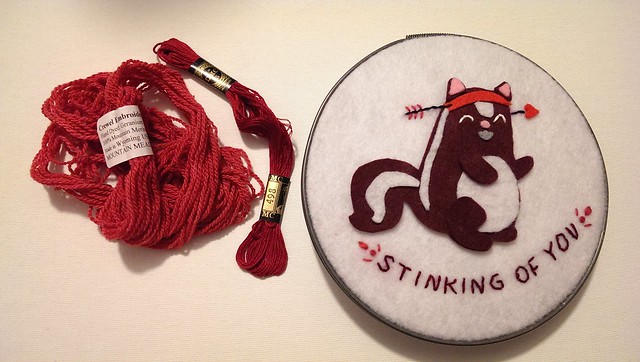
I asked Margarida if she could create something inspired by Portuguese embroidery but doing it "her own way"... She says that she was inspired by the hearts from Viana do Castelo and by the tradition of using words in Lenços dos namorados. But no doubt she has done it her own way...

This is my turn to present Margarida... and I leave you with her own words...


Sweet stitches

"When I think about myself and who I am, I always end up with a question mark. Not that I am a question without an answer, it's the other way around - I AM too many answers. Lately, the best way I find to describe me is by comparing me to a department store!

I'm a happy person. I'm happy wherever I am, as long as my family and friends are at a two hours flight distance and I'm surrounded by hundreds of crafty materials that can ignite my imagination.

I learned to knit when I was 6. My first embroideries are dated from when I was 7. And I made my first crochet chain when I was about 8. Yarns, fabrics, embroideries, hoops or anything else imaginable are part of my life just like carrots or peas... I'm a very lucky person to have a very talented mother and grandmothers who taught me what they know.


Many details

I love everything crafty! And as I'm also a very curious person I'm always jumping from one thing to other, trying new techniques and bringing to life what I dream of when I'm sleeping.

And then, my blog... I've been blogging for nearly 9 years. My blog is where I love to share my crafts, other talented crafters, places I visit, books I read, beautiful tutorials and some of my personal achievements. In 2011 I gave up my long term job. In January 2012 I moved to London and last August I decided to return to Portugal in order to begin another project: to be a Life Coach! Oh, and I cannot forget my plans of growing rhubarb in the hot sunny Algarve...

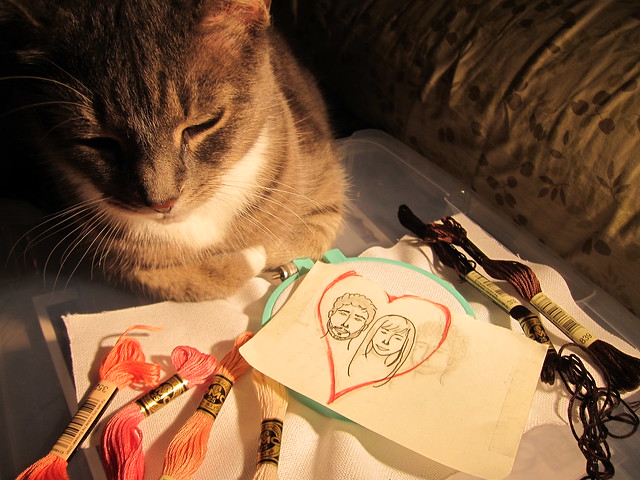
When Gabi challenged me to do embroidery there was one thing I knew: it had to have a heart (I've got a crush on hearts and I find them everywhere). First I thought I couldn't do it because it had been a long time since I had embroidered anything, but then I sketched directly in the fabric, chose the colors and started doing it. It was easy. I loved it and I'm thinking about repeating this experience as soon as possible."

Inspired words

Maybe Margarida forgot to say that she is romantic, too... Her embroidered words don't lie:
Amo-te no silêncio do teu sorriso... 

This time I won't translate... try by yourself to find the meaning of these words...
Have a happy Valentine's Day, inspired by stitches with Portuguese soul.

February 11, 2014

Tutorial Tuesday

Hello everyone!

Valentine's Day is quickly approaching and, if you are anything like me, you want to give your loved ones more than just a store-bought card. I decided on embroidering and assembling muslin treat bags to add some handmade love to my Valentine's Day gifts and goodies.


I used negative space embroidery for this treat bag, but I think any little hearts or embellishment would look adorable. 

To make this Valentine's Day treat bag you will need the following supplies: 

- unbleached muslin in two 8x7-inch pieces
- embroidery floss, needles, scissors, and related supplies
- iron and ironing board
- sewing machine and related notions
- scissors
- safety pin

Step One: Transfer a heart shape onto one piece of muslin. I free-handed this heart, but if you prefer to follow a pattern, there are various heart shapes available here


Step Two: Use a running stitch to out line the heart with 3-stranded floss. 


Step Three: Using a seed stitch, fill the space outside of the heart. Overlap the stitches close to the heart, and space them out as you move away from the main heart shape. 


Step Four: Press the two pieces of muslin and place them right sides together. Stitch an 1/4-inch seam allowance around the three sides of muslin, leaving one edge unsewn 2-inches from the top.


Step Five: Keeping the treat bag reversed, fold the top down 1/2-inch and press. Fold down another 1/2-inch and press. Sew along the bottom of this fold to create the area for the drawstring. I changed the bobbin thread in my sewing machine to red to create a contrasting stitch once I reverse the bag out. 

Step Six: Turn the bag inside out and tuck the unsewn edge of the drawstring fold into the bag and press. Take six-stranded floss, knot the end, and attach the safety pin to the knot. Use the safety pin to pull the string through the top of the treat bag. 


Step Seven: Knot the end of the string and your treat bag is ready. 


Step Eight: Add treats and goodies and your treat bag is ready for Valentine's Day!


Hope you enjoy and have a great Valentine's Day!

Hi, I'm Kristen! I am a lover of all things stitchy and crafty. I have been sewing for as long as I can remember. My grandmother taught me how to sew Barbie clothes when I was young and I have been sewing ever since.

You can find me at Bobbypin Bandit, on Instagram, and my Etsy shop.

February 9, 2014

Patterns: Valentine Roundup


L to R, top to bottom - (1) Frankenstein Valentine by Bridgeen, 
(2) Fox Hand Embroidery Pattern by teentinyhappythings, (3) Pick A Heart by DonnaBroidery, 
(4) Kaleidoscope Love Embroidery Patterns by littledear , (5) Fox With Hearts by Kinderling, 
(6) Love is Love by Carina (free! - thank you Carina)

With Valentine's Day this coming Friday, it's not too late to start stitching!

Hi, I'm Jo - I feature new embroidery patterns Sundays on Feeling Stitchy. I also post on our Twitter and Pinterest.

Is there a new pattern you'd like us feature? Email me!

January 28, 2014

Tutorial Tuesday

Happy Tuesday, everyone!

Today's tutorial is for a quick Valentine's Day project. I simply love Valentine's Day and enjoy making a little something to give to my friends each year, even if they roll their eyes at me. This year is no different, and I thought cupid's arrows would be a good way to spread the love.


To make a cupid arrow, you will need:

- Felt in red and pink, or any colors of your choosing
- Embroidery floss
- Embroidery needle
- scissors
- safety pin


Step One: Print out the cupid arrow template and cut out each shape. Use the template to cut two of each shape out of the felt. I used red and pink, but feel free to mix up the colors.


Step Two: Place the two rectangular pieces together and sandwich them between the two pieces of the tail, or fletching, of the arrow. Use a contrasting floss color, run the needle through the center of the felt pieces to hide the knotted end, and stitch down the center of the arrow tail with a running stitch. Make sure to stitch through all the layers of felt. 


Step Three: Use running stitches at an angle along both sides of the tail to make it look like arrow fletching. Again, make sure to stitch through all the layers of felt. As you can see in the photos below, I didn't measure or mark where these stitches would go, and my stitches are a little uneven and crooked. If you prefer straight stitches you can use a water soluble pen to create stitching marks, then dab them away with a wet cloth. When finished, hide the knot at the end of your floss in between the two pieces of felt. 


Step Four: Place the opposite end of the arrow between the two heart-shaped pieces of felt. This will become the arrowhead. Pin this in place to keep it aligned. Pull the thread with floss between the two heart pieces to hide the knot, and use a running stitch along the whole outer edge of the heart to attach them and enclose the rectangle. Hide the knot at the end of the floss in between the pieces of felt. 

*I decided to trim off a bit of the rectangle here, shortening it by about 3/4 of an inch. You can trim it to the length of your liking, or leave as is. 


Your arrow should look something like this.


Step Five: Use floss in a contrasting color, and create a blanket stitch along one long edge of the rectangle between the arrowhead and the tail/fletching. 


Pull the needle through the rectangular pieces and blanket stitch the other side. Hide the knotted end of the floss between the pieces of felt. 


Step Six: Take the safety pin and place it in the middle of the back of the rectangle. Attach the safety pin to the felt by carefully stitching to the back piece of felt. Make sure not to pull the stitch through both layers of felt. 


Step Seven: Your arrow is ready to be pinned to a jacket or shirt.


Hope you enjoy and are able to give this tutorial a try!

Hi, I'm Kristen! I am a lover of all things stitchy and crafty. I have been sewing for as long as I can remember. My grandmother taught me how to sew Barbie clothes when I was young and I have been sewing ever since.

You can find me at Bobbypin Bandit, on Instagram, and my Etsy shop.

SITE DESIGN BY RYLEE BLAKE DESIGNS