Showing posts with label work in progress. Show all posts

December 11, 2013

Countdown to Christmas: Printed fabric


I created this little design in Photoshop and then just embroidered the little berries. I think it turned out cute.
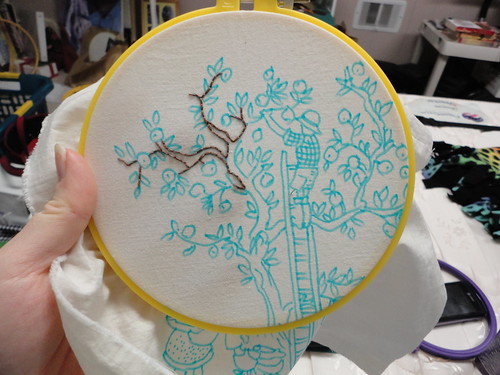
Stitched by Dawn Regan

I love this idea by Dawn Regan - using a printed fabric that is lightly embellished with stitches - so lovely!

Hi, I'm floresita, editor of Feeling Stitchy. I'm an avid stitcher, knitter, and crafter. You can see more of my stitching on Instagram and my blog. My vintage transfer collection is on Vintage Transfer Finds.

Feel free to email me with any ideas for the blog!

April 14, 2013

Patterns: Apple Harvest

Work in progress - Apple Harvest embroidery, pattern from Bustle and Sew


Sorry, but I couldn't resist another starting work in progress shot this week, this time it's happytransplant starting out on the Apple Harvest Embroidery pattern from Bustle & Sew. I love being nosy and seeing where other people do their embroidery!

The apple harvest pattern is an old pattern, so doesn't seem to be available at the moment on the Bustle & Sew website, but when's that gonna stop me admiring some good stitching ;)


Hi, I'm Jo - I feature new embroidery patterns Sundays on Feeling Stitchy. I also post on our Twitter and Pinterest.

Is there a new pattern you'd like us feature? Email me!

June 4, 2012

Beeton's Book of Needlework: 154. Sandwich Case Pt. 4

Hullo everyone! Sorry to have been gone so long and not updating on this project. I actually delivered a baby boy last month and have been on mommy duty since :-) And now that we have finally settled down with our new routine, I can go back to my Monday posts here on Feeling Stitchy.

For those who are just seeing this now and would want to make one, you can check out and get the patterns from: Part 1, Part 2 and Part 3.

Back to our little sandwich case. We got the embroidery and beadwork done:


Next up, I transfered the design unto the fabric. I used a picnic table cloth that I found for cheap as the lining fabric since I could not find any oil cloth here. You don't have to transfer the design onto the lining, just baste them together like so:


Then next I started on the scallop stitches using two threads. 


Then I cut them out to prepare for the button-hole stitch. (Sorry for the change in lighting, these were taken at night):


I used two threads of black for the button-hole stitch. There's grey threads sticking thru on the top part, so it might have been better to use three threads. But I already find it thick as it is so I will continue using two.


And this is where I am at after a month and half and a one baby later :-) I will post the finished Sandwich case on the Embroidery pool on Flickr this week and next Monday tackle a new project!


P.S. Yes, the embroidery is not centered, it happened when I transferred the design :-( Something I really have to watch out for in the future. I am comforting myself by saying, "That's its charm." 

April 23, 2012

Beeton's Book of Needlework: 154. Sandwich Case Pt. 2

Happy Monday everyone, hope you all had a restful weekend. We are now on Part 2 of the Mrs. Beeton Sandwich Case. As much as I love happy, candy colors, it is best that I stick as close to the colors described in the book to better see Mrs. Beeton's vision.

The original materials stated were: Strip of grey kid; strip of oil silk; 1 skein black silk; 1 skein red purse silk; 1 hank steel beads; steel button.

Now I am not sure what kind of fabric "kid" could be, unless it really could be from that of a ruminant?  I tried to search it, but to no luck, so do let us know if you find the answer to this. Oil silk is apparently silk painted with oil to make it waterproof, pretty much like our oilcloth of present day I would presume. (UPDATE: Thank you to Lemon Tree Tami and Jacinta for the explanation of "kid" fabric as can be read in the comments section. Much appreciated!)

So keeping those colors in mind and the stitches as stated in Part 1, I went ahead and worked on the design unto a more common grey linen fabric. And since I have no access to luxurious silk skeins, I am working the stitches in 3-strands of polyester sewing machine threads (this is purely a personal preference as I love working with these threads instead of embroidery floss).

Here are the scrolls being worked in red chain stitches:
Next Monday we will tackle the Overcast Stitch, embroidering steel beads and giving a pattern for those tedious side scallops :-)

Till next time, wishing you all a stitchy week ahead!

March 13, 2010

Sweet tweets

' Birdcage' - embroidered button brooch by knittinjo

I fell in love with this tinted linen birdcage as soon as I saw it! And I think I may have found the little bluebird that escaped from the cage on this wonderful sheet of wip buttons by BrooklyneChaos ...
___

____
Something for the weekend -
Check out this sweet freebie birdcage embroidery pattern by Aimee Ray!
___
SWAP - Just a little reminder that the post date for the Embroidered Button Swap is next Friday (19th)! I can't wait to see what you've all been stitching!
__
Have a lovely weekend x
___

February 27, 2010

More Button Finds

Heart Buttons

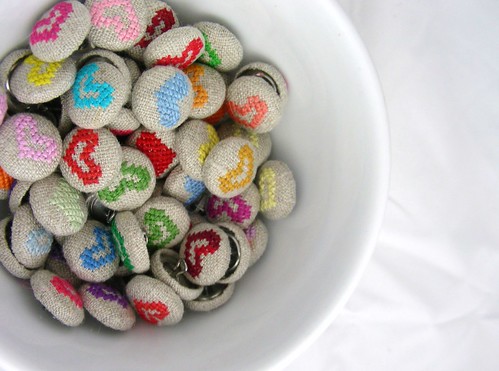
Heart Buttons by Deep Indigo

I just had to share this bowl of sweet hearts with you! You can see more of Deep Indigo’s rainbow heart embroidered buttons here.

___I hope to add a few work in progress photos next week from some of our button swap members (if they are willing to share with us!), but for this week I leave you with this sweetly stitched wip photo by Birthine -

__

Work in progress by Birthine
SITE DESIGN BY RYLEE BLAKE DESIGNS